The File Menu
|
|
|
In Gimp, you can get to the File menu in two different ways: by clicking on the File command at the top of the toolbox, or by clicking the right mouse button in an image window and moving your mouse cursor down to the File command. The menus are slightly different in the two places; in the toolbox File menu, you will find the following menu items: · New · Open · About... · Preferences... · Tip of the day · Dialogs · Quit And in the right-click File menu, you will find: · New · Open · Save · Save as · Preferences... · Close · Quit · Mail image · Onroot · Print In the Xtns menu (in the toolbox), you will find: · DB Browser · Guash · Screen Shot · Waterselect · Script-Fu · Web Browser With the exception of the Dialogs and Script-Fu menu entries, we'll discuss every entry in these three menus. You will find information on the dialogs for Brushes, Gradients, Palettes and Patterns in "Brushes, Gradients, Palettes And Patterns" starting on page 171. Script-Fu will be discussed in "Script-Fu: Description And Function" starting on page 687 and in "Mike Terry's Black Belt School Of Script-Fu" starting on page 697. | |
Creating Images
|
|

|
Let's start by creating our first image. Click on |

|
|
|
The dialog box allows you to decide the size of your image in pixels, whether your image should be grayscale or RGB and what color it should be filled with, or whether it should be Transparent (alpha-enabled). As you can see, three solid backgrounds are available: Background, Foreground and White. White will produce a white background, and Background will produce a colored background based on the background color in the toolbox (more about choosing a color from the toolbox background/foreground swatches can be found in The Color Selection Dialog.) Foreground will create a background using the foreground color in the toolbox. Transparent results in a checkerboard-like background that signifies transparency, or the presence of an alpha channel (a convenient feature for creating transparent GIFs). For now, let's stick to the default values; just click on OK. Now you have a work-space to work in. Close the image by choosing You may wonder why you can't create an indexed image (an image with a small, fixed set of specific colors) right away. After all, it would be great for that nice GIF you're trying to make for your web site. The reason for this is that you haven't chosen a set of colors, and Gimp can't predict which colors you'll use in your image. |
|

|
It's almost always a very bad idea to start out with an indexed image. You should create GIFs by converting your completed image from RGB to indexed (see "RGB, Grayscale And Indexed" on page 266). The rule of thumb is: Always work with RGB (or with whatever color model you need) and don't convert it until you're finished. |
Guash
|
|

|
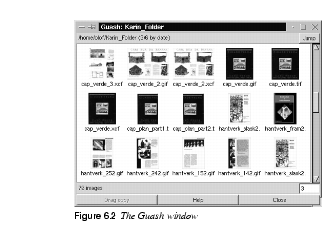
One of Gimp's most useful features is Guash. If you have worked on a UNIX system before, you have probably used xv and its Visual Schnauzer. Visual Schnauzer displays thumbnails of images, and allows you to browse through the thumbnails and load images using a graphical interface. Or if you're a former Macintosh and Photoshop user, and you're used to the small thumbnails in an image directory, then you're going to love Guash. Guash lets you browse your home directory and see all of your images as small thumbnails. |

|
To start Guash, select it from the Toolbox menu |

|
Tip: Load PostScript files only if you need to, and only load the first page in any case. Guash's directory scanning can take quite some time (five minutes or even more), depending on the number of images in the directory being scanned. Once the scan has completed, simply double-click on a thumbnail to load it (the first click will select it; the second opens it), and the image will open in a regular Gimp window. Guash only displays a set number of directories or images at a time. To change Guash's default behavior, you need to edit the · · · If you click on a Guash thumbnail, it will become selected and will be highlighted with a red frame. If you click once more on the highlighted image, it will be loaded into Gimp. To select or deselect more images, hold down the Shift key and click on their thumbnails. |
|
|
|
If no images are selected, pressing the right mouse button will bring up a root menu. If any images are selected, a right-click will produce a select menu, which allows you to perform various operations on the selected images. All of the items on the menus are easy to use and learn. To get the root menu when images are selected, hold down Shift and press the right mouse button. In Guash, you can do all the usual file management sorts of things (moving, copying and deleting images, and creating directories). You can even apply UNIX commands and, more importantly, Script-Fu "commands" to your images from either the root or select menu. The Jump button (at the top-right corner) allows you to quickly change directories. The Jump menu also includes shortcuts to directories you've already visited. You can also bring up a file dialog, which makes it simple to move quickly to another directory. We recommend using the Jump menu, because moving around within Guash can be quite slow, because Guash scans each directory you visit for images. | |
Opening Files
|
|
|
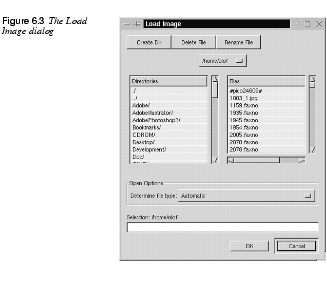
Next, we'll open an image using File|Open. This will pop up the Load Image dialog box, which allows you to browse file names so you can select the image you want. In the Determine file type pull-down menu, you can choose what kind of file you want to open, or let Gimp do it automatically (by leaving it at Automatic). |
|
|
|
|
In general, it's a good idea to let Gimp figure out the file type. If Gimp is having a hard time with a particular file, then you can step in and lend a hand by manually specifying the file type. Familiarize yourself with the interface by opening some images in common formats like GIF, JPEG and TIFF). Later in this chapter, we'll discuss what kind of formats Gimp can read and write. |
|

|
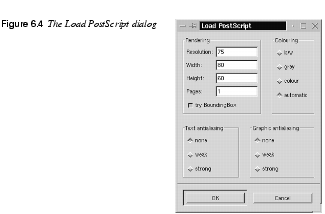
Tip: Gimp can automatically expand your file name, so you only have to enter enough of the name to uniquely identify the file. Then, press the Tab key to fill in the rest of the file name, just as you can do in certain UNIX shells. The Load Image dialog box also allows you to delete (Delete File) and rename (Rename File) files. To do this, simply click on the file to select it and press the corresponding button. This will bring up a confirmation dialog box. To create a directory, press the Create Dir button and a dialog box will prompt you for the name of the directory. If you've just created a new directory (or have made any changes to the files in the displayed directory), remember to double-click on the current directory symbol ( Opening PostScript And PDF FilesIf you select a PostScript or PDF file in the Load Image dialog box, and then click on OK, Gimp will pop up a Load PostScript dialog box, as shown. Our advice is to not change any values here if you're going to print it at home or in the office -- the default values are fine when displaying the paper formats that are normally used for PostScript files. |
|
|
|
If you lower the Resolution, you'll also have to reduce the Width and Height of the image canvas (and vice versa, if you increase the resolution). Note that if you don't change the width and height when you increase the resolution, only part of your PostScript file will be displayed. On the other hand, if the width or height exceeds the size of your PostScript file, the display will automatically be adjusted. If you uncheck the try BoundingBox checkbox, the pages will be stacked over each other; otherwise, they will be displayed side by side. The Pages entry allows you to specify what page or page interval to display; for example, Selecting b/w will produce a black-and-white image from a color PostScript file. Gray or color will produce a grayscale or a colored image, respectively. Automatic will produce whatever type of image the PostScript file was created as. Of course, you can't obtain a colored image from a black-and-white PostScript file, even if you select color. Gimp is good, but it's not that good! You can also specify the level of antialiasing for text and graphics. If you only want a quick look at your file, then select none or weak. On the other hand, if you're done working on the file and you're going to press, then select strong. | |
Saving Images
|
|
|
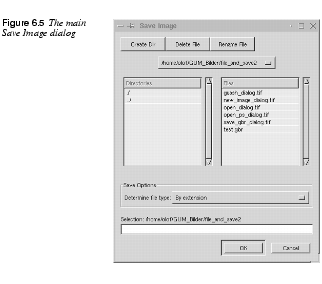
Gimp lets you save the images you've created. Isn't that wonderful? A free program with save abilities! Compare this to using Photoshop for free in demo mode, where "save and print are disabled, this is a demo copy." You can access the Save Image dialog by pressing the right mouse button in the window that contains the image you want to save: By extension means that the format of the resulting image depends on the image file's extension. For example, if you name your image | |
 |
Note: Remember to flatten the layers in your image before you save it, unless you are saving in XCF format (Gimp's native file format) or creating a GIF animation. Gimp supports many different file formats; the exact number depends on which plug-ins you have installed. Yes, as with most things in Gimp, file format support is implemented with plug-ins. Examples of plug-ins are the mail and print plug-ins, and all of the filters. We will discuss plug-ins in general later on in this book. Right now, we will concentrate on the file format plug-ins included in the base Gimp distribution. Supported File FormatsTable 6.1 shows some of the file formats that Gimp supports for reading and/or writing. Notice that your Gimp may not support all of these formats, because special software libraries must be supplied for some file formats Let's take a quick look at each of the different file formats. · XCF: The native Gimp format. It supports layers and other Gimp-specific information. If you save your image in a different file format, all Gimp-specific information will be lost, and you won't be able to open and edit your layers anymore. Note that GIF files can be considered to support layers (since each layer becomes a frame in a GIF animation). In general, however, you should keep your work in XCF format until you're completely finished working on it. Keep in mind that only the active layer is saved when you save an image in formats other than XCF and GIF. So, for example, if you want to save a layered image in TIFF format, make sure you flatten it before you save it. · BMP: An uncompressed bitmap format used by Microsoft Windows for displaying graphics. Color depth is typically 1, 4 or 8 bits, although the format does support more. · bzip: Allows you to open and save bzipped images. The name of the file must be · CEL: The file format used by KISS programs. · FaxG3: The format used by faxes. It's very useful if you have a fax connected to your UNIX workstation. · FITS (Flexible Image Transport System): Mainly used in astronomy; for example, it's used by NASA. · FLI/FLC: The file format used by many animation programs. Gimp reads both FLI and FLC file formats. The main difference between the two is that FLI only supports 64 colors at a resolution of 320x320 pixels, whereas FLC supports 256 colors at a resolution of 64Kx64K pixels. · GBR: Gimp's native brush format. You will learn how to make brushes in Creating A New Brush. · GIcon: Gimp's native icon format, used for the icons in the toolbox. This format only supports grayscale images. · GIF (Graphics Interchange Format): Trademarked by CompuServe, with LZW compression patented by Unisys. GIF images are in 8 bit indexed color and support transparency (but not semi-transparency). They can also be loaded in interlaced form by some programs. The GIF format also supports animations and comments. Use GIF for transparent Web graphics and GIF animations. · gzip: For opening and saving gzipped images. The name of the file must be · Header: C programming language header files. This format is for programmers who want to include their image in a C program. · HRZ: This format is always 256x240 pixels and it was used in amateur slow-scan TV broadcasts. The format does not support compression; it's just raw RGB data. · JPEG (Joint Photographic Experts Group): This format supports compression and works at all color depths. The image compression is adjustable, but beware: Too high a compression could severely reduce image quality, since JPEG compression is lossy. Use JPEG to create TrueColor Web graphics, or if you don't want your image to take up a lot of space. JPEG is a good format for photographs. · MPEG (Motion Picture Experts Group): A well-known animation format. You can load an MPEG movie into Gimp and play it with the Animation Player plug-in. You can also open an MPEG movie and save it as a GIF animation (be sure to remove all unnecessary frames beforehand). However, you can't (yet) save an animation created in Gimp as MPEG. · PAT: Gimp's native pattern format. · PCX: The Zsoft file format, mainly used by the Windows Paintbrush program and other PC paint programs. · PIX: A format used by the Alias/Wavefront program on SGI workstations. It supports only 24 bit color and 8 bit grayscale images. · PNG (Portable Network Graphics): The format that is supposed to replace the GIF format and thus provide a solution to GIF's trademark and patent issues. Indexed color, grayscale, and truecolor images are supported, plus an optional alpha channel. PNG also uses compression, but unlike JPEG it doesn't lose image information. · PNM (Portable aNyMap): PNM supports indexed color, grayscale, and truecolor images. PNM images can be converted to many other formats with the programs that come with the netpbm or pbmplus distributions. Use this format when you know that you will want to change the image later with a PBM program. · PSD: The format used by Adobe Photoshop. Great if you are a former Photoshop user and have lots of images in PSD format. (Note that Gimp will now preserve PSD layers.) · PostScript and EPS: Created by Adobe, PostScript is a page description language mainly used by printers and other output devices. It's also an excellent way to distribute documents. This plug-in can also read PDF (Acrobat) files. Most printing firms can handle PostScript files, so if you're going to have your image professionally printed, choose PostScript. · SGI: The original file format used by SGI graphic applications. · SNP: the format used by MicroEyes for its animations. You can load this format and then save the resulting image as a GIF to obtain a GIF animation. · SunRas (Sun rasterfile): This format is used mostly by different Sun applications. It supports grayscale, indexed color and truecolor. · TGA: The Targa file format supports compression to 8, 16, 24 or 32 bits per pixel. · TIFF (Tagged Image File Format): Designed to be a standard, TIFF files come in many different flavors. Six different encoding routines are supported, each with one of three different image modes: black and white, grayscale and color. Uncompressed TIFF images may be 1, 4, 8 or 24 bits per pixel. TIFF images compressed using the LZW algorithm may be 4, 8 or 24 bits per pixel. This is a high quality file format, perfect for images you want to import to other programs like FrameMaker or CorelDRAW. · URL (Uniform Resource Locator): With this plug-in, which is dependent on GNU wget, you can download a picture off the Internet directly into Gimp. The format of the "filename" (i.e., URL) that you must enter into the open dialog is · XCF: The native Gimp format. Use this format to store all your Gimp images (if you have enough disk space). Consider using bzip or gzip compression on your XCF files. · XWD (X Window Dump): The format used by the screendump utility shipped with X. · XPM (X PixMap): The file format used by color icons in X. Gimp's XPM plug-in supports 8, 16 and 24 bit images. |
Save Dialogs
|
|
|
When you save a newly created image, selecting the Save or Save As command will open the Save Image dialog box. Under Save Options, you can specify a file format for the saved image, which will in turn set the kind of compression and many other options for your saved image. We will now take a look at the different choices you have for image formats, and discuss what impact each format's parameters will have on the saved image. |
|
|
|
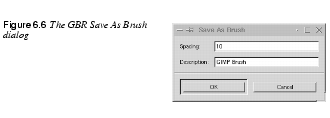
GBRThe GBR Save As Brush dialog allows you to save your own images as a brush. Spacing refers to the default spacing your brush will have as shown in the Brush dialog (more information on brushes is provided in Brushes). Description refers to the name for your brush in brush-related dialogs, so it's a good idea to enter something descriptive, like "My test brush." |
|
|
|
GIconAll you need to enter in the Save as GIcon dialog is the name of your icon. Note that this is not the file name; it's the internal name of the icon as Gimp sees it, so keep it short and descriptive. |
|

|
|
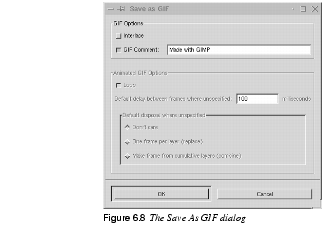
GIFThe Save As GIF dialog has many options. If you've flattened your image, you can save it as an interlaced GIF image, which enables it to be loaded incrementally by some applications (such as Netscape). You've probably seen this on the Web, when the image appears blurry at first but gradually becomes sharper. |
|
|
|
|
You can also set the GIF Comment stored in the GIF file to anything you want, like, "Made by Karin with Gimp." Note that if you want to change the default GIF comment ("Made with GIMP"), you'll need to edit the GIF plug-in source code. |
|

|
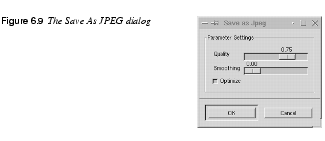
Note that you'll need to convert your image to indexed color ( If your image contains layers, you can create a GIF animation. If you want the animation to play only once, uncheck the Loop box; otherwise, it will loop forever. The Default delay between frames where unspecified field is the delay between frames in your animation. The checkboxes in the Default disposal where unspecified section control the following actions: · Don't care and Make frame from cumulative layers have the same effect: The animation starts by displaying the first layer in the GIF image. Subsequent layers are then displayed "on top of" each other. This mode is useful when creating, for example, a logo that you'd like to appear one letter at a time. · One frame per layer (replace) will use the first layer as the first frame, the second layer as the second frame and so on, just like in a movie. This mode is useful when creating an image of a moving object, such as a spinning globe. If your GIF image is transparent, the transparency will be retained when you save it. Transparency works in both flat and layered images. Note that GIF does not support semi-transparency; pixels are either 100 percent opaque or 100 percent transparent. Transparent GIF images will sometimes be displayed incorrectly. This happens in a few older image programs that can't handle transparency very well, and you'll see a color instead of transparency (for example, Photoshop 2.5 doesn't handle transparency). The best you can do is set the image's default background color to an appropriate color before saving the GIF. JPEGThe Save As JPEG dialog lets you set the Quality and Smoothing of the image. There is also an option to Optimize the image. JPEG uses lossy compression that takes advantage of the fact that the human brain cannot easily distinguish small differences in the Hue component of an image (see Hue for more information). In other words, the fewer colors in your image, the lower you can set the quality. |
|
|
|
A Quality setting of 0.75 is generally fine for a full-color image, but it's often as low as you can go before losing too much information. If the resulting image quality is too poor, go back to the original image and increase the quality, but never exceed a value of 0.95. If you do, the file will get bigger without any noticeable improvement in quality. If image quality isn't important for a given application, you could even go as low as 0.50. If you just need low-quality images, like snapshots of an image archive, then you can go down to 0.10 or 0.20 (although in most cases something like xv or Guash is better suited for this kind of task). Sometimes in JPEG images, sharp edges can appear a bit jagged. If this happens, you can increase the smoothing value. This will blur the edges so that they will become less jagged. But note that "smoothing" is a polite way of saying "blurring," so too much smoothing can make the image very blurry and that's not good. Checking the Optimize checkbox will tend to reduce file size further by using a special algorithm. |
|
|
|
Tip: Don't save a TIFF image of your mother-in-law as a low quality JPEG, and then delete the original TIFF image; if you do, you'll never again be able to view her in all her high-resolution glory. To put it simply, don't save important images solely in JPEG format. But if your mother-in-law would like a JPEG file with the smoothing bumped up a bit, we won't tell.... PATThe Save As Pattern dialog lets you name the pattern in the Description box. Note that this description will appear in the Pattern dialog box. Needless to say, you should give it a meaningful name, such as "rock" for a rocky texture. |

|
|
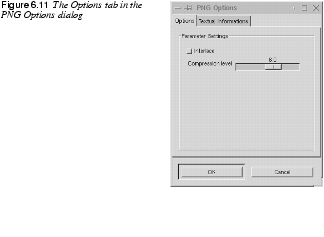
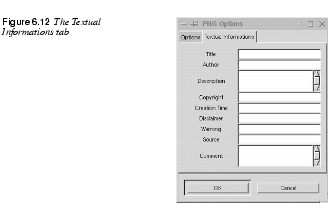
PNGThe PNG Options dialog allows you to set the image's Compression level and whether or not the image should be interlaced. The Interlace checkbox behaves just like the one in the GIF dialog. An interlaced image can be loaded and displayed incrementally (in applications that support it). PNG compression is handled by zlib, a general-purpose data compression library. If you slide the Compression level slider to 0, no compression will take place. If you slide it to 9, the image will be compressed by the maximum possible amount. Unlike the compression used in JPEG files, zlib compression is lossless. |
|
|
|
|
Textual Informations lets you include information about the image, such as Description, Author, etc. This is a good thing if you want to prevent anyone from stealing your image, but you should be aware that the information can be removed. |
|
|
|
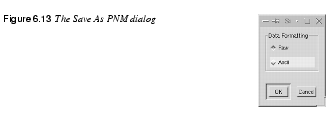
PNMThe Save As PNM dialog is fairly self-explanatory. Raw means that the file is saved in binary format, whereas Ascii will cause the file to be saved as a sequence of printable characters. You'll probably always want to save PNM files in Raw format, as it's smaller (eight times smaller, in fact) and saves faster than Ascii format. PNM is a UNIX image format. It is often used to translate images to and from other formats. PNM is also used as an image format within programs, so if you are a programmer you have to choose whether to use Raw or Ascii in your program. |
|
|
|
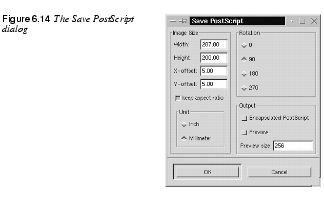
PostScript And EPSSaving your image as PostScript is significantly different from saving it as TIFF, GIF, JPEG, etc. When you save an image as PostScript, you must specify the Image Size. Think of it as if you were specifying the size of the paper on which the image will be printed. Choose a reasonable image size. In other words, a 300x400 pixel image won't look very good if you stretch it out to the default size of 11.30x7.87 inches. You will almost always have to alter the paper size. To do so, change the Width and Height fields. |
|
|
|
|
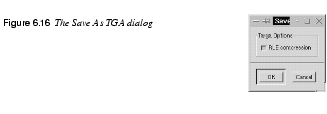
The X-offset and Y-offset fields can be thought of as the margin of your imaginary paper. Checking the keep aspect ratio checkbox means that the image size will be automatically adjusted to be the same relative shape as your image, so that the image won't be stretched out. For example, let's say you are going to save a 300x400 pixel image, and that you decide that the resolution is going to be 100 pixels per inch (suitable for printing to a 300 dpi laser printer). The image area would be 3x4 inches. If we add a margin of 0.2 inches on top and bottom, and 0.2 inches on each side, then the total image size will be 3.4x4.4 inches. So, let's set Width to 3, Height to 4, X-offset and Y-offset to 0.20, Unit to Inch and Rotation to 0. This will result in your image being saved in portrait mode. If you want to rotate your image by 90 degrees, you'll have to switch values in Width and Height, and the image will be saved in landscape mode. If you rotate your image by 180 degrees, you'll get an upside-down portrait mode, and if you rotate by 270 degrees you'll get an upside-down landscape mode. You can read more about resolution and printing in "Pre-press And Color In Gimp" starting on page 197. Clicking the Encapsulated PostScript checkbox will create an Encapsulated PostScript (.eps) file instead of a plain PostScript (.ps) file. EPS is useful for importing an image into a page layout or an illustration program. Encapsulated Postscript is also a commonly requested file format when you print at a professional printing company. If you're going to import your EPS file into another program, it is wise to check the Preview box. If you don't, the program may not show what your image looks like on screen (it will either be displayed as a gray square or at very low resolution) and the image will only appear when you print it out. SunRasThis is the SunRas save dialog When you save a SunRas file, you'll get a dialog box asking if you want RLE compression or Standard format (no compression). RLE compression is lossless so it's generally a good idea to select this option, but note that RLE format supports only 4 or 8 bits per pixel. This will have no effect on the image, except that you can't save Indexed images in SunRas TGAWhen you save a Targa image, the Save As TGA dialog box asks if you want RLE compression or no compression (RLE compression is not checked). Like SunRas compression, RLE is generally a good idea, since it will save disk space. |
|
|
|
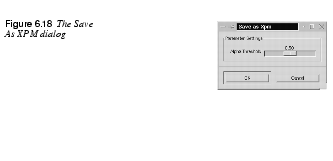
TIFFThe Save As TIFF dialog The Fill Order determines how the bits in your image are filled. The first option is Least Significant Bit (LSB) to Most Significant Bit (MSB), the default order on little-endian machines (for example, machines with Intel X86 processors). It is also known as PC filling. The other option selects a reverse fill order: MSB to LSB. This is the default order on big-endian machines (ones with Motorola and SPARC processors, for instance). This is also known as Mac filling. If you want to import the image into FrameMaker or a similar program, set Compression to None and set Fill Order depending on the type of machine that the program runs on. Most programs are fairly flexible when it comes to importing files, but this way you are safe. XPMThe Save As XPM dialog appears when you save an image that has alpha (transparency). Alpha Threshold determines which alpha values should be considered transparent and which should be considered opaque. For example, a threshold of 0.5 means that all alpha values under 128 will be transparent and all over 128 will be opaque (128 is half of the maximum channel value 255). According to the source code, 16 bit and 24 bit XPM images are supported on 16 bit displays; code for 8 bit images exists, but has not been tested. |
|
|
|
Other Image FormatsThe other image formats that Gimp supports, such as BMP, CEL, FITS, FLI, HRZ, HTL, Header, PCX, PIX, SGI, XCF, XWD, bzip2, gzip, etc., have no options at the time of this writing. Therefore, we can't supply any special information on how to save in those formats. | |
Mailing Images
|
|
|
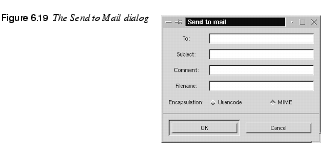
Gimp can mail images. This is a handy feature, particularly if you work in more than one location. Then, you can mail your image home or to work. You can also use it to send digital Christmas cards to your friends and family. Note, however, that mail administrators may not be very happy if you mail large images, so use this feature with care.
You also have to choose the mail message's Encapsulation or coding type; you can choose either Uuencode or 64 bit MIME. It's usually better to use MIME because it's supported by most mail programs. |
|
|
|
Displaying Images In The Root Window
|
|

|
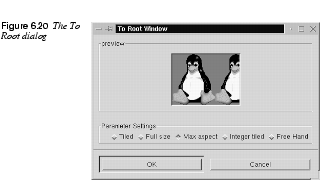
The root window is the "background" of your X Window System desktop. On start-up, most X desktops set the background to a specific color or image. The background is normally set using a GUI application, or by changing a line in a file. The next time you start the desktop, the new background will be displayed (many desktops allow you to do this without having to restart your desktop). This setup will suit most ordinary users who only want to choose from a set of preconfigured backgrounds. But since Gimp is an image manipulation program and you are an image manipulator, you will probably want to create your own background, and here's where the Onroot feature comes in handy. With Onroot, you can easily put the image you're working with in the root window to see how it will look. If you're not happy with the result, you can keep manipulating it, displaying it in the root window again and again until you are satisfied. Then, you can use your window manager to display the finished image. |
|
|
|
Onroot also has a dialog box where you can specify how the image will be displayed on the root window. There are five different options/settings. There is also a preview screen, so you can easily see what it will look like. A quick overview of the options is as follows: · Tiled: This option will place your image (in its original size) in the upper-left corner, and place copies from left to right until the entire row is filled. Then, it will put a copy of the image under the first and fill the second row. This will go on until the whole screen is filled. Since the image hasn't been scaled, it will probably be cropped at the right side and in the bottom of the screen. · Full size: This option will stretch your image so it will cover the entire screen. Unless the image is very large, it will (probably) lose its original ratio and become blurry, since it will be stretched to fit the screen. · Max aspect: This option will stretch your image with its ratio intact. This will most likely result in a cropped duplicate of your image unless its aspect ratio exactly matches that of your screen. · Integer tiled: This option is nearly the same as Tiled. The difference is that there will be no cropped images as they will be stretched to fill the window. · Free Hand: With this option you can place your image at any position on the root window. Initially, the image is placed in the center of the preview screen. You can then drag it to the location of your choice. Not every desktop environment can handle each of these options, so when you're creating the right background image, take into account the background options your desktop has to offer. | |
Printing Images
|
|
|
Before you start to print from Gimp, you should know that only the active layer of a layered image will be printed, so you must first flatten ( What kind of printer does Gimp support internally? To find out, open an image and select · PostScript printers (including PostScript level 2) · HP DeskJet 500, 500C, 520, 540C, 600C, 660C, 68xC, 69xC, 850C, 855C, 855Cse, 855Cxi, 870Cse, 870Cxi, 1200C and 1600C printers · HP LaserJet II, III, IIIp, IIIsi, 4, 4L, 4P, 4V, 4Si, 5, 5FS, 5L, 5P, 5SE, 5Si, 6L and 6P printers · EPSON Stylus Color, Color Pro, Color Pro XL, Color 400, Color 500, Color 600, Color 800, Color 1500, Color 1520 and Color 3000 printers Other Print SettingsGimp supports most common printers internally, so you probably won't need to use GhostScript. GhostScript is a program that is often used to convert PostScript to another printing language, such as PCL, which is used by HP printers. Since PostScript is the most common printing output for UNIX programs, GhostScript is often set up as a filter that interacts with the printer system to convert the output on the fly from PostScript to PCL, which is fed to the HP printer. |
|
|
|
|
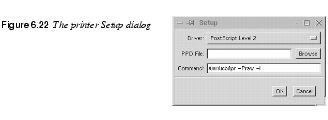
However, if you have GhostScript installed and use it as a printer filter for your printers, then you'll probably want to print using the PostScript Printer option. We recommended that those of you with Ghostscript installed create a raw printer device and let Gimp print directly to it, at least temporarily, so you can follow the examples in this manual more closely. SetupBefore you can print, you must enter the Setup dialog. Setup tells Gimp what type of printer you are using. As you might imagine, this is crucial information when it comes to printing. |
|
|
|
|
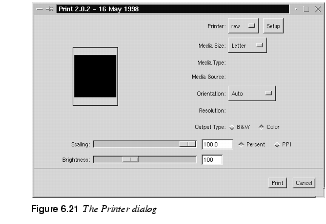
First, specify the Printer (actually the printer's queue) you'd like to print to in the drop-down menu, then click on the Setup button to access the Setup dialog box. In the Setup Driver pull-down menu, you specify what type of printer you're using. If you have a PS or PS level 2 printer, you can provide your printer with a PPD File. |
|

|
Tip: A PPD file is a file that describes your printer's capabilities. By providing a PPD file specific to your printer, you'll be able to use your printer's special features (like resolution, media source and media type). Just browse and choose the PPD file that comes with the printer driver for Windows, or you can download it from Adobe's FTP site. Gimp doesn't come with PPD files, so you have to get them yourself. Usually, you get it from the Windows driver for your PostScript printer, but sometimes it can be hard to extract the PPD file from the Windows driver. If that is the case, you can get the PPD file from If you don't have a PostScript printer, just choose one of the printers supported by Gimp from the drop-down menu. In the Command input field you'll see the print command that will be used when you print. Normally this is determined when you compile the print plug-in. But if the command is wrong, you can correct it here. Once everything is correctly set, press OK. If you don't have a command field, don't worry; Gimp has been set up so well that there is no need for it. The Print DialogThe main dialog box may now have changed its appearance depending on what features your printer supports. We will describe all of the options, but don't be surprised if your printer only supports a few of them. · Media Size: The size of paper you use in your printer. Gimp supports Letter, Legal, Tabloid, A4, A3 and other paper sizes. · Media Type: Refers to the type of paper you use, such as Transparent, Glossy, etc. · Media Source: The way to specify the tray containing the paper on which you'd like to print. As you might imagine, this is heavily dependent on your printer's capabilities. · Orientation menu: Lets you select whether you want to print in Landscape or Portrait mode. You can also let Gimp decide by selecting Auto. · Resolution: Provided because different printers support different resolutions. In this field, you can specify what resolution you want to use for your print job. This option can come in handy; for example, you probably don't want to use high resolution when printing a draft. We'll discuss resolution in more detail a bit later when we talk about scaling. · Output type: If you have a color printer, use Color mode; otherwise, use B&W (you can also use B&W on a color printer, of course). · Brightness is set by default to 100, which is fine for printing to lasers and black-and-white inkjets. Usually, though, you will have to increase this value when printing to a color inkjet. The author of Gimp's printer interface recommends a setting of 125 to 150, but for us, that's too bright. We use 110 for our Deskjet 870Cxi. The bottom line is that you will have to experiment a bit to find out what setting gives the best results on your printer. |
 |
·
Scaling: When you open the Print dialog box, Scaling is set to the default value 100, and the image will be stretched to cover the entire page (with a margin of 6 mm on each side, and 13 mm on top and bottom). If you use this scaling factor on a small image, it will get so enlarged that it will look jagged and ugly, because the effective resolution (in pixels per inch) will be extremely low. The nice thing about Gimp's printer interface is that you can set the scale in PPI. As we have already mentioned, PPI stands for pixels per inch and represents the resolution of the printed image. We recommend that you always use the PPI option; otherwise, you will have little control over print quality. So, what PPI value should you use? Well, it depends on your printer. A suggestion is to use 72 ppi for a 300 dpi laser printer and 110 ppi for a 600 dpi laser printer. Note: If you can set the resolution in the printer dialog, remember to also change the PPI value. But our suggestion is not absolute. For example, if you have a PostScript printer that uses AM screening, the PPI should be around 1.6 to 2 times the LPI (lines per inch) of the printer. As you may have noticed, the more we discuss this topic, the more you'll need to understand. We strongly recommend that you read Pre-press And Color In Gimp, where we discuss the complex subject of printing in more detail. However, we can give you a few simple guidelines. A 300 dpi laser printer will need at least 60 ppi, and a 600 dpi laser printer will need 100 ppi (minimum). A general rule is that inkjet printers get away with a lower ppi than laser printers, so try 50 ppi for a 300 dpi inkjet printer and 90 ppi for a 600 dpi inkjet printer. If you find this printing jargon confusing, stick to our guidelines or read "Pre-press And Color In Gimp" starting on page 197. If you have an inkjet printer it might also be a good idea to read Scanning, The Web And Printing. If you'd like to use the Percent option, remember that small images (set at 100%, which means 100% of the paper size) will print at a very low resolution. In order to get a nice printout, the image will have to be relatively large and you will have to scale it down to increase the resolution. Read more about this in Pre-press And Color In Gimp. A 300x400 pixel image will look fine with a scaling of around 30% (assuming that you use A4 paper and a 300 dpi printer). The procedure is the same as when we saved in PostScript format. |

|
Tip: If you are making a draft of a large image, like a poster, you will probably start by working with a small image in order to avoid heavily loading your computer. If you just want a quick printout of the draft, use the Percent function and enlarge the image. Since it is a draft, you only want a quick look anyway, so the quality is not that important. There's also a print to file choice in the Printer pull-down menu. When you select File, the data that would normally go to your printer will instead be saved to a file. When you press the Print button, a file dialog will appear where you can specify the output file name (and path). Printing to a file is quite handy as an alternative to saving the file as PostScript. In our opinion, it's often easier to print to file (in PS mode) than to save as PS, mainly because you don't have to mess with the Save As settings. However, even if you print to file, it's still important that you set the resolution correctly. Printing to a file is also an option when you want to print your image at the local printer. You only have to get a copy of its printer's PPD file and install it on your system. When the Print dialog appears, enter the setup in "print to file" mode. Choose the PPD file provided by your print house and click on OK. Now you can set the options that its imaging hardware supports. Once you've "printed" your image to a file, simply deliver the PS file to the local print house for printing. Read more about this in Pre-press And Color In Gimp. |
Gimp Preferences
|
|
|
In the Preferences dialog box ( To save any changes permanently, click on the Save button; if you press Cancel, all your changes will be discarded. If you press OK, your changes will affect Gimp at once, though not all values will be affected (dir values like swap will have no effect). If you press OK and not Save, your changes will only affect the currently running Gimp and will not be saved for future Gimp sessions. | |
 | Note:
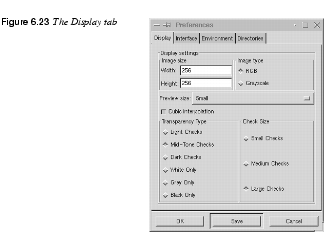
To enable your Saved modifications you must first quit Gimp and then start it up again. We recommend that you use Save and then restart Gimp instead of taking a chance with OK. DisplayOn the Display tab, you can set the default size for new images (in pixels), and the default image type (RGB or grayscale). You can also set the Preview size. If your computer has a small screen and is low on system resources (like RAM and processor speed) you'll generally want to keep the Preview size set to small. Check Size lets you choose the size of the checks in the checkerboard on an image composition screen that is used to represent transparency, and Transparency Type lets you specify the grayscale tone of the checks. The default values should be fine for just about any work. InterpolationWhen you scale an image to make it bigger, Gimp has to calculate what kind of pixels it needs to insert between the original pixels (in order to make the image bigger). This is called interpolation. Linear interpolation is faster and also leaner on system resources, but it does not produce as high a level of detail in the output image as cubic interpolation does. To get a nice-looking image with a lot of detail when you scale it, check the Cubic interpolation checkbox. If your system is not up to running with cubic interpolation enabled, make sure the Cubic interpolation checkbox is not checked. Gimp uses linear interpolation by default. |
|
|
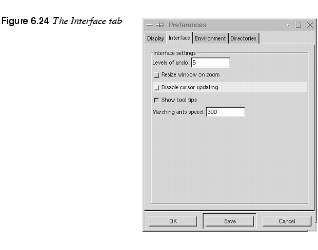
InterfaceOn the Interface tab, you can set Levels of undo. Setting it to a high number (over 10) requires a lot of disk space, so use with care if disk space is low on your system. Resize window on zoom means that the canvas size will always adapt to the amount of zoom you use, so you'll always be able to see the entire image regardless of zoom level. Our advice is to keep this option unchecked because you can easily enable and disable it in the Zoom Options dialog box. Read more about this in Zoom. Show tool tips is a nice feature; Gimp will automatically pop up small tips about the tool when you move the mouse over the tool. We recommend that you enable tool tips until you have learned every tool (i.e., never). By default Gimp changes the cursor symbol. For example, if you use the Move tool, your cursor will be the move symbol. However, this consumes system resources, so if you are extremely low on resources, check the Disable cursor updating checkbox. Bear in mind that this can be unwise because you won't be able to see what mode you are in. You can also set the speed of the "marching ants" (the blinking dots that appear whenever you make a selection). The value in the marching ants speed input field is the amount of time between updates (in milliseconds), so a lower value makes the ants march faster. |
|
|
|
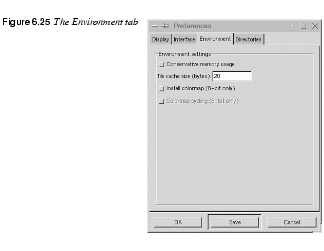
EnvironmentOn the Environment tab, you'll see the Conservative memory usage checkbox. Gimp will usually trade memory consumption for improvements in speed. Checking Conservative memory usage will make Gimp more concerned about memory, but it will also slow things down, so only use it when memory is scarce. Tile cache size is the amount of memory that Gimp consumes in order to ensure that it doesn't damage the tile memory when Gimp moves memory to and from disk. Gimp uses its own swap file on disk to handle memory; this is the tile memory. Since Gimp has its own swap file, you can edit really large images. The only restraining factor is disk space. We all know that keeping program memory on disk makes the program slow, so we don't want the memory that Gimp uses to edit an image to be on our disk. This is where the tile cache comes in. You can specify the amount of tile memory that you want to put in our computer's main memory. The rest will stay in Gimp's tile memory swap file. Setting this value high will make Gimp faster, because it doesn't need to keep all that information in the swap file. We recommend setting it to 32 MB on a computer with 128 MB RAM, 16 MB on a 64 MB system and 10 MB on a smaller system (note that Gimp will continue to work even if you set the Tile cache size to 0). Note that a big tile cache will only affect Gimp's speed on large images. Using a 64 MB tile cache when you work on a 2 MB image will not make Gimp faster. If you're working on an 8 bit display, you'll definitely want to use the Install colormap option. Because most of the 256 available colors on your 8 bit display will have already been claimed by other applications (such as the window manager, Netscape, etc.) Gimp, and the images it displays, will only be allowed to use the leftover colors. As you probably realize, under such conditions Gimp will be quite useless. Colormap cycling affects the "marching ants" selection border. If you check this option, the "ants" will be replaced with a smooth line. This line is dark as you drag the selection, and turns bright when you release the mouse button. |
|
|
|
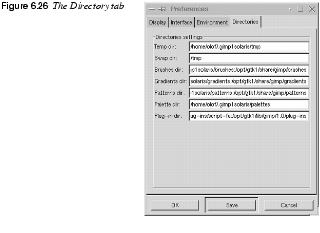
DirectoriesThe most important directories that you can manipulate in the Directories folder are Temp and Swap. The Temp directory is where Gimp stores all of its temp-orary data, like working palettes and images. The Swap directory is where Gimp keeps its swap file for the tile-based memory system. |
|
|
|
SuggestionsHow should you configure these directories for optimal performance? If you are on a system that mounts home directories from a server over NFS and/or you have only a fixed quota of disk space that you can use, you will probably want to place your Swap directories on a local temporary directory such as Temp is a bit different. Most of the files here will disappear when you exit Gimp, but some will remain (such as working palettes) so you will probably want a Temp directory that you don't share with other people, and that isn't cleared if you reboot your workstation. A good idea is to make a personal directory under
Set this directory to be your Temp directory. The other directories for brushes, gradients, palettes, patterns and plug-ins may be left as they are, or modified to suit your special needs. If you change them, remember to move your Gimp add-ons to the right place. If you don't, you may not have any plug-ins available the next time you start Gimp. | |
Miscellaneous Features And Extensions
|
|
Tip Of The DayIn the toolbox, click on DB BrowserIn the DB browser you can search for Gimp PDB calls and routines. This feature is mainly for people that deal with scripts and plug-ins. Even if you are not writing scripts or plug-ins, this can be a good source of information on Gimp's internals. You can search the database for both PDB procedure names and information about the procedure. If you call the DB Browser from the Script-Fu Console, you can also apply the PDB command to the console. PDB HelpThis is another interface to the Gimp PDB. With this extension you can run a specific PDB call on your image. To do this, simply click on Run, which will bring up a dialog asking for information. As with the DB Browser, this extension is mainly for developers. | |

|
Gimptcl ConsolioGimp's main scripting language is Scheme, which is one of the many scripting languages available for UNIX. Consolio is written in Tcl, and you can use it when you create Tcl scripting for Gimp. |

|
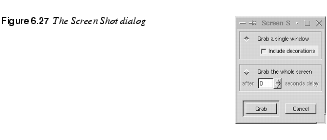
ScriptingIf you are familiar with Tcl or Perl, you probably don't want to bother to learn Scheme. If you are a user without technical background, you may well ask yourself, "Why should I bother learning some obscure UNIX scripting language?" Well, let's first state that there is no absolute requirement to learn a scripting language to use Gimp. You can happily use Gimp without giving a thought to learning any scripting language. But if you find yourself performing a certain operation over and over again, wouldn't it be nice to automate it? Take the Drop Shadow Script-Fu, for example. You can make a drop shadow by hand in Gimp, but isn't it nice that you have a script to do it for you? Situations like this make it worthwhile for ordinary users to learn a scripting language. At the time this was written, Gimp supports Scheme, Tcl and Perl as scripting languages. Each of these languages is well documented in a variety of different books, so feel free to choose whichever language you like. If you are totally new to computer languages and scripting, then we suggest that you learn Scheme, as it is Gimp's native scripting language. But Perl is also a good candidate because it's officially a part of the upcoming Gimp 1.2. Screen ShotIn the toolbox, click on To take a dump of the active window, check the appropriate options and press OK. Your mouse pointer will now change into a cross symbol. Use it to select the window that you want to grab by moving it within the window and clicking. When you want to take a dump of the entire screen, check the appropriate options and press OK. After a few moments, a new Gimp window with your screen dump will appear. All screen shots in this book have been taken with this tool. |
|
|
Waterselect |
|

|
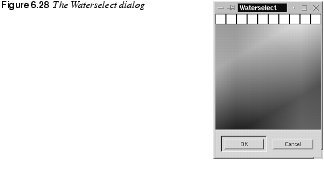
Waterselect is an alternative to the Palettes or the Color Select dialog. This tool resembles the little water cup you use for blending colors when you're making a watercolor painting. |
|
|
|
The interface is simple. At the top you'll find the last ten colors that you mixed. Press one of these colors, and it will be activated. If you want to mix a color, simply move the mouse over the color scale while pressing the left and right mouse buttons. The left mouse button, which mixes to darker colors, overrides the right mouse button. If the color gets too dark, temporarily release the left mouse button so that you only press the right mouse button while moving the mouse. The color will get lighter, just as if you had added more water. Release both mouse buttons when you're satisfied, and the chosen color will appear in the active color swatch in the toolbox. Press OK or Cancel to close the Waterselect window. Web BrowserThe Web Browser ( To open a site that is not available in the shortcut menu, select Open URL. This option pops up a dialog box asking you about the site. You can also choose whether you want to open the site in an existing Netscape session, or whether you want to open a new Netscape window. Naturally, for this to work, Netscape must be installed and in your path. If you want to change or add a shortcut, you have to edit the script that controls the behavior of this extension. The script is called web-browser.scm and is usually located in | |
| Frozenriver Digital Design http://www.frozenriver.nu Voice: +46 (0)31 474356 Fax: +46 (0)31 493833 support@frozenriver.com |
Publisher Coriolis http://www.coriolis.com |