![]()
![]()
|
Script-Fu: Description And Function In this chapter, we will take a look at what's under the Xtns/Script-Fu menu in the toolbox and the right-click menu. |
Script-Fu?
|
|
|
Script-Fu is what the Windoze world would call a "macro." But Script-Fu is more powerful than that. Script-Fu is based on an interpreting language called Scheme, and works by using querying functions to the Gimp database. You can do all kinds of things with Script-Fu, but an ordinary Gimp user will probably use it for automating things that: · He/she wants to do frequently. · Are really complicated to do, and hard to remember. Remember that you can do a whole lot with a Script-Fu. The scripts that come with Gimp can be quite useful, but they can also serve as models for learning Script-Fu, or at least as a framework and source of modification when you make your own script. Read "Mike Terry's Black Belt School Of Script-Fu" starting on page 697 if you want to learn how to make scripts. We will describe some of the most useful scripts in this chapter, but we won't cover them all. There are simply too many scripts. Some of the scripts are also very simple and you will probably not need any documentation to be able to use them. Script-Fu (Scheme) isn't the only scripting language available for Gimp. But Script-Fu is the only scripting language that is installed by default. Other available scripting extensions are Perl and Tcl. You can download and install both extensions at Installing Script-FusThe great thing about Script-Fus is that you can share your script with all your Gimp friends. There are several scripts that come with Gimp by default, but there are also scripts that are available for download all around the Internet. If you have downloaded a script, copy or move your new script to your The script will now appear in one of your menus. If you don't find it, look for it under the root file menu filters. If it doesn't appear at all, something was wrong with the script. Note that you can't use more than one Script-Fu dialog at a time, so don't open a script and one more after that. The last one will never be opened and displayed. Do's and Don'tsA common error when you are dealing with Script-Fus is that you simply bring them up and press the OK button. When nothing happens, you probably think that the script is broken or buggy, but there is most likely nothing wrong with it. Think again. Did you really read the information in the dialog, or did you just press the button? If you forgot an input the script needs, or if you gave it the wrong input, the script will fail. One of the most common errors is that the font specified in the script dialog hasn't been installed on your system. So please check the information in the dialog before blaming the script. Different Kinds Of Script-FusThere are two kinds of Script-Fus -- standalone scripts and image-dependent scripts. You will find the standalone variants under | |
Standalone Scripts
|
|
|
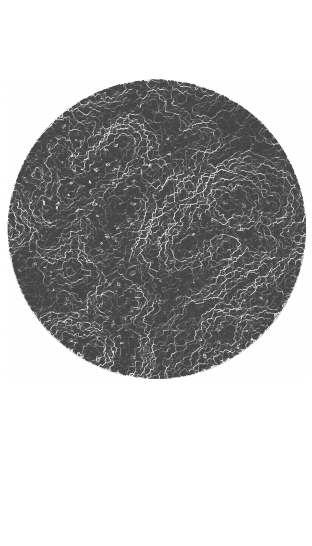
We will not try to describe every script in depth, as we did with the filters. Most Script-Fus are very easy to understand and use. At the time of this writing, the following types are installed by default: · Patterns · Web page themes · Logos · Buttons · Utils · Make Brush · Misc. PatternsYou will find all kinds of pattern-generating scripts here. Generally, they are quite useful because you can add many arguments to your own patterns. We'll take a look at the Land script. In this script you have to set the image/pattern size, and specify what levels of random to use for your land creation. The colors used to generate the land map are taken from the currently selected gradient in the gradient editor. You must also supply values for the level of detail, land and sea height/depth and the scale. Scale refers to the scale of your map, just as in an ordinary road map, 1:10 will be typed as 10. |
|
|
|
Web Page ThemesHere is clearly a practical use for scripts. By creating a script for making custom text, logos, buttons arrows, etc., for your web site, you will give them all the same style and shape. You will also be saving a lot of time, because you don't have to create every logo, text or button by hand. You will find the Gimp.org theme under the Web page theme submenu. If you want to create your own theme, this script will serve as an excellent template that you can modify to create a theme for your web site. |
|
|
|
|
Most of the scripts are quite self-explanatory, but here are some hints: · Leave all strange characters like · Make sure that the pattern specified in the script exists. · Padding refers to the amount of space around your text. · A high value for bevel width gives the illusion of a higher button. · If you type · Choose transparency if you don't want a solid background. If you choose a solid background, make sure it is the same color as the web page background. LogosHere you will find all kinds of logo-generating scrips. This is nice, but use it with care, as people might recognize your logo as being made by a known Gimp script. You should rather regard it as a base that you can modify to fit your needs. The dialog for making a logo is more or less the same for all such scripts: 1. In the Text String field, type your logo name, like Frozenriver. 2. In the Font Size text field, type the size of your logo in pixels. 3. In the Font text field, type the name of the font that you want to use for your logo. 4. To choose the color of your logo, just click on the color button. This brings up a color dialog. 5. If you look at the current command field, you can watch the script run. |
|

|
|
Make ButtonsUnder this headline you'll find a script that makes beveled buttons. The script has a dozen parameters or so, and most of them are similar to those in the logo scripts. You can experiment with different settings to come up with a button you like. UtilsUnder Utils you will find a small but nice script: the Fontmap script, which makes an image of your fonts. You will have to type the names of the fonts you want displayed in the Fonts text field. A tip is to use xfontsel to see what fonts are installed (see "How To Get Fonts To Gimp" starting on page 759). The Custom gradient script creates an image of the current custom gradient in the gradient editor. This can be useful if you want to pick colors from a gradient as in a palette. Misc.Under Misc. you'll find scripts that can be quite useful, but aren't suitable for the other submenus. An example is the Sphere script. You will have to set the radius in pixels to determine the sphere size. The lighting angle is where at the sphere you point the spotlight. This value also has an impact on the sphere shadow. If you don't want a shadow, you will have to type |
|

|
|
Make BrushThis script lets you make your own custom rectangular/circular brushes, with or without feathered (blurred) edges. To ensure full control over the parameters, you will have to look in "Brushes, Gradients, Palettes And Patterns" starting on page 171. The script will automatically store your brush in your personal brush directory. You just have to press refresh in the Brush Selection dialog to use your newly created brush. | |
Image-Dependent Scripts
|
|
|
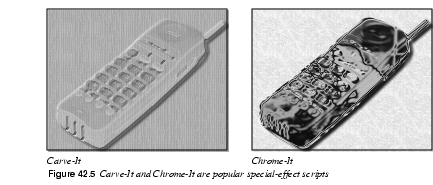
The image-dependent script is a script that will perform operations on an existing image. These scripts are more like the plug-ins in the Filters submenu. At the time of this writing, the following script groups are installed by default: · Decor · Modify · Animators · Stencil Ops · Alchemy · Shadow · Render · Utils · Selection Stencil OpsHere, you'll find two scripts: Carve-It and Chrome-It, which can render some truly nice artistic effects on grayscale images. |
|
|
|
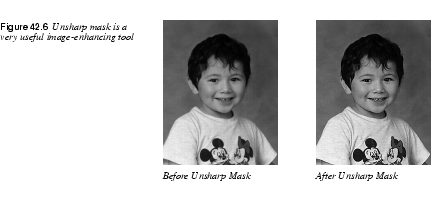
AlchemyUnsharp MaskOne of the most useful Script-Fus is Unsharp Mask, which sharpens an unfocused or blurred image. Unsharp Mask is often a better alternative than Sharpen will accentuate all of your image, including scratches, noise and other imperfections that you don't want in your image. Unsharp Mask works by increasing the contrast of edges and nearby pixels, while leaving other areas pretty much untouched. This makes Unsharp Mask ideal for enhancing scanned images. The mask value controls the amount of sharpening, or more accurately, how wide the edge areas should be. |
|
|
|
|
If you apply image-effect functions like Scale, Rotate and Perspective, try using Unsharp Mask afterward, as those types of filters use interpolation and thereby soften or blur your image. If you just want to enhance a small part of your image, then the ordinary Sharpen filter is an adequate tool (you can't use Unsharp Mask on selections). |
|

|
Note: There is now also an Unsharp Mask plug-in available (not a script) that has the same functionality, but has even better precision; see Unsharp Mask. Tip: It's a good idea to run Unsharp Mask twice, with half the mask value instead of just once with the whole value. This will sharpen more smoothly (don't forget to flatten the image). ShadowHere are two really useful scripts that you will probably use quite frequently: Drop Shadow and Perspective Shadow. Drop ShadowDrop Shadow will cast a shadow behind your selected object. It has three important parameters. X and Y offset determine where the shadow will be placed in relation to the selected object. Offset is measured in pixels. High values make the shadow look like it's far away, and low values will make it look closer to the object. The blur value is also important, because a shadow that is cast far from the object has a higher blur level. |
|
|
Perspective ShadowPerspective Shadow has a very important parameter: the perspective angle. If this angle is set to 0 or 180, there will be no shadow, because the script assumes that the object has no thickness. This also means that this script looks fine in certain angles, but unnatural in others. The other parameters are quite self-explanatory. You'll get more blur if the horizon is far away, and the shadow length is the length in relation to the selected object. |
|

|
|
|
| |
![]()
![]()
| Frozenriver Digital Design http://www.frozenriver.nu Voice: +46 (0)31 474356 Fax: +46 (0)31 493833 support@frozenriver.com |
Publisher Coriolis http://www.coriolis.com |