Basic Controls
|
|
|
|
The first six tools in the toolbox are selection tools. In order to manipulate a specific part of your image, you first need to select that area. The trick is to find the right selection tool (or the right combination of tools) to make your selection correspond as exactly as possible to the part of the image you want to work with. Even the untrained eye can pick out a sloppy selection, so it's important that your work looks convincing. The selection tools in the toolbox are used for quick, simple selections. For really advanced selection work, read Select Menu and "Channels And Duotones" starting on page 351. ToggleWhen you have made a selection, the boundary of the selection becomes a blinking dotted line, often referred to as "marching ants." Your selection is now the only active part of your image; the rest of the image is masked and will not be affected. If you find the blinking line distracting, Gimp allows you to switch it on and off with |
Selection Control
|
|
|
If you're not happy with your selection, just make a new one; the first will instantly disappear and be replaced by your new selection. If you regret making selections at all, just click once in your image (with the rectangular, ellipse or lasso tool active) and the selection will be gone. However, you might want to make more than one selection, or combine several selections into one -- for that you'll have to use the Shift and Ctrl keys. Pressing the Shift key as you create a selection allows you to add a selection. If the selections touch, they will be combined into one single selection (a union). |
|
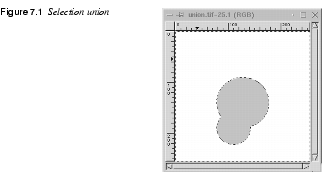
|
|
|
Pressing the Ctrl key will do the opposite; dragging a second selection that overlaps the first will subtract that area from the first selection (leaving you with the difference). Just pressing Ctrl while drawing selections won't do anything -- the selections have to touch each other. |
|
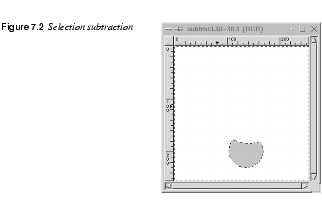
|
|
|
If you press both the Ctrl and Shift keys simultaneously, you'll get the intersection of the two, i.e., only the portion that is part of both selections. |
|
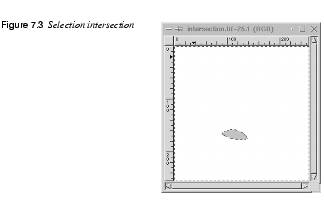
|
|
|
While making additions or subtractions, remember "to err is human." It's a good idea to keep your middle finger prepared to press the right mouse button. If you do this and then release the left mouse button, the selection you are drawing will disappear. The ability to Undo a selection before it's finished is useful, particularly when performing these kinds of selections. When you decide you don't like the selection you're drawing, you can undo that selection without also erasing the other "good" selections. You can, of course, do this afterwards with Ctrl+Z, but it's a bit quicker to do it with the mouse. | |
Moving Selections
|
|
|
Moving selections in Gimp is not entirely intuitive, so you may initially become somewhat confused. When you've made a selection in Gimp, the cursor will automatically turn into a move symbol (crossing arrows), and you'll find that you can move the selected part of the image, although the Selection tool, not the Move tool, is still active. What you may not have realized is that this action makes your selection float -- that is, the image information in the selection has been separated from the background and "floats around" until you either anchor it to the background or to a layer of its own. To learn more about floating selections, read Floating Selections. |
|
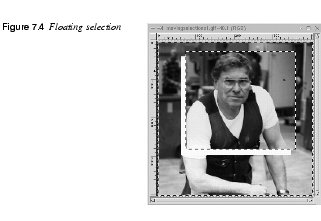
|
|
|
To leave the floating selection where it is, click on the image and it will merge with the rest of the image in the position you left it in. To place the floating selection in a layer of its own, open the |
|

|
Note: To move a selection without making it float, you have to select the Move tool and press the Alt key as you drag the (empty) selection to another position. If you try to use the Move tool on a non-floating selection without pressing the Alt key, you will just move the entire layer or background. Selections Within Floating Selections |

|
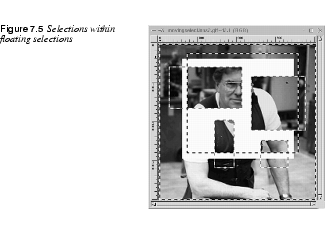
If you have already moved the floating selection once, you can't do it a second time without switching to the Move tool. If the Selection tool is still active, you'll just form a new selection inside the float. However, this isn't really a selection as you know it -- the dotted outline is gray instead of black, it doesn't blink and most importantly, the rest of the floating selection seems to have disappeared! |
|
|
|
The appearance of such a selection can be quite annoying if you created it by mistake (which is not uncommon). Don't panic -- just press Ctrl+Z (Undo) and you'll be back to where you started. Note that this doesn't happen when you move floats that are text selections or pasted objects, because then no Select tool is active. The Old Way Of Manipulating Floating SelectionsThis effect is a remnant from the time before Layers, when floating selections and channel operations were the only tools for working with composite image information. Making selections within the float was used as a quick, but rather ineffective, mask effect. Now that Gimp supports Layers, which is much more sophisticated, there is really no need for this kind of operation anymore. However, because this behavior has confused many users, we'll explain how it works: What happens is that the contents in the floating selection become invisible, so that you can see the background through it. It's only inside the boundaries of the gray-lined subselection(s) that you'll be able to see the original contents of the float. This part of the float is now the only area that can be affected by paint, filters or other operations. The rest of the float is masked, and will not be changed. You can make a new subselection at any time, in which case this selection will replace the old one, and the new selection area will show another part of the floating selection. This gray subselection won't turn into a normal selection until you save or delete the floating selection. To sum up, you have three options for floats: · As we mentioned earlier, you can save a float in a new layer by double-clicking on the thumbnail bar, or by pressing the New Layer button in the · You can delete it with the Delete Layer button, in which case the entire content of the float will be erased. · The third option is to click on the Anchor Layer button, which will merge the floating selection with the background (the same effect as clicking in the image). Anchoring will cause everything in the floating selection to be erased except the information inside the subselection. In all of these scenarios, the subselection will become a normal selection. GuidesTo place your selections exactly where you want them, use the horizontal and vertical guides. Guides are vertical or horizontal dotted lines that you can drag into the image canvas from the rulers. Because selections and layers will snap to guides, they are a great help when you want to align different image objects. The guides will not show up in your output image. They are only visible on the computer monitor and in Gimp's native file format (XCF). To switch the guides on and off, click the Toggle Guides radio button in the With a selection tool, drag the guide down from the top ruler or across from the left ruler. Use the Move tool to change the position of the guides (notice how the move symbol changes into a pointing hand when it touches a guide). Snap to guides is set by default in the View menu. If this option is checked, moving any kind of selection close to the guides causes it to "stick" or snap to it. |
|

|
You can also use the guides to specify exactly where you want your square or ellipse selection to start. If you use the Ctrl key and start dragging close enough to the point where the guides cross, that will be the center of the new selection. Without Ctrl, the selection will start from the cross and continue in the direction you drag. You can easily adapt the size, shape and position of a rectangular or elliptical selection to the guides by drawing it within the frame of two vertical and two horizontal guides (just using the guides as visual references). |
Rectangular And Elliptical Selection Tools
|
|
|
|
It's pretty obvious what these selections will look like. If you click the mouse and drag, you'll get normal rectangular or elliptical selections starting from the corner where you first pressed the mouse button. If you want to create circles or squares or make your selection spread from the center, you must use the Ctrl and Shift keys: · The Shift key constricts the selections to perfect squares and circles. The selection starts from the corner and continues in the drag direction. · The Ctrl key draws normal rectangle and ellipse selections, but with this key, selections will emanate radially from the point where you start dragging. This point is now the center of your selection. · Using both Shift and Ctrl results in circles or squares (as with Shift), but they grow from the center and out (as with Ctrl). |

|
Note: To make this work, first press the mouse button, then hold the key and drag. Now, if you want to use Shift and Ctrl for adding, subtracting or intersecting selections, and at the same time use Shift and Ctrl for the operations mentioned above, it gets a bit complicated -- but not impossible. First, you must decide what the selection will be used for: · If you want to make many selections, or add to an existing selection, use Shift. · If you want to subtract a selection from another selection, use Ctrl. · If you want to make an intersection of two selections use Shift and Ctrl. When you have decided, hold that key and then press the mouse button. Then, release the key but not the mouse button. Then, press Shift, Ctrl or Shift+Ctrl and drag. This time the key determines what shape or starting point you want for your selection (as delineated above). Table 7.1 on page 116 charts the different key stroke options. This procedure makes it easy to add a rectangle to a selection, or make subtractions with squares or circles. It is, however, rather tricky and if you want to do serious work using these commands, you need to plan ahead, and always use the guides and rulers to place new selections correctly. You can, of course, always use Channels to perform such operations. By making white circles in a channel and putting black ones on top of them, you'll subtract a circle without having to remember what key to use, except Shift for circle. Read more about making selections in "Channels And Duotones" starting on page 351.
SummaryTo create selections: 1. Press mouse 2. Press key and drag To add, subtract or intersect with other selections: 1. Press key 2. Press mouse and drag To create a selection of a certain shape or from a certain direction, and use that selection to add/subtract/intersect: 1. Press key 1 to determine effect 2. Press mouse 3. Release key 1, but not mouse 4. Press new key 2 to determine shape or direction, and drag |
Selection Options
|
|
|
If you double-click on a button in the toolbox, you'll see a little window showing you that tool's options. For example, if you double-click on the Select elliptical regions button in the toolbox, you'll see the Tool Options dialog shown in Figure 7.6 . Once you have accessed the Tool Options dialog, you don't have to repeat this procedure to view the tool options for another tool. The dialog will stay on screen, but it will change when you select another tool, displaying the options available for that tool. |
|

|
|
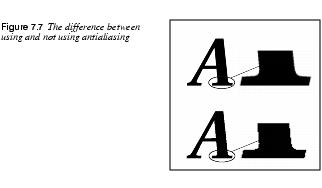
AntialiasingFor most select tools, you have the option of Antialiasing. Antialiasing is an effect used on curves and boundaries of high contrast areas, which makes the curve or boundary look softer and smoother. The most common use is the antialiasing of letters in bitmapped images, because it takes away the jaggies (the visible jagged and pixelly edges of the letter's curves in low resolution). It softly blends the edge pixels with the background, which will make curves look a lot better, but also a bit blurred. So you gain in smoothness, but lose in sharpness. |
|
|
|
FeatherFor the Rectangular select tool, the only option is Feather. Feather means that you can choose to make the peripheral parts of your selection transparent. It will be opaque in the middle, and get more and more transparent as you get closer to the edges. This is very useful if you want to make something look soft and blurry, like soft shadows or glowing edges, or if you'd like to use collage techniques with the Paste or Paste Into commands. |
|

|
|
|
An image you paste into a feathered selection will get soft and transparent at the edges and blend in nicely with your background. It is also usually a good idea to use a small amount of feather (a Feather Radius of around 5-10 pixels will do in most cases) if you want to select something that is to be copied, moved or cut and pasted, because the feathered edges will compensate for an imperfect selection edge and make it blend into the background. | |
The Free-Hand Selection Tool
|
|
|
|
The Free-hand selection tool, or lasso, lets you create a selection by drawing a free-hand form with it. You close a free selection by ending in the point you started from. If you draw an open shape, this selection tool will close it for you. |

|
Tip: Usually, you can't select a complex area with just one selection tool. Use more than one and add the selections together. The lasso is an excellent tool for fixing up selections. If you see that you've missed some pixels, it is easy to correct this with Shift+ or Ctrl+ lasso. As we explained earlier in Selection Control, Shift+ a selection tool will add to the selection, and Ctrl+ a selection tool will subtract from a selection. As I'm sure you have noticed, the mouse isn't a very sophisticated drawing instrument. The good news is that the Gimp now fully supports digitized tablets (like the Wacom ArtPad), and pressure-sensitive pencils. X programs have supported such devices as a substitute for a mouse for a long time. This means that you could use a Wacom device as a pointer or pencil, but the pressure-sensitive feature was not available. Gimp now has patches to make this work. Believe me -- working with lassos, pencils and brushes is dramatically different with an accurate tool. OptionsThe options for the Free-hand selection tool are the same as for the Ellipse selection tool: Antialiasing and Feather. Read about them in Selection Options. |
Fuzzy Select
|
|
|
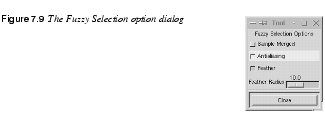
The Fuzzy Select tool looks like the Photoshop magic wand and works much the same way. Fuzzy Select selects adjacent pixels of similar color. It starts selecting when you click at a spot in the image. The wand will select the color on that spot, and continue outwards until it thinks the color gets too different. Fuzzy Select OptionsThe options dialog doesn't provide a control button for controlling the wand's sensitivity. To control the wand's sensitivity, after you position the cursor and press the mouse button, drag the cursor (without releasing the mouse button) from the upper-left corner, either to the right or straight down (it doesn't matter) to increase from a small, stingy selection to a very generous one. |
|
|
|
 |
Be careful where you start. If you select the wrong spot, you might get the inverted selection of what you wanted. In other words, selecting the wrong spot may make the wand select everything except your choice. (If you have a black, antialiased object on a white background, you can end up with a white to gray selection instead of a black to gray one if you are not careful.) The wand is the perfect tool to select sharp-edged objects in an image. The wand is easy and fun to use, so the beginner often starts out using the wand a lot. A more experienced user will find that tools like the Bezier tool, Color Select or Alpha Channels are often more efficient for selection, and use the wand less. Still, it's very useful for selecting an area within a contour, or for touching up imperfect selections. The wand is also very efficient for removing the remains of the background color from a cut and pasted selection. The Fuzzy Selection Options dialog includes a checkbox called Sample Merged. This option becomes relevant only when you have several layers in your image, and the active layer is either semi-transparent or is set to another Layer Mode than Normal. If this is the case, the colors present in the layer will be different from the colors in the composite image. If the Sample Merged option is unchecked, the wand will only react to the color in the active layer when it creates a selection. If it is checked it will react to the composite color of all visible layers. |
The Bezier Selection Tool
|
|
|
In our opinion, the Bezier selection tool is one of the
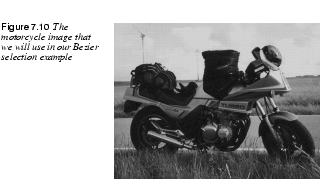
most useful tools. You'll find Bezier curves in all major drawing or imaging software packages. Use Beziers As A Simple Drawing ToolThe Bezier selection is the equivalent of "Pentool Paths" in Photoshop. Most drawing in programs like Corel, Illustrator, Freehand or even 3-D programs is done with Bezier curves. Because Gimp is based on bitmaps and not on vector graphics (like Corel or Illustrator), you can't draw with Bezier curves, but you can make advanced selections. |
|
|
|
|
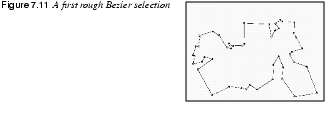
As far as drawing with Bezier tools goes, I don't count using Stroke ( Control PointsYou use the Bezier select tool by clicking out splines or anchor points in a rough approximation of the shape you want. You click, move the cursor and click again to make straight lines and click and drag to make curves. Don't bother to try to make curves at this stage though, unless you're an experienced user. Just click out a rough, angular shape and make sure you close it by placing the last point over the first and clicking. |
|
|
|

|
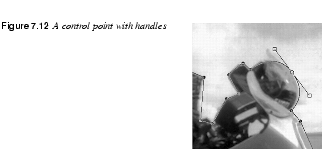
Tip: Be careful about where you place anchor points, because you can't remove or add anchor points with this tool. This reduces the control you have over your curves. You can't change anything, so watch out where you put your splines! Also, don't use too many splines. You only need one for each curve segment, so adding too many to the Bezier curve will just make it harder to create the final selection shape. Modifying Control PointsNow, you can start to make curves out of the straight lines. When you click on an anchor point, two little handles appear. If you pull the handles, they will change size and direction and shape a curve from the lines. |
|
|
|
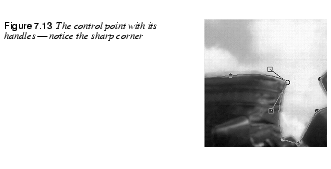
Long handles result in a flattened curve, and short ones in a steeper curve. Turn the handles in the angle and direction you want them by clicking and dragging with the mouse. Moving SplinesThe first thing you'll want to do is move the splines to their correct position. By pressing Ctrl, you can drag and drop an anchor point any way you like. The other important thing to do is determine what splines are to be soft, and which are to be sharp or angled. By default, the handles have equal length and create curves with round corners. When you need a sharp corner, press Shift. Then, each handle can be controlled separately, and you have total control over the shape of your curves. |
|
|
|
The Final TouchWhen you're happy with your curve, click inside the curve and it will turn into a selection. |
|

|
|
|
Remember to always preserve a complex selection like this in an alpha channel. You'll probably need it again. |
|

|
An alpha channel is a storage place for selections. Selection information is interpreted as transparent (unselected areas), semi-transparent (fuzzy selection edges) or opaque (selected areas). The OptionsThe options for the Bezier tool are Antialiasing and Feather. Read more about them in Selection Options. |
Intelligent Scissors
|
|
|
|
The Intelligent Scissors tool is a very interesting piece of equipment. It will guess the edges that you're trying to select. It's quite hard to fully control the Free-hand tool, unless you're extremely dexterous. This is where Intelligent Scissors comes in. This tool lets you draw the outline of an object, just like the Free-hand tool (you can be a bit sloppier), but when you have defined your selection, it will automatically seek out the edges of the object that you are trying to select. If it's not a perfect selection, you have the option to convert the Intelligent Scissors selection to a Bezier curve, and make the necessary adjustments. Sounds wonderful, doesn't it? Sorry to say, the current version of Intelligent Scissors (Gimp v. 1.0) is not in full working order, but let us show you how it's supposed to work when it's functional again. Open a Gimp image, make an IS selection around a clearly defined object in the image (like you would with the Free-hand tool). Hopefully, you'll now have a nearly perfect selection. If you want to adjust the IS selection, double-click on the IS tool. This will bring up the Intelligent Scissors Options dialog. Press Convert to Bezier Curve and make the final adjustments. Activation And ShortcutsYou may have noticed that there is no marching ants border in an IS selection. IS is just like Bezier select -- you have to click inside the shape to create a selection. After you have activated your selection, all the usual selection shortcuts (creating unions, subtractions, intersections, etc.) work as they do with an ordinary selection. OptionsThere are several options in the Intelligent Scissors option dialog: Edge-Detect Thresh. (for Threshold) and Elasticity are the most important ones. · Edge-Detect Thresh. controls how sensitive Intelligent Scissors is to the edges in your image. The higher the value, the more sensitive IS will be. · Elasticity controls how willing IS is to bend away from the curve you have drawn and snap to the edge. These two options more or less control the entire functionality of Intelligent Scissors. For selecting solid objects with well-defined edges, you can set both Elasticity and Edge-Detect Thresh. to a high value, because there is only one edge, and you want to make a quick and sloppy selection. The clear contours will enable IS to easily snap away from what you have "selected" to the edge of the square. On the other hand, if you're trying to select a certain edge in an image that is full of edges, you have to be more careful in your drawing, and also lower the Elasticity value so the section won't snap to another edge than the one you wanted. There are also a few other options. Curve resolution controls the roughness of the selection. If you have a lot of curves in your selection, a low curve resolution will make the curves rough or uneven. A higher curve resolution will make the curves much smoother. Antialiasing and Feather work like they do for all the other selection tools. Using Undo With Intelligent Scissors |

|
An Intelligent Scissors drawing doesn't turn into a selection until you click in it, and there are some advantages to this. You can Undo what you did before the IS operation without destroying your IS selection. After you have used IS to create a selection, but before enabling it, press Ctrl+Z to undo the previous action (but not your IS selection). When you're finished, click inside the IS selection (or convert to Bezier curves for further adjustment) to turn it into an active selection. This will, for example, enable you to run some of the |
| Frozenriver Digital Design http://www.frozenriver.nu Voice: +46 (0)31 474356 Fax: +46 (0)31 493833 support@frozenriver.com |
Publisher Coriolis http://www.coriolis.com |