![]()
![]()
|
Obtaining And Installing Gimp In this chapter, we will tell you how to obtain a copy of Gimp, and how to install it. |
How To Install Gimp Personal Files
|
|
|
Most Linux distributions include Gimp. But if Gimp isn't already installed, it can most likely be installed by your Linux distribution application's installation tool. However, if you are working on, for example, an SGI workstation, Gimp will probably not be installed. Please read Obtaining Gimp to get a full explanation on how to install Gimp both as a binary and as a source on your system. At the command prompt, type " |
|
|
|
|
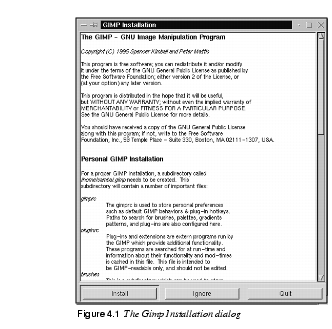
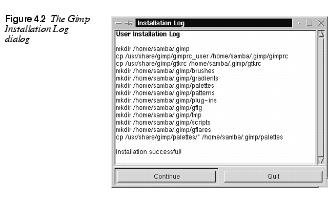
The dialog box also describes the Gimp license and what kinds of files Gimp will install. It's advisable to read it, but we will discuss these topics later in this chapter. If you want to run Gimp, press the After a short delay, you will see the Installation Log dialog box, informing you that all files were successfully installed. |
|
|
|
|
A nice feature of UNIX is that programs often store personal initialization files and modules in your home directory. Then, you can change and add features to an application without having to modify the application at a system level. Gimp is no exception. Unfortunately, most UNIX programs do not have a GUI for making adjustments to these files and modules. Here, thankfully, Gimp is an exception, because it includes a GUI for adjusting user-defined functions. However, there are some special functions (i.e., plug-ins) that you'll have to edit using a regular text editor. After the file installation, you'll see a splash screen, along with a progress bar. The progress bar shows Gimp loading all its extensions, data and certain plug-ins. Gimp In 256 Colors (Using An 8 Bit Display) |
|
|
|
Does your 8 bit X11 system cause Gimp to crash just after displaying the splash screen? If it does, you'll need to configure Gimp to use a private color map. Using a private color map, you'll see color flashing as you move from window to window, but at least all possible colors will be available to Gimp. To make Gimp use a private color map, you need to edit the
This command starts the vi editor (however, you're welcome to use whatever editor you prefer). Move to the line
This command will both save and exit the file. Gimp is now configured to work in an 8 bit display environment, and will not crash. We would like to point out that if your system can only display 256 colors, you will never be able to access the full power of Gimp. Gimp will simply not display the colors as they would appear with 16 bit (or higher) color resolution. We therefore strongly suggest that you upgrade your graphic device to at least 16 bit. Advice On System ResourcesSince we only use Intel and SPARC hardware platforms running Linux and Solaris, we can only give advice on these platforms and operating systems. Our advice is also subjective, because it is what we consider to be the minimum or the recommended hardware for running Gimp. On a Linux Intel platform: · Minimum: Pentium 75, 32 MB RAM · Recommended: Pentium 200, 64 MB RAM Solaris Sparc platform: · Minimum: SparcClassic, 32 MB RAM · Recommended: Sparcstation 5 110 MHz, 96 MB RAM Graphic device: · Minimum: Frame buffer capable of 16 bit color at 800x600 · Recommended: Frame buffer capable of 24 bit color at 1024x768 What Are All These Files Used For?Now, let's examine the files and directories that Gimp installed in your home directory. Gimp created the . · |

|
· · The · The · The · The · The · The · The · The · The The nice thing about all this is that if you find any new plug-ins, scripts and so on, you can easily install them in your personal Gimp directories, and don't have to beg your system administrator to install them for you. We encourage you to create your own brushes, palettes, gradients, plug-ins and Script-Fus, and to share them with the whole Gimp community. Don't be shy; even small contributions are welcome. You can upload them to |
Obtaining Gimp
|
|
|
Gimp version 1.0 was released as a source distribution, but for some popular systems there may be binary distributions. To get the source code, FTP to The directory If you are not familiar with FTP, you can use your Web browser to download Gimp, just type the URL Installing A Source Distribution |
|

|
If you downloaded a source distribution, you should now have a file called To unpack the archive, move to the directory containing the Gimp file you downloaded and type in the following command:
This command creates a subdirectory in your current directory called Which Libraries Does Gimp Need?If you don't have them already, you need to get the following libraries or programs: · GTK+ (1.0.x), to compile Gimp. You need this library because all of Gimp's GUI and functions are built on top of it. · GNU GhostScript, to enable PostScript file viewing and editing. Type · Aladdin GhostScript (version 5.50 or higher), to enable good PDF (also known as Acrobat) file viewing and editing. Type · GNU wget, for downloading files off the Internet directly into Gimp. To check whether you have wget, type · xv, if you want to use Guash. Guash is a Gimp plug-in with a GUI interface for browsing and opening images. Guash uses xv to create its thumbnail images. · gzip, to enable extra file compression/decompression of any image format. To check whether you have gzip, type · bzip, to enable extra file compression/decompression of any image format. To check whether you have bzip, type · SANE, if you want to scan images directly into Gimp. · libtiff, to enable reading and writing of TIFF images. · libz, to enable PNG compression. · libpng, to enable reading and writing of PNG images. · libjpeg, to enable reading and writing of JPEG images. · libmpeg, to enable reading of MPEG movies. To determine whether you have these libraries, look in Remember that even if you have the libraries you must also have the header files to compile Gimp. It's very common to divide, say, a libtiff package into a library package and a header package (development package). So please make sure that you have the header (development) package installed. Let's Begin To Build GimpFirst of all, fire up a new xterm window using your window manager or via the command:
In the new xterm window, move to the directory where you put the Gimp files. Then, type in the command:
This command will try to locate the files that Gimp needs in order to compile. Now, scroll up and find out if the configure program could find all of the files. If not, you will have to tell the configure program where to find the missing files. For example, if your system couldn't locate the (If you are a user and not a developer, you want to turn off debugging. Debugging is turned off by default). So, the command line might look something like this:
After the
make will build your Gimp application. (If you're having problems, you will find more information on compiling in Compiling Plug-ins.) If there were no errors, Gimp built successfully, and you can install it. To install Gimp, enter the command:
make install will, by default, install Gimp in You are allowed to install Gimp in directories other than the ones mentioned above. To do so, read the Once you're done, go back to the first section in this chapter and read about how to install your personal Gimp files. Installing A Binary DistributionFirst of all, get the latest binary distribution for your system -- download it from the Gimp FTP site or a mirror site. If you are working on a Red Hat Linux or Debian system, download the packages appropriate for your system (.
Make sure that Gimp is in your path and execute it (type in gimp and see if it works). Then, go back to the beginning of the chapter, to where personal Gimp files are discussed. If you have bought the printed version of this book, you will find an enclosed Gimp CD-ROM compiled for Linux and Solaris systems. Installing Extra Packages To Extend GimpTo install the extra data distribution you only have to download it. Unpack it, run the configure script and do a You may also consider downloading and installing the contrib archive, to install more brushes, gradients, etc. You only have to download it, unpack it and install the contents in the right directory. You can install new brushes either in your personal brush directory (
Most of the time this will install the data distributions correctly. It's a good idea to download the Extra Plug-ins |

|
Many of the plug-ins described in GUM are not found in the standard Gimp distribution. They are either in the We don't want to recommend that you download all of the extra plug-ins available for Gimp (they are quite numerous). If you don't, you will most probably lack some of the filters described in the manual, or have an older version of the plug-in. Most of the time you have to compile these plug-ins by hand; no binary distribution or configure scripts are available. But if you find an interesting plug-in in this book that you don't have, don't hesitate to download it and install it. On the other hand, when you installed Gimp, a second program called gimptool was also installed. Gimptool makes it easy for you to compile plug-ins for Gimp. Read more about gimptool in Compiling Plug-ins and The gimp-tool Man Page. So, if you don't have a plug-in (or a filter) that is described in the GUM and you would like to get it, you'll need to download and compile it. Note that many of the plug-ins are beta software and can be considered unstable, but most of them are (as usual in the UNIX world) of very high quality, and we have encountered very few problems (compared to the bugs in commercial alternatives). |
![]()
![]()
| Frozenriver Digital Design http://www.frozenriver.nu Voice: +46 (0)31 474356 Fax: +46 (0)31 493833 support@frozenriver.com |
Publisher Coriolis http://www.coriolis.com |