![]()
![]()
|
Brushes, Gradients, Palettes And Patterns How to use these basic tools, and how to create your own brushes, palettes, patterns and gradients. |
Brushes
|
|
|
The Brush Selection dialog is accessible from the toolbox ( The Brush Selection dialog displays all the available brushes. You may notice some unusual brushes, like artistic text, little flourishes or doodles, etc. Such brushes are not very difficult to make yourself. In this section, we'll discuss how to create a brush. First, however, we'll take a look at the Brush Selection dialog. The Brush Selection DialogWhen you select a brush, its name and size in pixels will be displayed at the top of the dialog. The Mode pull-down menu lets you select what kind of mode your brush will use (more information about modes is included in "Modes" starting on page 335). | |
 | Tip:
If you can't see the whole brush, click and hold on the brush square and the entire brush will appear (and disappear when you release the mouse). The Opacity slider sets the amount of transparency. With the max value of 100, your brush paints with a solid color. An Opacity of zero gives you total transparency (or invisible paint). Spacing is the distance between your brush marks. If you set the spacing to zero, the brushmarks will create a solid, brush-shaped line. |

|
|
|
Test one of the Circle brushes and set the spacing to 150. Your brush stroke will now consist of a dotted line. The larger spacing makes it clear that the brush shape is circular, but if you had used the default spacing, you wouldn't be able to see it. Now, try a decorative brush like the Guitar pattern. Change the spacing value to 10 or less (mouse-click the Spacing slidebar and use the arrow keys to set exact values) and see what happens. Normally, you'll want to use low spacing values, but when you paint with special brushes a bit of spacing can be useful. | |
 |
Creating A New Brush 1. Create a new image using Image Type: Grayscale and Fill Type: White. 2. Use the Pencil tool to draw an X inside the image frame. 3. Invert the image with 4. Rescale it to 20x20 using 5. Use 6. Move 7. Open the Brush Selection dialog ( |

|
Tip: To make good-looking brushes, make them large and then resize them to the size you want. Note that creating the brush in a solid black color (before inverting) makes your brush look hard. If you use a gray color, the brush will look softer. The same effect occurs when you create a brush with lots of blur; the new brush will have soft edges. Experiment with different kinds of brushes. Create them with or without blur, soft edges, etc. until you achieve the effects that you want. |
Patterns
|
|
|
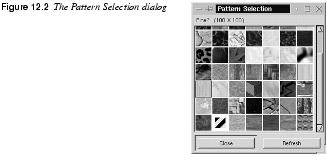
You can fill selections or backgrounds with a pattern instead of with a solid color. Gimp includes many preset custom patterns. You can also find patterns at many Gimp users' home pages. If you're interested in finding more patterns, look through http://www.gimp.org/patterns.html and/or search the web using your favorite search engine for terms like gimp and patterns. Click on |
|
|
|
|
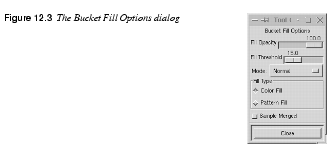
To use a selected pattern, double-click on the Fill tool icon to display the Bucket Fill Options dialog. Under Fill Type, select Pattern Fill. Now you can click on a selection to fill it with your selected pattern. You can also paint with patterns, using the Clone tool, but you can't use patterns with any other tools. |
|
|
|
 |
Making A New PatternTo make your own pattern: 1. Open a new RGB image and set an appropriate size for your pattern tile. You may want to make two versions of your pattern, one larger (say 256x256) for pattern filling in high resolution/large images, and a smaller version (such as 64x64) for filling smaller images (like GIFs for the web). 2. Create a pattern tile by painting something interesting, or by pasting part of a scanned photograph into your image. 3. Your tile will reproduce itself in a rather stiff perpendicular grid, so if you want a wallpaper effect with a simple repeated shape, it's a good idea to use the This is how you do it: · First, check out what your present pattern will look like by opening |
|
|
|
· Open the Layers & Channels dialog box and duplicate the pattern layer. · Open the Offset dialog box and offset the top layer by x/2 and the bottom layer by y/2. (This is not the same as offsetting the original image with the Offset by (x/2),(y/2) button!) Set the top layer in Multiply Mode (if the background color is other than white, the pattern element must be created in a transparent layer on top of the colored background layer), then flatten the image and take a look at your pattern once again with the Small Tiles preview. |
|

|
|
|
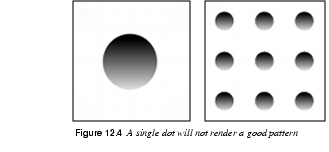
4. If you have created a more complex pattern or have used a photograph (for example, a wood structure), you will also need to use the Offset option to remove visible seams between tiles. This is described in more detail in Offset. The You can also take an existing pattern and change it. System patterns are in 5. When you're satisfied with the tile, resize the image to fit the tile size of the pattern you want to create. Use 6. Click on | |
Palettes
|
|
|
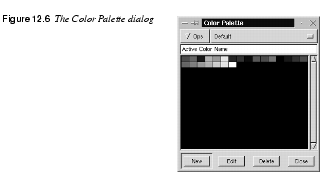
Use Palette OptionsSelect New Palette from the Ops pull-down menu to create a new palette, and name the new palette. The same pull-down menu allows you to refresh and delete palettes. When you create a new palette, you always start with an empty (black) palette. |
|
|
|
|
To add a color to the new palette, use the Color Picker tool to select a color from an image, or specify a color in the Color Selection dialog (open this dialog by double-clicking in the foreground color swatch in the toolbox). The chosen color is always visible as the foreground color in the toolbox. Press New to add this color to your palette. Edit a color in your palette by selecting it and pressing the Edit button, which will open the Color Selection dialog (see The Color Selection Dialog). You can delete a color by selecting it and pressing Delete. As soon as you edit a system palette (any palette other than your personal palettes), it will move to your personal palette directory. You can't delete a system palette; Gimp will simply acknowledge that you don't want to use it in this session. However, if you delete a personal palette, it is gone forever. Note that if you have added a large number of palettes to the palette directory, it will take some time before they are all displayed in the pull-down menu. | |
 |
Creating A Palette From An Indexed ImageYou can create a palette from an indexed image. This is quite handy if you only want to use the specific colors contained in the image. Here's how you do it: 1. Convert the image to Indexed mode with 2. In the Index dialog, select how many colors your palette should comprise and click 3. Save the palette with 4. Name the palette and press OK. Your palette now exists, but Gimp will need to re-read all the palettes. Use Hints |

|
Tip: Use palettes when you want to create images with a fixed number of colors, for example, when you are creating icons. If your screen depth is only 8 bit (256 colors), you'll need to be concerned about whether the created icons use up all 256 colors. If your icon manager reduces the number of colors it may look awful. You'll need to create a palette with a limited number of basic colors for your icons and then create the icons using those colors. The palette file format is similar to the format of the |
The Gradient Editor
|
|
|
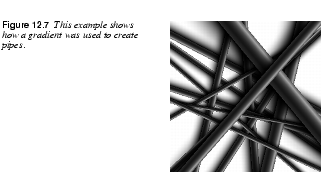
When we mention gradients, the Blend tool may come to mind. The Blend tool lets you "flood" a selection or image, starting with one color and smoothly changing into another. Gimp allows you to do even more complex blends with a tool called the Gradient Editor. The Gradient Editor comes with a number of preset custom gradients, but you can also create your own gradients or edit one of the custom gradients with this tool. The Gradient Editor is a flexible tool that can create very advanced gradients. To apply a gradient from the Gradient Editor you double-click on the Blend tool icon in the toolbox and select Custom (from editor) from the Blend pull-down menu in the Blend Tool Option dialog. The custom gradients from the Gradient Editor can be very useful. You can use them in advanced fountain fills or patterns, and you can also create objects with them, like an eyeball, a hole or a pipe. For tips on how to make the best use of the gradients in the Gradient Editor, read about the Blend tool, which is described in The Blend Tool Or Gradient Fill. |
|
|
|
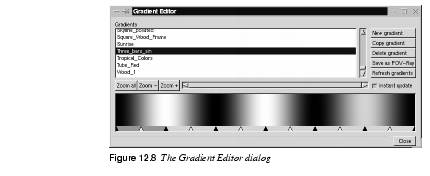
The Gradient Editor DialogClick on The buttons to the right let you create, copy, delete, save and refresh gradients. If you click the right mouse button in the gradient preview window and hold it down, a menu of editing tools will appear for that gradient. You can also zoom the gradient with the zoom buttons present in the main dialog. The Save as POV-Ray button allows you to save a gradient in POV format. POV-Ray is a popular ray tracing software program. If you have downloaded a gradient and placed it in Edited system gradients will be saved to your personal gradient directory ( If you delete a system gradient, it just means that you don't want to use it in this session. However, as is the case with personal palettes, if you delete a personal gradient it will be gone forever. |
|
|
|
. So, What Can You Do With The Gradient Editor?Start by copying a gradient and playing around with it. Select a gradient and click on the Copy gradient button. This will bring up the Copy Gradient dialog, which will ask you to name the new gradient. Name the copied gradient and click OK. If you edit a system gradient, it will now be copied to your personal gradient directory, as when you edit system brushes or palettes. |
|

|
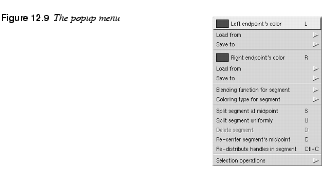
Note: There is no undo option in the Gradient Editor. The Gradient Preview WindowThe triangles at the bottom of the gradient preview window are color section markings. Two kinds of marks exist: black endpoints and white midpoints. The area between two black points is called a segment. In the gradient shown in Figure 12.8 a segment has been selected by clicking on it. A selected segment turns a darker shade of gray. Adjusting Endpoints And Midpoints· You can move an entire selection by clicking in the darker gray field and dragging, but you can only move it as far as the next midpoint to the left or right. · If you move a white midpoint (by clicking and dragging on it), you will see the color transition shift as the balance between the two end colors is being changed. · Dragging a black endpoint (not the ones to the extreme left or right, because you can't move them) will stretch the area between that endpoint and the midpoint, making it wider or narrower. The stretch limit is the next midpoint to the left or right. · If you click on an endpoint, then press Shift and drag, you will compress or expand the entire selection in the drag direction. This deformation will also include the neighboring midpoint, which will move along until you reach the next endpoint. · You can extend or add to a selection by pressing the Shift key and clicking on another segment. Any of the described manipulations can be used on extended selections (more than one segment). The Popup MenuAs mentioned before, if you press the right mouse button in the gradient preview window, a menu will appear for editing the colors in the selected segment. Editing An Endpoint's ColorYou can edit the color of the endpoints by selecting either Left endpoint's color or Right endpoint's color from the popup menu. This will bring up a color select dialog where you can select a new color. |
|
|
|
The Load from and Save to menu options allow you to load a color from an RGBA channel to an endpoint, or to save an existing endpoint color to one of the preset RGBA channel swatches, so that you can load that color later. The Load from command allows you to load some nice basic colors and transparent backgrounds. The Save to option is useful if you want to use a particular endpoint color in another part of the gradient. |
|

|
|
Blending FunctionsIn the Blending function for segment submenu, you will find some functions that control how the appearance of the gradient in your selection: · Linear: This is the default function, and it causes the color to change at a constant rate from one endpoint to another. · Curved: Causes the end sections' colors to change at a different "rate" than the colors in the middle section. Think of it as a semi-circle where the color changes more at the ends and less in the middle. · Sinusoidal: This is the opposite of Curved, so the rate of change is slow at the ends and fast in the middle. · Spherical increasing: Causes the color change rate to be faster on the left and slower on the right. · Spherical decreasing: The opposite of spherical increasing; the color change rate is slower on the left side and faster on the right side. ColoringThe coloring type for segment submenu lets you choose a color model for your selection or segment. You can choose Plain RGB and two kinds of HSV. See "Color Models" starting on page 187 for more information on the different color models. SegmentsThe Segment commands will work on the selected segment. If you have selected more than one segment, they will not be treated as a unit. Each segment will be treated separately: · Split segment at midpoint: Puts an endpoint at the midpoint and then divides the two new segments with new midpoints. · Split segment uniformly: Lets you specify how many splits you want to make in the selected area. · Delete segment: Deletes the entire selection, not just the segment you press the right mouse button in. · Re-center segment's midpoint: Re-centers the midpoints in all of the selected segments. · Re-distribute handles in segment: Evenly distributes all the points in the segment. This is useful if you have selected several segments and want a smooth gradient in the selection. Selection OperationsThe Selection operations submenu allows you to flip or replicate the segment and also allows you to blend the endpoints' colors and/or opacity: · Flip segment: Lets you flip or reverse a segment or selection. Flip can be used to change the order of two segments. First, select two segments and flip both together. Deselect one segment and flip the other one. Select the first segment and flip that one, too. Now you have changed the order of your segments. This can be done to more than two segments, and gives you the freedom to change the structure of the gradients. · Replicate: Provides a small dialog in which you can copy the selected segment(s) as many times as you like. The copies will be squeezed into the original segment's space. · Blend endpoints' colors: Only works if you have selected more than one segment. It will blend the color in the endpoints of the selection, and will subsequently "merge" your segments so they blend gradually from the selection's left handle to the right handle, thus changing the color of the endpoints inside the selection. · Blend endpoints' opacity: Works the same way as blending colors. This command will create a soft transition from the opacity (transparency) in the left endpoint to the opacity in the right endpoint of a multi-segment selection. | |
![]()
![]()
| Frozenriver Digital Design http://www.frozenriver.nu Voice: +46 (0)31 474356 Fax: +46 (0)31 493833 support@frozenriver.com |
Publisher Coriolis http://www.coriolis.com |