![]()
![]()
Scanning In Gimp
|
|
|
There are a number of scanner programs available for UNIX/Linux, see Scanning Using A UNIX Or Linux System. This chapter is only going to discuss Sane (Scanner Access Now Easy), which in our opinion is the only "sane" way to scan with Gimp. For a list of Sane-supported scanners and operating systems, take a look at the Sane scanner list on page 870. In this chapter, we will discuss how to install Sane for Linux and Solaris. We will also cover usage and configuration of the Umax Astra 1200S flatbed scanner and the HP Photosmart slide scanner (SCSI model). Note that this doesn't mean that we advise the reader to buy a specific brand or type of scanner. It will suffice to say that we are satisfied with the functionality that the reviewed scanners provide, and that they are adequate for our use here at Frozenriver. The HP Photosmart support in Sane is still rather undeveloped, and will therefore not be discussed here, although it will serve as an example for configuring Sane. | |
What Scanner To Buy
|
|
|
First of all, you can forget all cheap parallel port scanners, because they are not very well supported under Sane or Unix/Linux. Secondly, as far as Sane is concerned, you can also omit USB (Universal Serial Bus) scanners; they are even less supported than parallel port scanners. The USB interface may well be a good one, but Linux just got its USB stack as of Kernel 2.2.7. At the time of writing (July 99) Sane doesn't support USB scanners, and the Linux USB stack is, as we mentioned before, still very "young." However, the situation may change later on; both Sane and Linux may well have excellent support for USB scanners in the future. Other UNIX versions, such as Solaris, IRIX and AIX, don't support USB, because there are no USB ports available for their hardware (well, the BSD versions of UNIX have some USB support). Let's just overlook USB for the time being, because there is no current support in Sane for USB scanners (besides, SCSI scanners are much better). So to make it short, the only scanners that we can recommend for use with Gimp are scanners that use the SCSI interface to deliver data. How Do You Want To Use Your Scanner?First, ask yourself why you want a scanner. Is it intended for collecting graphics for web design, is it for easy desktop publishing, is it to digitalize drawings or documents, is it to put all your slides and negatives into the computer or is it just for you and your family's sheer enjoyment? Well, the purposes are many and the answers are just as many. Because this book concerns Gimp and how to use Sane in Gimp, we will only discuss a small fraction of the possible fields of application, and when we do, we will try to group them in categories where the demands on the scanner are identical. Not many years ago, scanning was something you did for a living. Scanners were expensive equipment, and only professional service bureaus could afford them. Scanning was also a complicated procedure, which meant that you had to be an expert to be able to operate a scanner. Today, the scanner (for most us) is a tool, much like a word processor or a screwdriver. We use the scanner when we need it, i.e., when we want a digital copy of an image, drawing or document. The different fields of application (which are relevant for use within Gimp) can be divided into the following categories: · Web images · School use, low-level desktop publishing, SOHO (Small Office, Home Office) scanning and printing · Semi-professional desktop publishing · Drawings and image composing · Professional desktop publishing · Scanning of slides and negatives The modest scanner requirements are at the beginning of the list, followed by the high demands required by advanced applications. Before we go into what scanner qualities are relevant for each group, we need to discuss and analyze what different scanner specifications really mean. | |
What All Those Specs Really Mean
|
|
|
When you buy a scanner today, most salespeople think of it as just another piece of hardware or computer accessory. Because scanners have become really cheap compared to a few years ago, the computer store will not make as much money from selling a scanner as it used to. This means that the salesmen aren't specialized in the scanners they sell, so you'll have to do all the research yourself. There are several ways to do the research (start by checking if the scanner is supported by Sane). Try the scanner manufacturer's web site, read computer magazines (a small suggestion is to only read magazines that focus on DTP or image manipulation), browse the web for reviews, and finally, my personal favorite: Search Usenet for comments about the scanner you're interested in. During your investigation you will most likely face several new terms in the scanner specification or review/tests. The most common ones are: · Bit depth (bpp): Stands for the maximum numbers of bits each RGB channel can have. For example, a 24 bit (8 bit grayscale) scanner can have 224 different colors and 28 shades of gray. A scanner with a high bbp can capture more information in dark and light areas of the image than a scanner with a lower bpp. | |

|
However, note that it's very common to cheat with this value, and there are very few scanners today that are 30 bit or higher in reality. · Optical resolution: Typically specified as 600x600 ppi (or dpi). This expression is often used for the optical sampling rate of the scanner in · Hardware resolution: Typically specified as 2,800x2,800 dpi (for a flatbed scanner). This value is normally the maximum hardware interpolation that the scanner can deliver. As you may realize, this figure is of little interest because it doesn't tell us how good the scanner is at resolving details. · Maximum resolution: Typically specified as 9,600 dpi. In nearly all cases, this term refers to the maximum interpolation that the bundled scanner software is capable of producing. This is a figure of no interest at all. You can make a better job in Gimp and it's only limited by diskspace storage. Furthermore, every interpolation exceeding 3 times the image size is very questionable and something that we don't recommend. Bit DepthLet us consider this example; we have a 24 bit scanner (8 bit grayscale) and a 30 bit scanner (10 bit grayscale). In the 24 bit scanner the signal-noise ratio is 1:X. Noise is false or incorrect scanning information, and signal noise ratio is the ratio between the signal and how much noise the signal carries. If the advertised 30 bit scanner is indeed a 30 bit scanner, then the signal-noise ratio must be decreased to a fourth of the noise factor X in the 24 bit scanner. The scanner manufacturer can achieve that end in several ways: The light source intensity can be increased, a more sensitive CCD (the device that captures the image) can be used or a longer exposure time could be implemented (i.e., make the scanner move slower in order to capture more "light"). The first two alternatives are expensive and the third is no good because it will slow down the scanning and the CCD will get too much light. The best thing is probably to integrate a more sensitive CCD and a better lamp, but as we mentioned, it costs. The signal in a scanner is analog and it's converted to a digital signal by an AD (analog-to-digital) converter. In an 8 bit (24 bit color) scanner this is done with an 8 bit AD converter and in a 10 bit (30 bit color) scanner this is done with a 10 bit AD converter. Since bpp is a sales argument these days, the simplest way for the manufacturer to improve a system is to just buy a new 10 bit AD converter and not bother to adjust the rest of the system (this is naturally the worst-case scenario), and all you'll get for your money is 2 bit of extra noise instead of 2 bit of extra details. This is not necessarily true for all 30 bit scanners, but it's a reminder that you can't take bpp figures for granted. Optical ResolutionYou can apply the same conclusions for optical resolution as for bit depth when you want to increase the optical resolution from, for example, 300x300 to 600x600, because the light gathered by a pixel in a 600 ppi scanner is 1/4 of the light in a 300 ppi scanner. Again, the light source and the CCD device are the bottlenecks that must be replaced in order to achieve a higher resolution. The manufacturer must include a new CCD to increase the optical sampling rate, but he may choose to get a CCD of lower quality. Why Are Some Scanners Cheaper Than Others?Given these facts we can easily understand why two different 600x600 optical resolution scanners can have very different price tags. The more expensive ones (besides the added cost of a well-known brand) are most likely to have much better CCD, lamp, optical lenses and mechanics, and they will also most likely be provided with better electronic contrivances inside. The truth is that most cheap scanners with excellent specifications will not match your expectations. A good 300 ppi scanner may well do a much better job of computing details than a 600 ppi scanner with a lower price tag. Different Types Of ScannersSo far we have only discussed scanners in general, as if all scanners were flatbed scanners. There are naturally other types of scanners: · Handheld scanners: This is the sort of scanner that you drag by hand over a page in order to capture the image. Handheld scanners were quite popular several years ago, when flatbed scanners were expensive. This type of scanner will not even be able to stand up to very modest demands, such as scanning images for the web. However, if you are into mobile computers, then this type of device can be of interest, because you can take it with you and make fast, sketch-quality scans of documents or a page in a book. · Sheetfed scanners: These are scanners of fax-type; you feed your image or paper into a slot. This is the most common type of scanner for fax machines (yes, a fax is in fact a scanner). This type of scanner can be used to scan simple text documents, but it is obviously not suitable for acquiring images for Gimp. · Flatbed scanners: These are the most versatile of the scanner types described here. They resemble a copy machine, since they also have a platen (the optical document glass) where you place your original. It is probably this type of scanner you will need for scanning images and drawings for Gimp. The only disadvantage is the size; a flatbed scanner is big and cumbersome compared to the other scanner types. · Slide and Film scanners: These are specialized for scanning 35mm negatives or positive film strips. The usage is limited to this type of original, but it's a very useful device if you're a photographer. The quality of the scan is also much better than the quality that you can get from scanning a paper copy in a flatbed scanner. We will discuss this type of scanner a bit later in the chapter, because some rules don't apply to this type of scanner. This is the scanner to get if you both like to take photos and work with Gimp. · Drum scanners: These are expensive scanners for professional work, and the price is beyond most people's reach. A drum scanner will produce top-quality, high-resolution images. If you need that type of quality, you can always buy it from a service bureau. If you are working with desktop publishing, you can work with low-resolution scans until the last stage when you order the high-quality drum scans from a service bureau. The conclusion is that the best choice of scanner, for an image manipulation program like Gimp, is a flatbed scanner. Optionally, you can get a slide scanner if you like to be able to scan slides or negatives. What Scanner Quality Do You Need?The recommendations in this section aren't absolute, we are just trying to make your scanner choice a little bit easier by providing some general information. Note that Gimp doesn't support higher bit depth than 8 bit grayscale and 24 bit color even if Sane supports higher bit depths. Assuming that the ppi and bpp specifications are correct (which they often aren't), we can give you the following advice: 300 ppi Scanner· Scanning of photographs 1:1 scale and 2 to 4 times real enlargement · Scanning of logos, low-end drawings and artwork · Scanning for usage in web pages · Scanning for faxing, OCR, document storage and to use as a copy machine for your printer 600 ppi Scanner· Scanning of photographs for real enlargement beyond 4 times · Scanning of drawings for high-quality reproduction or enlargement · Scanning of large transparencies such as 2x2 and 4x5; note that you'll need a transparency-enabled scanner 1,200 ppi (Or More) Scanner· Scanning of 35mm slides or negatives 24 bpp Scanner· Scanning of photographs · Scanning of drawings and artwork · Scanning for web publishing 30 bpp Scanner· Scanning of bad photographs; e.g., under- or overexposed photos · Scanning of slides and negatives 36 bpp Scanner· If you are a professional, you might use a 36 bpp scanner for scanning large slides PricesThe prices of scanners are falling constantly, so keep in mind that these guidelines may not be accurate if you read this passage after 1999, when this edition was published. · Flatbed scanner for non-professional work: You can find a good letter scanner for less than $500. If the retail price falls below $175, the scanner's quality is questionable. · Professional flatbed scanners: You will get a really good letter scanner for around $700 and up. Prices may be dropping, but what won't change as fast is the fact that really cheap scanners are often not much more than cheap junk. Cheap scanners are also often parallel port scanners, which aren't supported very well under Linux/UNIX. SCSI CardsKeep in mind that the SCSI card that comes with the scanner is often useless in a Linux/UNIX environment, because there are no drivers for it. You can get a nice cheap SCSI card that is supported by Linux for around $50 to $100. On UNIX workstations, SCSI is more or less standard; all Sun workstations (except Ultra 5 and 10) come with a SCSI interface. Remember to assign a high SCSI-id to your scanner (since it doesn't need a low SCSI-id, which has a faster response time). Some scanner SCSI interfaces are also of SCSI one standard, and should be placed at the end of the SCSI chain. Summary· For the average user, a 600 ppi, 24 or 30 bpp scanner will suffice for almost any job. · It's often better to buy a more-expensive, but lower-specified scanner than a cheap one with higher figures, because those figures are likely to be bogus. · Don't buy an ultra cheap scanner, you will soon come to regret it. · Buy a flatbed scanner if you aren't into photography, in which case a dedicated slide scanner is a good option. · Even if you are a professional graphic artist, you may not need a very expensive professional scanner. If you are working with web publishing, you definitely won't need it. If you plan to use the scanned images as a component or base for further image manipulating, then you might be satisfied with the result of a good scanner and not need to invest in an advanced professional scanner. · If you don't use Windows or a Mac, you don't need to pay attention to bundled software, and the quality of that software. However, if you do use Windows or a Mac, then the scanner software is of high importance. |
Installing Sane
|
|
|
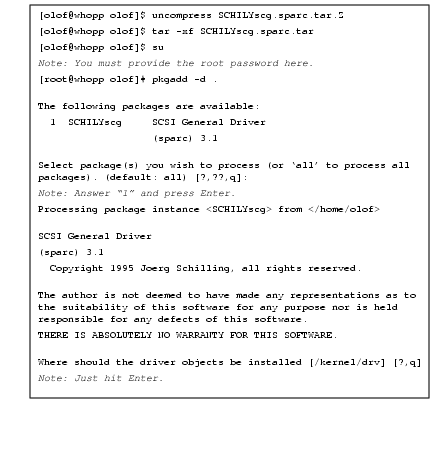
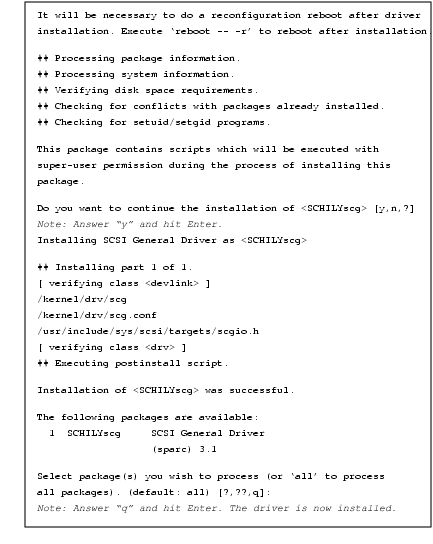
Compiling and installing Sane isn't difficult. The part that can be a bit more troublesome is the configuration, especially the configuration that enables network scanning. One of the smartest things about Sane is the network interface, which allows several graphic workstations to share a common scanner, which is attached to one of them. This is very practical; having a dedicated workstation just for scanning can be very distressing in a busy office. SCSI ModulesThe fist task you must take on is to install a generic SCSI module driver under Solaris or to load a generic SCSI module under Linux (alternatively recompiling your kernel to support generic SCSI access). Without a generic SCSI interface (which is provided by the generic SCSI module), Sane will not be able to send SCSI commands to the scanner, and you will not be able to scan. Solaris 2.xThere are at least two generic SCSI drivers for Solaris. One that is free, made by Joerg Schilling, and one that you have to pay for, made by Kevin Sheehan. The commercial SCSI driver is more secure, but with some configuration, we can work around that problem in the free version. In this chapter, we will describe how to install the free SCSI driver. First of all, download the SCSI driver; see Sane for a download location. Note that if you have a Solaris 7 system, you have to follow Joerg Schilling's instructions. We will provide you with information for Solaris 2.4 to 2.6. If you have a Sparc system; download Here is a guideline to help you install the driver. |
|
|
|
|
|
|
|
|
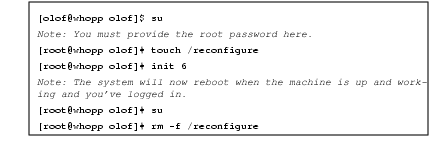
If you work with an X86 system, just substitute All you have to do now is reboot to reconfigure your driver settings, and to rebuild |
|
|
|
|
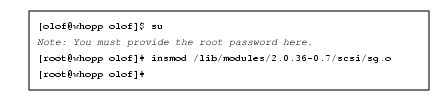
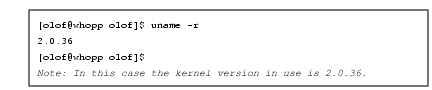
The driver is now ready to use; we will configure the driver interface later: See Setting Device Permissions. But for now, this is all we have to do. LinuxThere are two options in Linux: either you load a generic SCSI module (recommended) or you recompile your kernel with generic SCSI support. Recompiling your kernel is beyond the scope of this book. We will describe how to load the generic SCSI module. You must also have a Linux-supported SCSI card, and please remember that most SCSI cards that come with the scanner aren't supported by Linux. We will not describe how to enable your SCSI card; you have to check in your Linux distribution manual or in the Linux SCSI How-to. See Sane. Here is how to load the SCSI module: |
|
|
|
|
The example above is from Red Hat Linux 5.2, so it may be different if you have another distribution. The key value is |
|
|
|
|
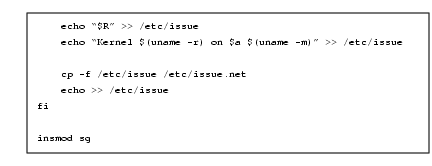
When you have loaded the module without any problems, it may be wise to put it in a start up file, like Here is an example from a RedHat Linux 5.2 |
|
|
|
|
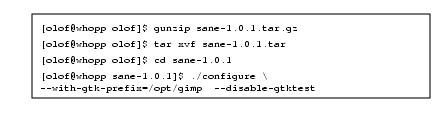
Note that this is not the preferred way to load a generic SCSI module. Modern Linux kernels can use a load-on-demand schedule in which the module is loaded only when it's needed, i.e., when you want to scan. Consult your Linux distribution manual for instructions on how to enable this feature. Otherwise, just use kedit or gedit to edit the file (you must be the root user to edit the rc.local file). Configuring For CompilingIt's quite easy to configure and build Sane -- just remember that you will need the development header files when you compile, not just the needed libraries. Take a look at "Compiling Plug-ins" starting on page 769 for general tips if you have problems compiling or configuring Sane. · First of all, you must download Sane, see Sane for where to get your copy of Sane. · Configuring Sane to make it ready for compilation is easy. All you have to do is to run · To find out if Gtk and Gimp are installed under · However, if you have installed Gtk and Gimp somewhere else, such as
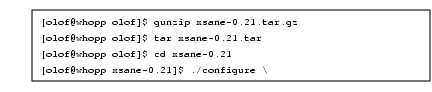
and configure will display all of its options. Here is an example of how to extract and configure Sane: |
|
|
|
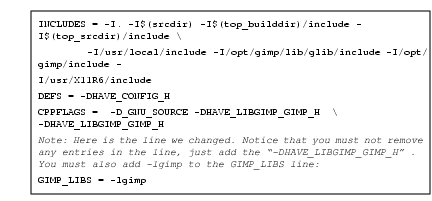
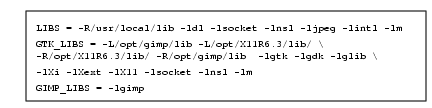
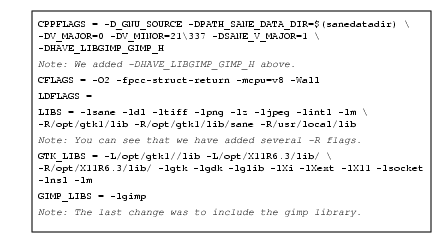
If Gimp Is Not Installed In A Standard DirectoryIf you have Gimp in a standard location, i.e., If you have Gimp installed somewhere else, such as However, if both Gimp and Gtk are installed under the same location, this is very easy to fix. Just edit the Makefile in the frontend directory in Sane with gedit (or kedit). You'll find You have to add Here is an example of how it looked after adding these command lines: |
|
|
|
Preparing For SecurityWell, we don't want to jump ahead, but there are some adjustments you can do now that will enable you to raise the security level later on. You may have dependent libraries in non-standard locations, for example, Gimp and Gtk could be installed under After having raised the security by enabling sgid (set group id on execution) on the scanner program, the scanning program (e.g., xscanimage) will not find all of the libraries that it needs, because they are located outside the standard library directories. Why? Well, when you read Setting Device Permissions you will understand what we are doing here. · On Solaris, outside standard libraries means outside / · Under Linux, you have to check the The solution is to add the command In the following example we will include:
in the |
|
|
|
|
It's very easy to find out if any libraries are missing. Just enter All you have to do now is include the directory where the library is with a Run CompilingYou must have make, gcc or cc (the compiler), ld, etc., in your path. Under Solaris those tools are in the gcc must also be in your path, and you have to find out under which directory it is installed (this depends on which precompiled version of gcc you downloaded). When you know the gcc directory (in this example, gcc was installed under
In Linux, this is no problem as long as you have installed the necessary programs; they will be in your path automatically. If you have problems later on, when running Sane, you can add the following flags when you run configure:
Normally, you don't need to do that under Linux or Solaris. You are now ready to build and install Sane. The configuration above will install Sane under
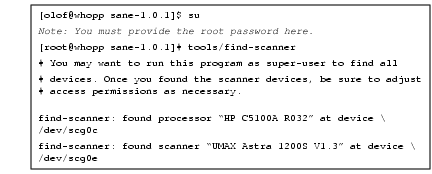
Lets build and install Sane Sane will now hopefully be installed under Runtime ConfigureBefore you can use Sane to scan on your local workstation (we will discuss network scanning under Network Access), you will need to configure Sane. Sane's configure files are located under To help you find out which device your scanner is attached to, and what type of scanner you have, the Sane team has created a program called find-scanner. This program is located in the tools directory in the Sane distribution directory (in the tools directory in the main directory where you compiled Sane). Here is how it can look under Solaris |
|
|
|
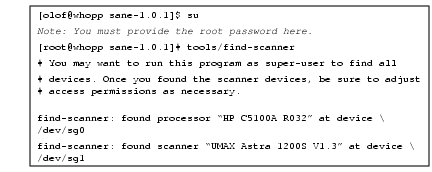
: And here is how it can look under Linux: |
|
|
|
|
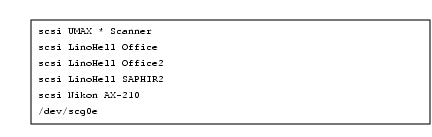
This tells us that we have an HP scanner under Here is an example of a bit of the file: |
|
|
|
|
Now, run |
|
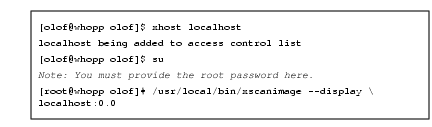
|
|
|
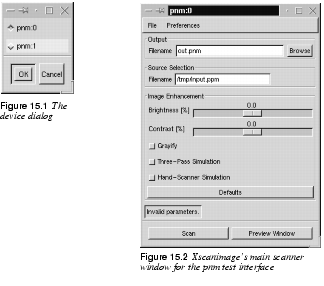
If Sane works (the dynamic loading of modules), a dialog will appear where you can set which pnm device to use. Click OK and continue. You will now access xscanimage's main scanner window. |
|
|
|
|
If these dialogs appear, Sane is probably working just fine. Now, edit the Now, it's time to use the device information extracted from In our case, we have to edit Here is an example from our The last line tells the scanner that your scanner is attached to Still as root, run |
|
|
|
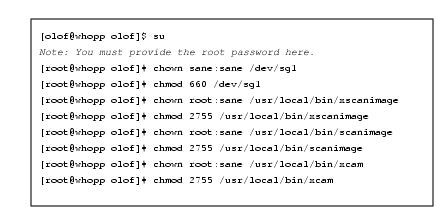
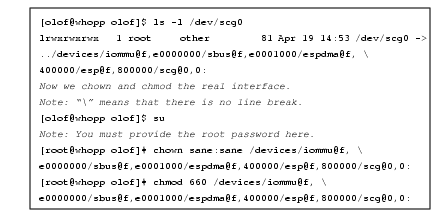
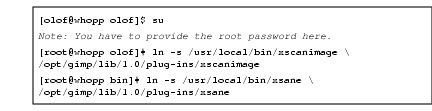
Setting Device PermissionsThe problem that we have to face now is that no ordinary user can scan, because Here is how to do it in a shell:
Note: You have to type the root password here. The problem is that if you do the same on the Solaris interface, everyone will have the right to write and read to every device on that SCSI interface. This means that if you have SCSI disks on the same interface, someone (or you by mistake) can send an "erase everything" command to one of your disks. As you probably understand, this is not a good solution for solving this problem. The answer is to create a special user and group that have read and write access to the device, e.g., This is also the safe way to do it under Linux. Also, you will need the user and group to enable network scanning later on. Adding a user is beyond the scope of this book, because there are a lot of ways to manage users. Please consult your operating system's manual. A good hint is to read the Under Linux, enter: |
|
|
|
|
Doing the same thing under Solaris will include finding out the real device name of This example will show you how to find out the real device name. Notice that we do it on |
|
|
|
|
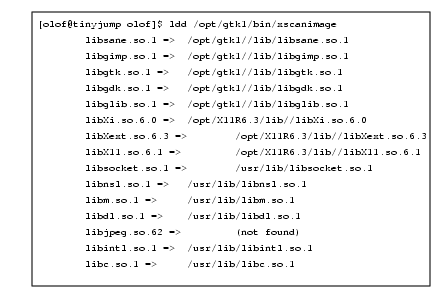
The rest is like the Linux example. You can now try to run the xscanimage program as an ordinary user. If you added the right directories with the |
|
|
|
|
|
This means that when you compiled xscanimage, you forgot to add all directories (with the |
|
|
|
|
As you see, only the jpeg library wasn't found, but naturally, many more libraries could have been missing. You'll never know, until you run Now, you must find out where the missing library is installed on your system. When you have that information, you can rebuild the scanner program: When you have edited the |
|
|
|
|
After that, you have to run |
|
|
|
|
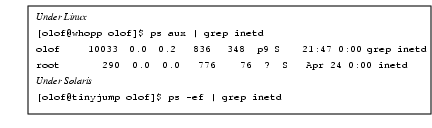
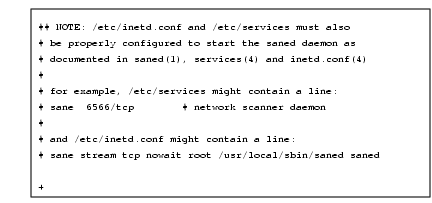
Sane should work now. If it fails anyway, you'll have to check everything again and make sure that you didn't make any mistakes. Network AccessOne of the most amazing capacities of Sane is that you can scan over the network. In fact, every Sane-controlled scanner can be a network scanner. To make this work, you have to configure both the clients (the workstations that will use the network scanner) and the Sane server (i.e., the scanner server). This involves: · Setting up network access rules for Sane · Configuring server start-up through the inetd super server · Configuring your scanner clients to request scanning from the right hosts Inetd -- The Super ServerThe easiest way to create a Sane network server is to use inetd. Inetd is the server that provides you with Telnet (or rlogin). Every time you make a Telnet (or rlogin) to a host, the inetd server on that host starts the Telnet (or rlogin) server on the same host to answer your Telnet (or rlogin) demand. To enable the saned scanner server to start (on client request), you have to edit the You also have to edit the There are inetd servers with tcp wrappers (standard on most Linux distributions) and without tcp wrappers. (Tcp wrappers are used as a way of controlling the access rights of all your inetd controlled servers). The configuration entry in the This is how it will look in and this is how it looks when you have tcp wrappers Just add the appropriate line at the end of your Note that Solaris only accepts user, not group in the The /etc/services FileThe next step is to add a line in |
|
|
|
|
|
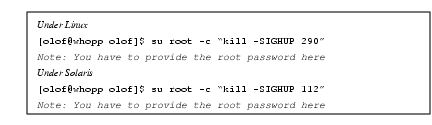
All you have to do now is restart the inetd server. This is done by sending a |
|
|
|
|
Notice that it is the |
|
|
|
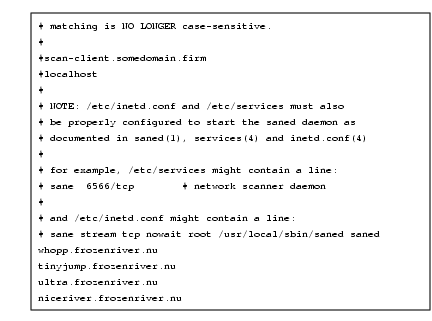
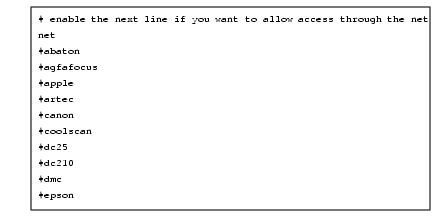
Access ControlThere are now three ways of allowing hosts to access the saned server. · · · / You can use any of these methods, but Here is an example of how it may look (host names are naturally site dependent): |
|
|
|
|
Here, we have enabled If you have tcp wrappers installed, we recommend that you use them. The configuration of tcp wrappers is beyond the scope of this book, but you can read about it in the man pages; enter Here is an example of what the file will look like: |
|
|
|
|
The Its purpose is to make it easy to log in to different UNIX workstations within a UNIX domain. The function makes sense if you are in a well-secured UNIX-only network. Suppose that a user name is present on a remote UNIX computer (host, client) UNIX-like computer and on your workstation (server). If the remote login host is specified in the We assume that you will now have selected a safe way to enable secure scanner access to your workstation. Network Client ConfigurationStart by installing Sane on the network client, as we did in Configuring For Compiling. You also have to edit the Now, you have to edit the |
|
|
|
|
The next file you have to edit is the This is an example of a client |
|

|
|
|
If you use a long hostname, you have to exchange You are now ready to test the network scanning with the This is how it looks on our site: |
|

|
|
|
If you get a similar list that shows the scanner(s) available on the Sane scanner server, you will know that network scanning is working. Installing XsaneWell, we could start using Sane right away. The default GUI to Sane which is called xscanimage, is nice, but there is a program that is even better -- namely Xsane. Xsane has several advantages over xscanimage. It's easier to use and you can, for example, save gamma correction settings. Another nice thing with Xsane is that it allows you to use your scanner as a copy machine. Xscanimage is not as sophisticated; it's a bit more powerful, but also harder to use. Therefore, we will go ahead and show you how to configure and compile Xsane. Start by downloading Xsane; see Sane for where to get your copy. Configuring And CompilingXsane follows the same path as Sane when it comes to configuring and compiling. If you run into difficulties, please take a look at "Compiling Plug-ins" starting on page 769. Configuring Xsane to make it ready for compilation is easy. All you have to do is run You don't need to tell Xsane's configure program anything; it will find Gimp and Gtk anyway. But if you have installed Gtk and Gimp under another directory, such as This example shows how to extract and configure Xsane: |
|
|
|
|
If you have installed Gimp in a non-standard directory (i.e., not Xsane is dependent on a few Sane libraries found under Here is how the |
|
|
|
|
You can now build Xsane in the xsane distribution's top directory, and this is how it looks: |
|

|
|
|
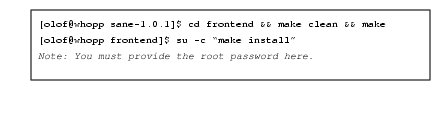
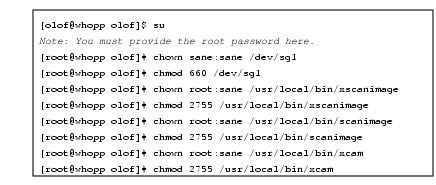
If you experience any problems, please read Configuring For Compiling, because the way of configuring and compiling described there is very similar. Installing On A Server And A Network ClientThe last thing you need to do before using Xsane is to sgid the xsane program file. Here is how you do it (it is just like what we did for Sane's program files): |
|

|
|
|
You can now try to run Xsane as an ordinary user. If you want to use Xsane on scanner network clients, you will have to install Xsane there as well. It's no different from installing it on the Sane server, which we just did. | |
Using Sane In Gimp
|
|
|
You can, of course, use Sane (or more precisely, xscanimage and Xsane) as a stand-alone program, but using Sane with Gimp is so much better. Together with Gimp, xscanimage and Xsane will be much more powerful, because all of Gimp's image manipulation functions will be available. (The only exception is if you want to scan with a higher bit depth than 24 bit color or 8 bit grayscale. The xcam program, which also comes with Sane, is for use with equipment like Connectix QuickCam, according to the Sane web site. We will not go into the usage of xcam in this book. Scanimage is a CLI program, and we have used it to list available devices. Its field of application is, however, much wider. It can, for example, be used in shell scripts to achieve all sorts of things. Since it can't be used with Gimp, we will not discuss it further. There is, however, a very good man page in the Sane distribution. If you have the Sane man pages in your Installing The Plug-inTo use Xsane and xscanimage as Gimp plug-ins, you must install them as such. The easiest way (and the right way to do it) is to make a symbolic link from |
|
|
|
Running Gimp With SaneYou will now be able to access Sane from Gimp. You only have to start (or restart) Gimp, and Xsane and xscanimage will act as plug-ins, letting us scan directly into Gimp where we can continue to edit the image. Xsane can be accessed from Notice that if you change the scanner configuration, you must remove the We have chosen to use Xsane and not xscanimage in the following examples, because Xsane introduces some very useful basic scanner manipulations. The principal advantage of xscanimage is that you can set the gamma correction curves manually, just like in the curve dialog under Gimp. This feature enables you to adjust the gamma curve in all directions, instead of specifying a fixed gamma value with a slider or in an input field. | |
Scanning With A Flatbed Scanner
|
|
|
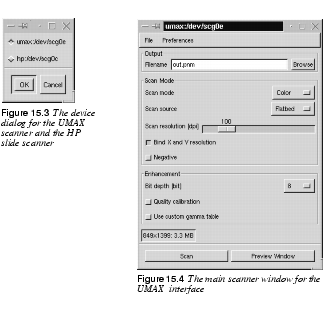
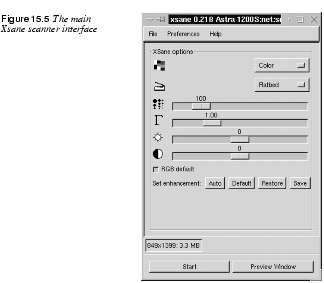
We will describe how to scan with a UMAX Astra 1200S flatbed scanner. However, the chief functions in the scanner interface will be similar to what you'll find in many other flatbed scanners. Sane has adopted the standard approach to providing generic scanner functions, such as gamma correction, levels, ppi, bit depth, preview, etc. The ppi (resolution) and bpp (bit-depth) specifications are, of course, scanner-dependent, but all flatbed scanners operate in a similar fashion. Essentially, things that differ among scanners are the special functions, such as the Photosmart scanner's ability to eject the filmstrip. The Scanner Interface (UMAX)Start up the Gimp UMAX Xsane interface; in our case, You will now be presented with the main Xsane scanner interface. We will make a quick description of what all the controls and menus are about, starting from the top in the main dialog. · The Checkerboard symbol menu determines the scan mode: Color, Grayscale or Lineart (Black&White). The number of possible choices in this menu depend on the capacity of your scanner. · The Scanner symbol menu lets you specify the scan source; for example, if your scanner has a sheet feeder (don't touch this control menu if your scanner doesn't have any such options). · The Halftone dots symbol slider controls the optical resolution in ppi (dpi). · The · The Sun control slider controls the scanning brightness. · The Half-moon control slider controls the scanning contrast. |
|
|
|
|
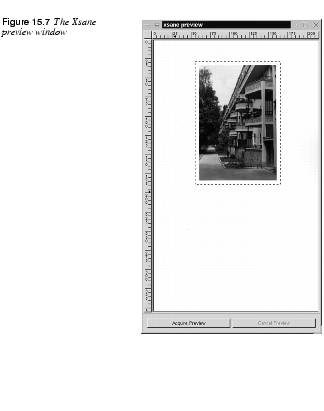
Below the sliders, you will find some buttons for scan enhancement: Auto, Default, Restore and Save. If you uncheck the RGB default checkbutton, you can set the gamma, brightness and contrast for each RGB channel separately. The interface will then look like Figure 15.6 In the top menu bar, you'll find three menus called File, Preferences and Help. Under File, you'll find info about the Xsane creator and general info about the device you are using. In the Preferences menu, you'll find entries for Setup, Advanced and Standard options. You can also view a scanning histogram and save device settings. We will talk more about these settings a bit later, but let us concentrate on basic "Sane'ing" for a while. The Preview WindowWe're sure you know what a preview is meant for. To open the preview window, press the preview button. (If you checked Save preview in the Preferences, then you will see the last preview when you open the preview window.) When you first open the preview window there will be nothing but a white board. Place a photo on the document glass and press Acquire Preview. Sane will now make a rapid low-resolution scan of the photo. While the preview scan occurs, all options in Xsane will be grayed out, and the only thing you can do is press Cancel Preview. We don't recommend canceling the preview or any other scan for that matter (it's a bit buggy). Just let Sane finish the scan job; you can always dump the image later on. One of the advantages of Xsane over xscanimage is that you can preview how your adjustments in the main window will affect the final scan. To limit the scanning area, click and drag the mouse in the preview window to create a selection. You will now see a dotted selection outline, and Sane will only scan the contents within that rectangle. When you are satisfied with your selection (a rough selection will do, because it's much easier to crop the image in Gimp), press the Scan button in the main dialog. Sane will now scan the image and display it in Gimp. |
|
|
|
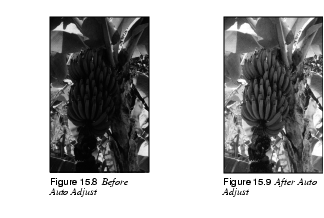
OptionsThe Preference menu offers both Standard options and Advanced options as well as a Histogram option. Most options are quite scanner-specific, but we will mention some of them. · Use Custom Gamma Table: If your scanner supports hardware gamma correction you can enable it with this button. Furthermore, if your scanner supports more than 8 bit color, then the custom gamma table will make the gamma correction with that number of bits. The conclusion is that if your scanner supports more than 8 bpp and/or has hardware gamma correction, then it's a good idea to use it. It's also worth mentioning that xscanimage has more features dealing with gamma curves. The gamma curves in xscanimage are built up in the same way as Gimp's Curves command ( · Bit depth 8 or 10 bpp: If you are using Xsane or xscanimage within Gimp, you can only use 8 bpp because Gimp only supports 8 bpp. If you scan with 10 bpp you will only get errors. · Histogram: This works like Levels in Gimp ( Scanner ModesMost flatbed scanners support lineart, grayscale and color scanner modes. LineartThe result of scanning in lineart mode is often unpredictable, so to retain a high level of detail, we suggest that you scan in grayscale mode, and then manipulate the grayscale image by indexing to black and white. Alternatively, use GrayscaleGrayscale scan mode is, of course, useful if you want to scan grayscale (B&W) photos. Scan a grayscale image in color, and you have to worry about the scanner's color balance. If you want to colorize the image later, it's better to convert from grayscale to RGB mode in Gimp. Scanning a color image in grayscale mode is not unusual. If your color image is destined to be printed in black-and-white, you might think that it is pointless to scan in color mode, but that's not always true. It depends on how good your scanner is. For example, a yellow color is perceived by the human eye as being lighter than a blue color with the same intensity (value). Gimp makes quite a good conversion from color to grayscale and compensates for the human factor by converting the yellow color to a brighter shade of gray than the blue color. If your scanner can manage to produce an equally good or better grayscale image than Gimp, then scan in grayscale mode. Otherwise, scan in color and make the grayscale conversion in Gimp. ColorColor mode is color mode, and there's not that much to say about it. Naturally, you should be concerned about color correctness and dropout color, but if you have a bad scanner, we can only recommend that you try to correct it with the different color correction functions in Gimp. Auto CorrectionXsane has a very useful feature called Auto Adjust (the Auto button in the main dialog). Auto Adjust will correct a poorly exposed photo automatically in the scanning process. The correction calculations are based on the highlights and shadows of the selected part in the preview. It is therefore very important that you don't select any part of the white scanner lid. This auto function is even more useful when you want a particular part of an image to be correctly "exposed." For example, you may want a person's face to be correctly exposed in a portrait. The trick is to select the face in the preview image, press Auto and then select the entire area that you want to scan in the preview window. Of course, an Auto Adjust function will never be able to correct an image with the same accuracy as a well-trained professional. We use it as a starting point for further correction, but in general, Auto Adjust does a really great job and leaves us nothing or very little to correct manually. |
|
|
|
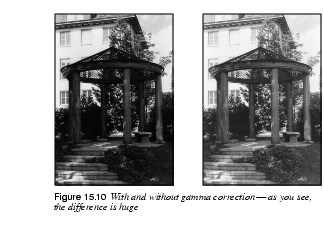
Gamma CorrectionIn our opinion, there is no scanning correction that is more important than gamma correction. Most people believe that gamma correction is a correction of some fault in the scanner, but that's not it. Gamma correction compensates for the imperfections of output devices, such as computer monitors or printers. Gamma correction is a tonal correction (light/darkness), and it refers to a special gamma curve that is used to perform that correction. To find out which gamma correction is needed for your display, read Gamma Calibration. When you know that gamma value, drag the gamma slider to that value. Your scan will now be gamma correct -- the lightness in the photo will be the same on the original as on the scanned image displayed on your monitor. Notice that gamma correction will not make a bad picture good, it will only correct it so it looks equally bad on your monitor. There are other correction functions to help improve your photos (gamma can naturally be used as a correction function here, too, in the sense that you will alter the gamma to not match your monitor). |
|
|
|
Tonal CorrectionWe have already discussed tonal correction to some extent in the previous paragraph. We mentioned that setting the gamma value to the correct value according to your monitor isn't always that good. If the original image was overexposed to begin with, the scanned image will be equally overexposed, unless you lower the gamma value to compensate for the faulty exposure (and vice versa for an underexposed photograph). When you scan older color photographs, you will often have to deal with different kinds of color tone problems. A well-known problem with aging photographs is that they often attain a tonal shift towards blue or red. To rectify unwanted tonal shift, you can uncheck the RGB default button in the main Xsane window, and suppress the color channel that is overly dominant in the image. Move the gamma control slider of the channel that is overrepresented until you're satisfied with the result. If the photo's tonal range shifts toward cold, blue shades, and you want to make your image look a bit warmer, then you should increase gamma value in the red channel (and also a little bit in the green channel). This technique is commonly used to increase the warmth in the skin color of a model's face. Likewise, if you have a photo that you want to adjust toward a cooler color range, then you should either increase the gamma value in the blue channel, or lower the gamma in the red channel (or a combination of the two). ScalingWhen you talk about scaling and scanning, it's not just a question of scaling to make the image bigger; you must also consider the final output device (the printer or monitor). Let's scan an ordinary 4x6 photo: · If you decide to print that photo in a 1:1 scale with a resolution of 300 ppi (not dpi!) you will scan with a 300 ppi resolution. · If you'd like to make the print twice as large as the original (2:1) using the same resolution (300 ppi), then you need to scan with a 600 ppi resolution. · If your final target is a web page with a 72 ppi resolution, then to get the same size as the original photo, you have to scan with a 72 ppi resolution. · Likewise, if you want a 2:1 resolution, you have to scan at 144 ppi. As you probably have understood by now, the scaling factor depends on the final output. Scaling LimitsUsing a 300 ppi scanner, you are not advised to scale an image more than 4:1. If you have a 600 ppi scanner, you can scale beyond that (but it is not sufficient to scale 35mm slides). Generally, the quality of the source (the photo) sets the limit for how much you can scale an image. If the scanned photograph was of poor quality, you will see the structure, or grain, even with a relatively modest scaling. Obviously, there's no point in including photographic artifacts such as grain and structure. Any scaling beyond 4:1 using a 300 ppi scanner will only render in a high noise ratio in your image, so don't think that you can scale a small photo (or slide) with a 300 ppi scanner. |
|

|
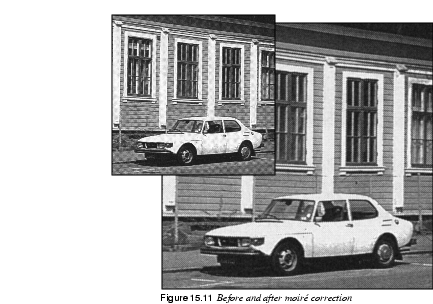
A final big tip is that you should always scale with the scanner. Never scan at 100 ppi and then scale the image in Gimp. When you scale in Gimp, Gimp will interpolate (guess) what would be an appropriate color between pixels. So always scale with the scanner! Scanning Drawings And Printed ImagesScanning drawings and printed material involves artifacts such as moiré patterns and aliasing effects. So, why does it look so bad when you scan an image from the newspaper? Moiré EffectsA book, magazine or newspaper is printed with a certain lpi (lines per inch), also know as line frequency. According to digital sampling theory, you must sample at least twice the frequency of the source in order to capture accurate information of the signal (in this case, the signal is the printed halftone dots). This is called the Nyquist rate or Nyquist frequency. So, to capture a book printed in 150 lpi you must scan it in at 300 ppi. Because most 300 ppi scanners aren't really capable of making true 300 ppi scans, it's clear that such a scanner can't be used to scan a book printed in 150 lpi, because it is not capable of resolving the frequency that is needed to scan a 150 lpi source. |
|
|
FIxing Up Moiré PatternsEven if you scan with the right resolution (300 ppi for a drawing or book that has a line frequency of 150 lpi) the moiré pattern problem will pop up again when you resize the image to make it fit your layout. The solution is to: 1. Add some Noise: 2. Then add a little Gaussian Blur: 3. Then sharpen it up with Unsharp Mask (a lot): 4. Now you can resize and print your image The result isn't perfect, but this is as good as it gets without running one of the anti-moiré programs available on the market. AliasingHaving gained a basic knowledge of sampling frequency, you now understand that the same effect will occur when you scan a line drawing. A drawing consists of lines, so imagine that we take all of those lines and calculate how many lines will fill one inch. That is the "lpi" of the drawing. We must scan at a resolution twice as big as that lpi to get an accurate result. If you scan at a lower resolution, you will not resolve every detail of the source. This may render lines in the drawing that weren't there to start with. This unwanted effect is called aliasing, and is due to the fact that you can't resolve all of the lines with such a low sampling frequency. The thin lines you see in an aliased image do not represent the thinnest lines in the original; it's an aliasing effect built up from several of the thinnest lines. To learn more about lpi and printing, read "Pre-press And Color In Gimp" starting on page 197. | |
Scanning, The Web And Printing
|
|
|
In the pre-press chapter (see page 197), we discussed printing from a more professional point of view. But there are probably a lot of readers out there who only use Gimp in a SOHO (Small Office, Home Office) environment. This means that you will probably print to an inkjet printer with a "resolution" somewhere between 300 dpi and 1,400 dpi, or perhaps you have a 300 dpi or 600 dpi laser printer. Inkjet PrintersInkjet printers are quite different compared to laser printers, because they use FM screening. FM screening (see "Why Doesn't My Inkjet's Print Look Like Halftone Screens?" starting on page 214) can yield excellent results with a much lower image resolution than the halftone dpi equivalent printer (note that you can't really talk about dpi when you discuss FM screening printers; see Resolution). A very rough rule of thumb is to use 125 ppi for every 300 dpi in the output device (printer): · 300 dpi inkjet printer; scan at 100 ppi · 600 dpi inkjet printer; scan at 200 ppi · 720 dpi inkjet printer; scan at 240 ppi · 1,440 dpi inkjet printer; scan at 480 ppi This table is not absolute; it's a guideline that will help you get a good result after running some tests. Also try lowering the scanning resolution when you scan in very high resolution. For example, test to scan in 150 ppi for your 600 dpi inkjet printer (instead of 200 ppi) and see if the result is acceptable. Naturally, if you don't use the full capacity of the printer (for example, if you print with a resolution of 300 dpi on your 600 dpi printer) you should scan in 100 ppi, not 200 ppi. When you print your image from Gimp, always make sure to use the ppi option in the Printer dialog, and print with the scan resolution (e.g., 100 ppi for a 300 dpi inkjet printer). Laser PrintersThe list above covers inkjet printers, but it will most likely also apply to your SOHO laser printer. However, it may be wise to try a few different resolutions. To get a really good result, you need to figure out what lpi your printer uses (or set an appropriate lpi if you have that option). The lpi will determine what ppi you'll need for scanning and printing. Please read "Resolution And Image Size" starting on page 200 to understand lpi and halftone printing. Web PagesScanning for web publishing is generally very simple -- just scan in 72 ppi. This resolution will suffice for color photos that don't require a high level of detail. If you scan items where detail is important, such as drawings, you have to scan at a much higher resolution (see Scanning Drawings And Printed Images). This will produce huge web images, but if you scan in a lower resolution you won't be able to capture the details. There is no simple solution to this problem. However, you can try this trick: Apply the Unsharp Mask filter (see Unsharp Mask) to enhance all edges and details in the high-resolution image. After that, you can resize the image to a more web-friendly size. | |
Scanning Other Objects
|
|
|
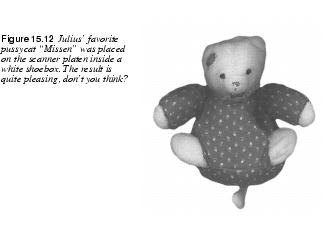
If you have a flatbed scanner, you are of course not limited to scanning photographs. You can scan almost all flat objects, and with a few cunning tricks, you can also scan certain 3D objects. It's very easy to scan textures, but you may have to increase the exposure time (if that option is available). Alternatively, you can add more light or increase the gamma, since a texture doesn't reflect as much light as a paper or a photograph. We suppose that many of you have tried to photocopy 3-D objects, such as your hand. The result is often quite disappointing. The reason for this is that the focus of the scanner/copy machine is optimized to the distance of the document glass. Another reason is that the amount of light doesn't suffice to reflect 3-D objects back to the CCD. If you want quality images of 3-D objects, then you should get a digital camera or even better, a real 35mm camera. Good digital cameras are very expensive (at the time of writing), you will not get ahold of a good digital camera for less than $1,200, and then we are talking about cameras that are good enough for SOHO usage. If you want a professional camera, we're talking about $10,000 or more. We mentioned that you could make some limited 3-D object scanning. Well, you can, but the result will not be very professional (if you don't want some special effect). Still, to get a decent result, you have to put some sort of box over the object, don't think that you can squeeze it in between the platen and the lid. Get a cardboard box, preferably white inside. Place the object on the platen and the box over the object. Now, you can try scanning using a slightly higher gamma than you normally would. Here is the outcome of a scan using the "white box" technique: |
|
|
|
![]()
![]()
| Frozenriver Digital Design http://www.frozenriver.nu Voice: +46 (0)31 474356 Fax: +46 (0)31 493833 support@frozenriver.com |
Publisher Coriolis http://www.coriolis.com |

 :
: :
: :
: (gamma) slider sets gamma correction.
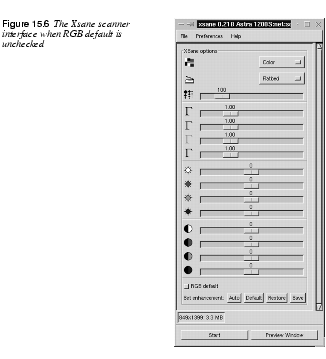 .
.