![]()
![]()
Why Should I Use Gimp When I Have Photoshop?
|
|
|
Perhaps you reckon that you already have the best of the best when it comes to image editing programs. In our view, you don't have the best of the best, simply because there is no single image editing program that is "the" best. There are several reasons why you should migrate to Gimp, and there are also some reasons why you shouldn't. First, we'll describe Gimp's strengths. Gimp has nearly all the functionality that Photoshop has. In certain areas, Gimp has more capacity, and in some areas less. Contrary to what many people believe, Gimp is not just another Photoshop clone. Even if there are likenesses between Gimp and Photoshop, many other programs such as Paintshop Pro, X-res, Picture Publisher and Photo Paint also have their fair share of such similarities. This is not surprising, because Photoshop and its user interface is more or less a de facto standard when it comes to image editing programs. Of all the image manipulation programs for advanced users that we have worked with, we have found Gimp to be one of the most versatile and powerful instruments available. Gimp Is FreeGimp is a free program, and it can be downloaded from the Internet. But even more importantly, it's not freeware. Gimp is an OSS (Open Source Software) program covered by the GPL license, which gives you the freedom to access and also to change the source code that makes up the program. This is how and why Gimp is constantly being developed and improved. Gimp Has A Lot Of Great Plug-ins And Special Functions· Gimp comes with more than 220 plug-ins, some with very advanced functions. Practically all of the usual plug-ins that you can purchase as accessories to Photoshop are already there in Gimp, or they can be downloaded from · Gimp's plug-ins are often much more powerful than Photoshop's. We are not saying that all Gimp filters will produce better results. But if you compare them to plug-ins that are supposed to do the same thing, then a Gimp filter is usually a more fine-tuned instrument that will supply the user with a large number of parameters. This is for better or for worse, depending on what kind of user you are. Photoshop filters are often of the "press OK and get an instant effect" type. They are more static, and provide the artist with less choices. Still, Photoshop filter effects are generally very well chosen. Settings are mindful, and the effect they yield is extremely useful for many standard assignments in graphic design. In short, it is hard to fail with a Photoshop filter. Gimp filters on the other hand are more unpredictable in the hands of an inexperienced artist just because they offer such a wide range of parameters and settings. However, for an advanced user, they provide an incomparable artistic freedom. · Gimp has predominantly been targeting web design, and comes with a variety of tools designed for creating electronically distributed graphics. Most of these tools are not available with Photoshop, which means that you have to invest in a number of additional programs to be able to access these features. Gimp Has An Innovative And Intuitive Structure· Gimp has a much smarter menu system that is far more efficient than the one present in Photoshop, or for that matter in all other image manipulation programs that we know of. · Gimp has a very different outlook on layers, which is much more flexible than what you will find in Photoshop. Layers in Gimp don't come in one size only; you can create layers of different sizes, or Gimp will optimize the layer size automatically. · Gimp has a much more intuitive way of dealing with patterns. All patterns are displayed in thumbnail format in a pattern dialog. To select a pattern, you just press one of the thumbnails, and the chosen pattern can be applied with the bucket fill or clone tool. · Gimp is faster than Photoshop when you work with relatively small images, such as those targeting web design. Nothing Beats Gimp Scripting· Gimp has no less than four powerful scripting languages that can be used to create very powerful plug-ins. (Note that in the 220 plug-ins mentioned earlier, the numerous scripting plug-ins have not been included.) · Yes, Photoshop also has certain scripting capabilities, but it doesn't compare to the power of an advanced scripting language such as Perl. When it comes to scripting, we don't think it's unfair to compare Photoshop with a little baby and Gimp with a full-grown adult with 30 years of working experience. That's how big the difference is. · Gimp can be a backend in your web server, serving your web site with stunning graphics. · Gimp has functions such as revision control, so you can keep track of changes made to a file. You can also connect Gimp directly to a database and create a very nice image database. Those functions are among the more exotic, but they are just some of the things that indicate that this is no ordinary image manipulation program. If you are working with a UNIX version of Photoshop, such as version 3.01, or if you have an older Mac or Windows version of Photoshop, then we could make this list about twice as long. Let's just say that if you are working with a UNIX version of PhotoShop, then you shouldn't contemplate switching to Gimp. Just do it! You will still have Photoshop for tasks where Gimp is insufficient. So What's The Drawback?Gimp can't handle anything other than 8 bit RGB, grayscale and indexed images. That's the big disadvantage of Gimp. Since Gimp doesn't support CMYK or spot colors such as PANTONE, Gimp can't compete with Photoshop in the prepress field. Photoshop has more third-party plug-ins than Gimp. Yes, even though Gimp has around 220 real plug-ins at the moment and that number is constantly growing with around one plug-in every two weeks, there are still more plug-ins that you can buy as accessories to Photoshop, and they aren't available for Gimp. Photoshop is also more effective (faster) when it comes to big images with a lot of layers (images bigger than 500x500 pixels). ConclusionIt is more or less impossible to tell you what you should or shouldn't do; we will always be wrong in some cases. Still, there are situations where it is relatively safe to suggest that you should migrate to Gimp: · If you work in a UNIX environment and already have Photoshop installed on your workstation, don't hesitate for a second, switch to Gimp right away. You can still work with Photoshop when you need to deal with prepress matters. · If you are a graphic designer working with web design, then it's a very good idea to migrate to Gimp. · If you're interested in advanced scripting, and you need to automate certain functions for your daily work, Gimp is the program for you. As the authors of this book, we'd like to recommend Gimp for all kinds of graphic design. Gimp is so powerful and gives you so much more freedom. There are, however, cases when you should think twice before switching to Gimp: · If your chief occupation is prepress, then it's not a good idea to switch to Gimp. The exception to this rule is if you work with a UNIX version of Photoshop. If you work with the UNIX version, then you can create the design in Gimp and import the final outcome into Photoshop. · If you are working with a Mac and don't want to change operating systems, you will not be able to use Gimp. | |
Migrating To Gimp
|
|
|
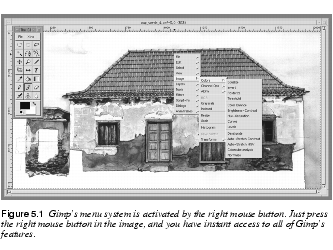
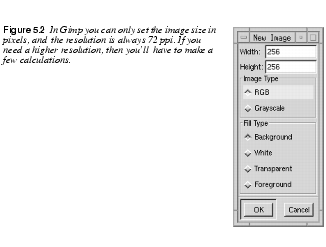
So, you have decided to switch to Gimp, or at least to try it out. In this section, we will try to describe the main differences between Gimp and Photoshop. We will assume that you are fairly well acquainted with a reasonably recent version of Photoshop. We will not cover every dissimilarity between Gimp and Photoshop, because then this chapter would turn into a new book. Look at it as a quick guide that will serve as a starting point. What's Compatible?Gimp can read Photoshop files, so if you have a large image library of PSD files you need not worry. You can open PSD images in Gimp, but you have to remember that Gimp doesn't understand CMYK or spot color specifications. The PSD file must be 8 bit grayscale, 8 bit RGB or indexed. If you are an Adobe Filter Factory fan, and have a lot of Filter Factory filters, we have some good news for you. By copying the FF filters to Gimp's User Filter directory, they will be available for use in Gimp. Please read User Filter (Adobe Filter Factory Emulator) how to install your filters. There's also a file that will make Photoshop shortcut commands available in Gimp, so you can control functions with the same shortcuts that you're used to in Photoshop. You are also free to assign any shortcut key to a function of your choice, simply by typing the new shortcut beside the function in the menu. Where Are The Menus?The first time you run Gimp, it will install some personal configuration and data files. Just answer OK to those questions (see How To Install Gimp Personal Files). A moment later Gimp will start by displaying the Gimp splash screen. Then the toolbox, which is quite similar to the one in Photoshop, will appear on your desktop. The questions that every Photoshop user will ask themselves now are undoubtedly: Where are the menus and where is my working area? There is only a File menu and an Xtns menu, and there isn't much in those menus. How To Get To The MenusTo access the menus in Gimp you have to open or create a new image. Select Select The Right Mouse ButtonPress the right mouse button in the opened image, and voilà, there are the menus! In our opinion, this is one of the best things about Gimp, and you will probably agree with us as soon as you get used to it. In most other programs, you have to travel a long way with the mouse to access the different function menus. This results in a constant clicking, dragging and moving the mouse up and down, to perform even the simplest task (which is why remembering shortcut commands by heart tends to be so important in Photoshop). In Gimp, you simply press the right mouse button and all the menus are there, close at hand. Where Do I Set Resolution And Canvas Size?Resolution In A New ImageLet's try to make a new image in Gimp with Gimp only has one resolution, and that is the most common monitor resolution; 72 ppi (pixels per inch). This is also known as web resolution. Images created in Gimp will look the same when they're open in Gimp as when they are displayed in a browser such as Netscape, so this is no disadvantage if you design for the web. Since Gimp only displays one resolution, it's only natural that the width and height variables are measured in pixels. Fixed units such as inches or millimeters are not relevant on a monitor and you can't make decent printouts from 72 ppi resolution, so there is no point in using them when you create your image. |
|
|
|
|
Still, you will need to set the resolution if you want to print your image, and you can do that from Gimp's Print dialog (or from Save As PostScript). However, there is some math involved. For more information, take a look at Preparing For The Press for formulas that you can use. Image Size And Image/ScaleIn Photoshop, you are used to changing the resolution and print size with the Image Size command. As we have just explained, in Gimp you can't change the resolution and print size until you print (to paper or to file), but you can prepare your image for a certain resolution by changing the size (in pixels) of your image. In Gimp, this function is called Scale ( Canvas Size And Image/ResizeIn Photoshop, the relative size and proportions of an image can be changed with Canvas Size. In Gimp, this command is called Resize ( |
|
|
|
|
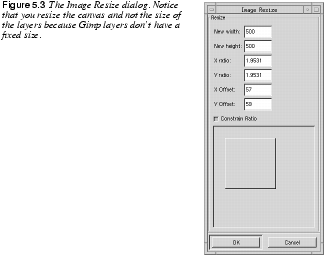
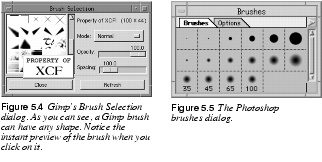
The next thing that will bewilder Photoshop users when they increase the canvas size is that the background layer (or any of the other layers for that matter) will not conform to the new size. The reason for this is that in Gimp, layers can have different sizes. By changing the canvas size, you have specified the new maximal layer size (see Layers And Channels). If you want any of your layers to assume this layer size you must select DialogsWhen you open Photoshop, the Palette windows will appear containing: · Navigator, Info and Options · Color, Swatches, Brushes and Actions · History · Layers, Channels and Paths. Gimp also has such dialogs or palettes, but they aren't open when you start Gimp. They are also arranged a bit differently. Let's just say that in Gimp there are no Navigator, Path, Action or History dialogs. We will, however, discuss Actions in Actions. First of all, you have to open all dialogs in Gimp yourself, because they aren't open by default. You will find them under · The Color Info dialog will pop up when you use the color picker. · Tool Options is the same as Options in Photoshop. · To access the Color dialog, you have to double-click on the foreground or background color swatch in the toolbox. · Palettes is the same as Swatches. · Brushes in Gimp equals Brushes in Photoshop. · Layers and Channels are in the Layers & Channels dialog. · In Photoshop, you set the gradient type both in the toolbox and in the option dialog of the Gradient tool. In Gimp you have the same (only more advanced) possibilities, but the Gradient Editor is invoked from the Dialogs menu, not from the Tool Options dialog. · Using Gimp's Patterns dialog to apply a pattern is much easier than to search for pattern libraries in Photoshop. · If your image is indexed, then you can view and edit all of the indexed colors in the Indexed palette. BrushesThe Gimp Brush Selection dialog is similar to the Brushes dialog in Photoshop, but there are some differences. In Photoshop, there is a brush editing dialog, where you can change or create new round or calligraphic brushes. In Gimp you can also make your own brushes, but not as quickly, because there is no brush editing dialog. In both Photoshop and Gimp you are quite free to create brushes in any form, but the way brushes are handled in Gimp is much easier than in Photoshop. The biggest advantage is Gimp's Brush dialog. If you have a big brush in Photoshop, you will only see the left top corner, which may be totally white. In Gimp, if the brush doesn't fit into the thumbnail image, you can click on the Brush icon, and a life-size image of the brush will pop up. As soon as you release the mouse button, the image will disappear. Read more about brushes in Brushes. |
|
|
|
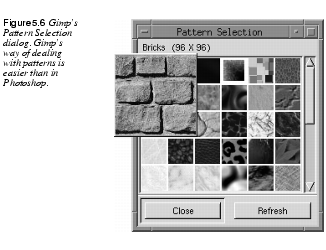
PatternsWorking with patterns is much easier under Gimp than under Photoshop. In Gimp, the currently active pattern is determined by the selected pattern in the Pattern Selection dialog. This pattern is available for all tools that use patterns in Gimp (the bucket fill tool and the clone tool). You can apply patterns in different opacity and modes by setting these parameters in the Bucket Fill dialog or in the Brushes dialog. You can also create and save your own patterns (Gimp has a bundle of excellent tools for making seamless tiles for patterns). When you browse the patterns in the Pattern Selection dialog, you can view the pattern in full scale by clicking on it, just as in the Brushes Selection dialog. Read Patterns for more information on patterns in Gimp. |
|
|
|
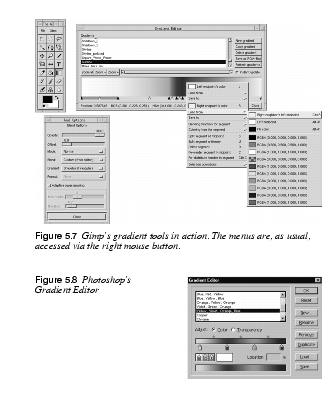
GradientsThe Gimp Blend tool has everything that Photoshop's five Gradient tools have, and much more. Gimp has more gradient types, notably the Shapeburst gradients, where the gradient follows the shape of the selection so that it looks three-dimensional. There is also an Offset control and a very useful Repeat function that creates sine- or sawtooth gradient patterns. If you set Blend type to custom gradient, Gimp will use the currently active gradient, which is specified in the Gradient Editor dialog. Gimp's Gradient Editor is far more advanced than Photoshop's. In fact, it is such a complex tool that we have dedicated an entire section to it, see The Gradient Editor for more information. |
|
|
|
Tool OptionsTool options work just like in Photoshop. However, Gimp doesn't have multiple toolbox buttons, so you can't, for example, click on on the Gradient tool to change to another gradient type. Instead, Gimp keeps the tool controls in the toolbox option dialog. This means that you will have to change the gradient type in the Blend tool's option dialog instead of pressing another button in the toolbox. Layers And ChannelsThe Layers & Channels dialog looks a lot like Photoshop's, but there are some big differences. We will discuss Layers and Channels further in Layers And Layer Controls and "Layers And Floating Selections" starting on page 315 will give you even more information. How layers are handled is one of the major dissimilarities between Photoshop and Gimp. First of all, there is no Path dialog. Gimp does support paths (see Paths) but only one at a time, and you must store it in an alpha channel to be able to save it. Channels· There is no support for CMYK or spot color, so only alpha channels and RGB channels are available in the channels tab. · All RGB channels are displayed in color in Gimp; for example, if you select a single color channel, it won't look like the grayscale thumbnail; it will be blue, green or red. · Split and Merge Channels functions are in · To load the selection from an alpha channel, right-click in that channel bar and select Channel to Selection. · To save a selection in a channel, use · Color in a channel always indicates masked areas (default color is black). · There is no simple way of merging (add, subtract or intersect) two alpha channels to create more advanced selections. To do this you must load one of the channels into another and: · Fill the selection with white to add. · Fill with black to subtract. · Layers· Since layers can have different sizes in Gimp, you may want to change the layer's size and relative position. The commands that will do that are called Scale Layer and Resize Layer, and you'll find them in the Layers tab's right-click menu. · To enable transparency in a solid background layer, alpha must be enabled; select · To load layer transparency, select Alpha to Selection in the menu accessed by right-clicking in the Layers tab. · When you move layers or channels up and down the stack in Photoshop, you simply drag and drop. In Gimp, you move layers one step up or down with the arrow buttons. This is one of the rare occasions when Gimp's UI isn't as good as Photoshop's. SelectionsSelections in Gimp and selections in Photoshop are alike in the idea, but not in the implementation. Therefore, this is one of the areas that Photoshop users tend to say "%¤#%¤#" since they don't understand what's happening. Moving Selections/Floating SelectionsWhen you make a selection in Photoshop, your Selection tool will be translated to a "Move tool" and you can move the selection. The same happens in Gimp, but when you move the selection you move the substance of the selection, not the empty selection outline. If you now (in desperation) use the selection tool again (within the selection) you will create a mask, not a real selection. This is because when you moved the selection the first time, you created a floating selection, and when you moved it the second time, you created a subselection (a selection in a floating selection). To use selections as you're used to in Photoshop (v.5.0) you have to hold Alt + your mouse button when you move the selection. You may now move the selection without creating a floating selection. Does it sound complicated? Well, it both is and isn't. Please read Moving Selections and everything will be clear. Selection ControlBasic selection control is nearly the same as in Photoshop, but not exactly the same. Adding to a selection is the same in both Gimp and Photoshop. But where Photoshop uses Alt to subtract, Gimp uses Ctrl. Intersect is therefore quite logically Ctrl+Shift in Gimp. However, Shift also controls the shape of your selection. If you press Shift it will a create a square or circular selection, depending on which tool you use. If you want a rectangular or an elliptical selection when you add or intersect, the trick is to start the selection with Shift pressed down, and then release Shift immediately after dragging the mouse. For a full understanding of all Gimp tricks with selections, please read Selection Control. Quick MaskThere is no quick mask function in Gimp. But quick mask is really the same as painting a mask in a channel. The difference is that you can invoke the selection really quickly, and also switch to and from mask/selection in an instant. You can achieve the same effect in Gimp (or Photoshop) using channels. It will be a bit slower, but that's nothing a good script can't take care of. PathsGimp doesn't have multiple, re-editable paths. Gimp paths can't be stored, so once you have converted a path to a selection, there is no way back. Of course, you can use channels to store the selections. For more information about paths in Gimp, i.e., Bezier selection, read The Bezier Selection Tool. Magnetic SelectionsGimp's equivalent is called Intelligent Scissors, but we must admit that Photoshop's tool is much more effective. This is a bit strange because Gimp was first with this feature (Gimp 0.54), well ahead of Photoshop. However, when Gimp 0.99 arrived, the internal image handling was so different that the Intelligent Scissors feature no longer worked. An experimental version was used instead; it was stable but not very efficient. The current rumor is that Intelligent Scissors will be in good shape when Gimp 1.2 is released sometime in the future. Magic WandGimp's Magic Wand tool is called Fuzzy Select. In the Photoshop tool, you set the sensitivity in the Option dialog. With Fuzzy Select you do it this way: After you position the cursor and press the mouse button, you have to drag the cursor (don't release the mouse button yet) from the upper-left corner, either to the right or straight down (that doesn't matter) to go from a small, stingy selection to a very generous one. Layers And Layer ControlsLayers is one of the areas where Gimp differs most from Photoshop -- not in the essence of basic usage, but Gimp's layers are much more powerful because they don't suffer from the "one size fit all" syndrome. Moving LayersWhen you use the Move tool for the first time, you will probably move the whole image, which will seem very confusing to a Photoshop user. Actually, you didn't move the image, you moved the Background layer. In Gimp, layers can be moved without restrictions, so it's no problem to move the layer outside the image canvas. This is a very handy way of moving text in a text layer. Please read The Move Tool for more information about moving layers. Layer SizeSince you can move layers freely, even outside the image canvas, you can naturally create layers that are bigger than the image itself. When you create a new layer (right mouse button in the Layers dialog), a dialog will appear, where you'll be asked to specify the size of the new layer. It's now up to you to make it as big or as small as you want. The fact that the layers can be bigger than the canvas is used very effectively in a plug-in called GAP (see "Advanced Animation With Gimp Or How To Use AnimFrames" starting on page 639) where you can use this possibility to effectively panorate the background in an animation. (Yes, Gimp has its own animation studio.) For more information about layers and layer size, please read Resize Layer. Layer OptimizingWe were discussing floating selections in an earlier paragraph. Just as in Photoshop, when you create a floating selection you will get a special layer in the Layers & Channel dialog. Just double-click on the floating selection bar in the dialog, and Gimp will create an optimized layer from the floating selection. The new layer will not be bigger than the selected object that made up the floating selection. Read Floating Selections for more information about floating selections. Layer Alignment And ManipulationGimp's layer alignment differs from Photoshop's. Because Gimp works with optimized layer size, you align the layers and not the substance in the layers. Gimp provides several ways of layer aligning, rotating, and redistributing. It may seem confusing in the beginning, but once you get to know it you will love it. Read more about it in Layer Align, Adjust And Move Operations. You can also bend and otherwise manipulate layers and the objects within them. After being manipulated, the layer will be resized on the fly to fit its new optimized size. If you want to know more about these special layer functions, read Transforms. Types And FontsThere are two ways of handling fonts in Gimp. The first one is the Text tool in the toolbox, which is a rather simple and restricted way to add text to an image. If you are used to Photoshop's Text tool, you will probably find this Text tool very limited. This Text tool is useful for simple texts where only a few characters are involved. Relax, there is an advanced Gimp text tool. It is similar to the one in Photoshop 5.0, and you will find it under ActionsHere is one of many areas where Gimp is a lot more powerful than Photoshop. Gimp supports Script-Fu, Perl-Fu, Tcl-Fu and Python-Fu -- no less than four types of "actions" languages. Script-Fu is the current default script language and it is based on Scheme. Perl is the new runner-up. Perl is the de facto standard scripting language for CGI scripts. There are literally thousands of Perl algorithms and functions that you can use for image manipulation in your scripts. You can even use Gimp as a CGI script, delivering custom graphics on the fly. Furthermore, you can enable image editing from the web with the help of Net-Fu which is a way to access Gimp from a web server. A lot of Gimp users make scripts, and you can easily download all sorts of scripts from various web sites. Maybe it's not that easy to get started with scripting in Gimp, but the power it offers is so much stronger that it's well worth the trouble. Read Web for further information reading scripting in Gimp. Pre-pressIn this area, Photoshop is much better than Gimp. Gimp pre-press capabilities are very limited because it can only handle RGB, grayscale and indexed images. Working with pre-press and Gimp will require some planning, and it's way too much to write about here. We have devoted a whole chapter to pre-press and Gimp so please read Pre-press And Color In Gimp and you will know what to do if you are in the pre-press business and still want to use Gimp. If you already have a UNIX version of Photoshop, we recommend that you use Gimp until you reach the stage where you would normally convert the image to CMYK. Instead, save the image and switch over to Photoshop to make the CMYK conversion and other preparations for print. | |
Some Final Notes
|
|
|
We have not covered every single difference between Gimp and Photoshop, but we have discussed the major ones. You should also keep in mind that Gimp has a lot of functions that aren't available among the Photoshop stock programs. Reading this overview will not make you a master of Gimp. This chapter should be seen as a means to help you quickly move over the basics so that you can concentrate on the fun stuff, which is exploring the more advanced Gimp functions. A migration is never easy, and it will take some time before you are adjusted to your new favorite. We can only say that we have never regretted that we switched from Photoshop to Gimp. | |
![]()
![]()
| Frozenriver Digital Design http://www.frozenriver.nu Voice: +46 (0)31 474356 Fax: +46 (0)31 493833 support@frozenriver.com |
Publisher Coriolis http://www.coriolis.com |