![]()
![]()
|
|
This is the math corner of Gimp. You will find different kinds of filters that apply mathematical formulas to your image, as well as Gimp's equivalent to Filter Factory. |
Convolution Matrix
| ||||||||||||||||||||||||||||||||||||||||||||||||||||||||||||||||||||||||||||||||||||||||||||||||||||||||||||||||||||||||||||||
|
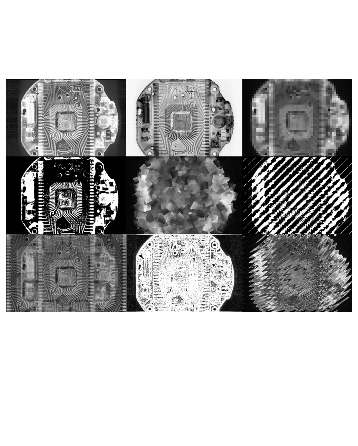
Convolution Matrix allows you to create simple custom filters. Convolution Matrix adds together the color values in the 5x5 pixel box around each pixel, multiplying each pixel in the box by the corresponding value from the matrix. ExamplesIt works like this:
Divisor: 1 Offset: 0 The middle value represents the pixel to be modified. Here, the destination value is 1 (the source value and the surrounding pixels are multiplied by 0 so they don't count). The matrix can be used for offsetting. For example:
Divisor: 1 Offset: 1 The destination value for a pixel is the source value of the pixel above it, so this offsets the image one pixel downward. A simple blur works like this:
Divisor: 9 Offset: 0 Now, for each pixel, the value of that pixel and the eight surrounding pixels is taken, added together and divided by nine. Thus, the resulting pixel is the average of the 3x3 pixel region around it. Similarly, a very strong (and unsophisticated) sharpen filter works like this:
Divisor: 1 Offset: 0 This takes the center pixel, multiplies its value by five, then subtracts the values of the four immediately adjacent pixels from that. This kind of operation enhances the differences between colors. The Divisor argument is just a number by which the result is divided, and the Offset is added to that. The Offset is useful in some cases, such as this:
Divisor: 1 Offset: 128 In this case, the values on the lower right are subtracted from the values at the upper left. This produces a basic embossing effect. Since these values could easily be negative, and a picture can't have negative colors, we add 128 everywhere, making this in all likelihood something like a gray bump map. The Automatic checkbox sets the Divisor so that it is the sum of the matrix values. If the sum is positive, the Offset is 0. If the sum is negative, the Offset is set to 255 (for inverting). If the Divisor is 0, the Offset is 128 (for embossing). The Channels checkboxes control which channels the plug-in operates on. Alpha adds an additional factor to the calculations: the alpha channel. If Alpha is checked, the values of all pixels are weighted both by the matrix values and by its alpha value. Try this out by making an image with nearly transparent (low alpha) green and fully opaque red next to it. If you aren't using alpha weighting, and you blur the image, a brownish line will appear between the transparent and red regions, because the transparency (the "weakness," one might say) of the green wasn't taken into consideration. With alpha weighting on, the blurring won't create any unexpected artifacts. | ||||||||||||||||||||||||||||||||||||||||||||||||||||||||||||||||||||||||||||||||||||||||||||||||||||||||||||||||||||||||||||||
Universal Filter
| ||||||||||||||||||||||||||||||||||||||||||||||||||||||||||||||||||||||||||||||||||||||||||||||||||||||||||||||||||||||||||||||
 |
There are two different types of signal (image) processing: linear and nonlinear. A median algorithm is an example of a nonlinear filter. The Universal Filter is a linear filter, which means that you can describe a transfer function that describes the output in relation to the input. In principle, a linear operation is reversible, but in practice a few nonlinear operations (like clipping and quantization) are involved, which limit the reversibility. As for any linear system, a frequency response can be calculated. This description is going to skip over the mathematics and theory and just describe the basic working algorithm. At the moment, the Universal Filter uses a 3x3 Matrix and two other parameters (Divider and Bias). The extra parameters can be calculated from the Matrix in most cases, but you can set them if you want to. For every pixel of the new image, the original pixel and the surrounding pixels are taken, multiplied with the values in the Matrix, added to the Bias value and divided by the Divider. If you change the Matrix values, different kinds of filters can be generated. If you put the value 1 in every Matrix field (and leave the Divider and Bias values as calculated), you'll get a lowpass or blur effect, because you add all nine pixels to calculate the new one. If you want a smaller effect, you can increase the center value so the surrounding pixels will have less effect. To get a highpass filter or sharpening effect, use a Matrix with -1 in all cells and a 9 in the center. You can choose to run the filter in just one direction, by only using coefficients in the middle row or the middle column of the matrix. To invert the picture, put a -1 in the center field. The values for Bias and the Divider are calculated so that the resulting image will be in the normal range of 0 to 255 for color or gray values. So the Divider is the absolute value of the sum of the Matrix. If the sum is 0, then the Divider is set to one. The Bias value is derived from the sign of the Matrix sum. If the sign is positive, the Bias is 0; if it is negative, the Bias will be 255. If the sum is 0, the Bias value will be 128. All calculated values are rounded to integers and clipped to the range 0 to 255 after the computation. | |||||||||||||||||||||||||||||||||||||||||||||||||||||||||||||||||||||||||||||||||||||||||||||||||||||||||||||||||||||||||||||
User Filter (Adobe Filter Factory Emulator)
| ||||||||||||||||||||||||||||||||||||||||||||||||||||||||||||||||||||||||||||||||||||||||||||||||||||||||||||||||||||||||||||||
 |
User Filter is a clone of Adobe Photoshop's Filter Factory. This is a real goldmine, because you can use all of the hundreds of available Filter Factory filters made for Adobe Photoshop. An enormous amount of free filters are now available for Gimp. User Filter can handle all the different Filter Factor filter formats: .afs, .txt and .8bf plug-ins, as well as .ffl (Filter Factory libraries). Note that you can't use ordinary .8bf Adobe Photoshop plug-ins with the User Filter; they only work with Adobe Photoshop. To understand Filter Factory, you'll need to read the pertinent sections of the Adobe Photoshop manual. There are too many Filter Factory filters for this manual to describe, but we plan to write some documentation about Filter Factory filters in the future. To find Filter Factory filters and information about Filter Factory, start with the Filter Factory web page at http://privat.schlund.de/f/filter-factory/ or search the web for "Filter Factory" with your favorite search engine. Notice that you must add the line Operating The User FilterThe user interface is quite simple. First, you'll need to open the Filter Manager folder, where you can browse through the available filters. When you have decided which one to use, simply select it and press Load. The preview will show how the result of the filter will appear. If you want to adjust any of the values, open the Value folder. The first time you open the User Filter, you won't find any values here, but after your first load/use you will find the values you used the last time, or the default values of the last filter. If you have enabled Update, you will be able to see the preview change as you alter the values. If this isn't enough, you can open the Edit folder, where you will find the mathematical expression of the filter. If you understand how Filter Factory works, you can simply edit the function. | |||||||||||||||||||||||||||||||||||||||||||||||||||||||||||||||||||||||||||||||||||||||||||||||||||||||||||||||||||||||||||||
 |
Tip: Sometimes, the User Filter can be quite slow when you scroll the preview. A solution to this problem is to disable Update, scroll and then try the preview again. | |||||||||||||||||||||||||||||||||||||||||||||||||||||||||||||||||||||||||||||||||||||||||||||||||||||||||||||||||||||||||||||
![]()
![]()
| Frozenriver Digital Design http://www.frozenriver.nu Voice: +46 (0)31 474356 Fax: +46 (0)31 493833 support@frozenriver.com |
Publisher Coriolis http://www.coriolis.com |