![]()
![]()
|
Layers And Floating Selections Layers and the use of layers are the foundation of effective image manipulation. |
Introduction
|
|
|
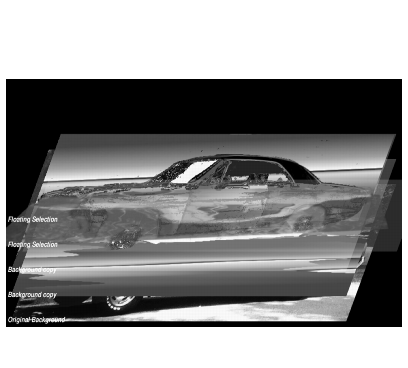
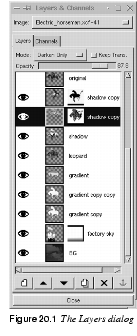
If you're new to image manipulation, the concept of layers may not seem obvious, but using layers is really as simple and straightforward as wearing layers of clothes on your body. Once you have started to use layers, you won't understand how you could ever do without them. Composite Image InformationAn image created or manipulated in Gimp usually consists of several image objects. You may, for instance, have copied and pasted parts of other images into your image, or perhaps you have added a text string. Instead of placing all of these things onto a single background, you can paste or paint them in different layers. These layers are just like a stack of transparent plastic sheets placed on top of one another, creating a composite image. This means that you can easily manipulate the contents of a certain layer without affecting the rest of the image. You also have artistic freedom with the possibility to adjust the transparency in a layer, or to composite it with other layers using Layer Modes. Optimal Layer SizeContrary to other graphics programs where all layers have the same size as the image, Gimp has the ability to optimize the layer size. When you turn a selection (for example, a text string) into a layer, the new layer is never larger than the selection itself. This saves both disk space and valuable processing time. The edges of the small layers appear as a yellow dotted line, and can easily be distinguished. It is also a great advantage to be able to move an entire layer and its contents with the Move tool, instead of first having to select the image object and then move it within the layer. The Layers & Channels DialogOpen the Layers & Channels dialog ( The Layers TabThe Layers tab includes Image and Mode pull-down menus, an Opacity slider and a Keep Trans. (Keep Transparent) checkbox. The Image pull-down menu is at the top of the dialog, and will display the name of your image. If you are working with several images, the Image pull-down menu is very useful, because all open images are listed in it and you can choose the one you want to work with by clicking on its name. Six buttons are at the bottom of the dialog: New Layer, Raise Layer, Lower Layer, Duplicate Layer, Delete Layer and Anchor floating selection. All of these buttons will be discussed later in this chapter. Each layer has a bar corresponding to it in the dialog window. The bar contains a thumbnail icon of the layer. An eye icon is to the left of the thumbnail, and if your image only contains one layer, your image/layer will be called Background. |
Basic Layer Operations
|
|
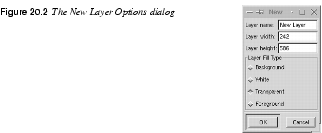
New LayerIf you right-click on a layer's bar, another menu will appear that includes a few more options than the When you choose New Layer, the New Layer Options dialog will appear. Name your layer in the Layer name box. For example, you could call the layer "shadow" if you are going to create a shadow of an image object in this layer. Always name your layers if you work with a lot of them, especially when you use similar layers with different functions. |
|
|
|
|
If you don't want the new layer to be the same size as the background, you can specify the size of the layer by filling values into the Layer width and Layer height boxes. You also need to decide on a Layer Fill Type. Your options are Background (the current background color in the toolbox), White, Transparent and Foreground (the current foreground color in the toolbox). White is the default fill. Click on the radio button for the fill you want and click on the OK button. Now, you have created a new layer on top of your background. The Active LayerWhen you have two ore more layers, it's really important to know which one is the active layer. As soon as you have several layers in an image, Gimp's actions are in the active layer, so you can only work in one layer at a time. The active layer's bar in the dialog is marked with blue. If you click on another layer's bar, it will become the active layer. |
|

|
If a layer is smaller than the background layer, you can also make it active by clicking in it (in the image) with the Move tool. If you want to move a transparent layer, or just make sure that you move the right layer, press the Shift key as you drag. With the Shift key pressed, only the active layer will move. When the selected layer's boundary changes color from yellow to blue, you know that it's safe to move it. For more information about the Move tool, see The Move Tool. The Background LayerRemember that your original image was automatically named Background? The background layer doesn't act exactly like other layers. The background layer is a fixed and solid area for other layers to work against. The background works the same way that it did when you didn't have any other layers. When you cut parts of it, or use the eraser, the background color shows, and not a transparent surface. You also can't use Layer masks (see Add Layer Mask) on the background layer, and you can't raise the background layer. Normally, you won't need to do any of these things with a background layer, but if you want to (for transparent GIFs, for example), double-click on the background layer's bar, and rename it. From then on, it will act like any other layer. To achieve the same result, you could also use Symbols And ExplanationsThe Eye IconThe eye icon allows you to toggle the visibility of layers on and off, so you can work with a particular layer without having to see all other layers. Click on the eye icon and the image/layer will disappear if you have more than one layer in your image. Click again and it returns. If you press the Shift key and click on an eye icon, all of the layers except that one will be hidden from view. If you press Shift and click on that eye icon again, the other layers will return. |
|
|
Linking LayersIf you click between the eye icon and the thumbnail icon, you'll see a crossed arrows symbol (like the Move cursor). The cross symbol links layers. Linking layers means that all layers with the cross symbol are locked or grouped in relation to each other, so you can't move one layer without moving the others at the same time. |
|

|
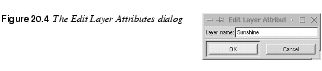
Remember to unlink layers before moving another layer; otherwise, you'll move all of the layers even if the linked layers aren't active. Keep TransparentTo understand the Keep Trans. button, you'll need to have something drawn in a transparent layer. Make the layer active, and paint something with the Paintbrush tool (with Keep Trans. unchecked, which is the default). Then check Keep Trans., change the color of your paint, and start painting again. You will only be allowed to paint the opaque areas, i.e., the areas that you already painted. Keep Trans. protects the boundaries of opaque shapes in a transparent layer. It also makes it very easy to change opaque shapes' colors, because you never have to worry about painting outside of their edges. If you want to use a filter on a layer, you normally won't want to have this option checked, because if Keep Trans. is checked, the filter will only affect the interior of opaque objects in the transparent layer. NamingYou can rename a layer by double-clicking on the layer's old name. The Edit Layer Attributes dialog will allow you to type in a new name. |
|
|
The Layer Toolbar ButtonsNew LayerCreates a new layer, as described in the paragraph New Layer. Raise Layer And Lower LayerThese commands (and the corresponding buttons on the Layers & Channels dialog) move the active layer to a higher or lower position in the layer hierarchy. You can only raise or lower a layer one step at a time. The background layer can't be raised, unless you rename it or apply Add Alpha Channel (see Add Alpha Channel). Duplicate LayerMakes a copy of the active layer, and places it immediately above the original. Delete LayerDeletes the active layer. Anchor LayerAnchor Layer is used to merge floating selections with a layer (the layer that was active before you placed the float). If you don't know what a floating selection is, read Floating Selections. Usually, all you need to do is click in a floating selection to make it stick to a layer. Sometimes, the Move tool needs to be active for this to work (for example, when you are trying to anchor a floating text string). However, the Anchor Layer command always works and is quick, especially if you use the shortcut key (Ctrl+h, unless you've changed your hotkeys). The Layer Dialog MenuIf you right-click on a layer's bar, the Layer Dialog menu will appear. The first five commands (and Anchor Layer) on the Layer Dialog Menu have already been discussed in The Layer Toolbar Buttons, and the more complex options, such as Layer Mask and alpha commands, will be discussed in the next section. Scale LayerShrinks or enlarges the layer and its contents, to measurements that you specify. Resize LayerChanges the size of the layer, but not its contents. If the contents of the layer are larger than the new layer size, the image or selection will be cropped to fit the new layer size. You can use X Offset and/or Y Offset to place the original layer in a particular spot inside a larger resized layer. |
|

|
|
Merge Visible LayersThis function combines all layers that have the eye icon turned on. Invisible layers are not affected. The options Expanded as necessary and Clipped to image have the same result: The merged layer is just big enough to fit all layers, but no larger. Clipped to bottom layer results in a merged layer with exactly the same dimensions as the bottom layer. |
|

|
|
 |
ToBot, ToTopThe active layer is moved to the top or bottom position. Flatten ImageFlatten Image merges all layers without exception. Remember that you must use Flatten Image before saving your image, if you want to save it in any image format other than XCF and GIF formats. Also remember to erase your alpha channels (see Alpha Channels) if you have made any in the Channels folder. Many image formats and printers don't understand alpha channels. |
Mask, Alpha And Selection Operations
|
|
|
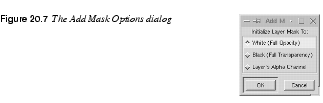
Open the Add Layer MaskAdd Layer Mask is an advanced option, used for changing the alpha (transparency) values in a layer. If you don't know what alpha values are, read Alpha Channels. When you add a layer mask to a layer, you always work with a grayscale image (you can use colors, but they will appear as shades of gray in the mask). In the layer mask, black means transparent and white means opaque. After you create a layer mask, the objects in that layer will be more or less transparent, based on the values of white and black in the layer mask. After you click on Add Layer Mask, the Add Mask Options dialog will appear. You'll need to choose which initial fill you want: White, Black or the Layer's Alpha Channel. If you choose Black, you start with a transparent mask, White gives an opaque mask and Layer's Alpha Channel means that the mask will use the layer's alpha values. |
|
|
|
|
After you've chosen the initial fill, a small layer mask thumbnail appears next to the layer thumbnail. To switch between layer mask and layer, click on the appropriate thumbnail. Mask Display OptionsYou need more than the mask thumbnail to edit the mask. Press the Alt key and click on the mask thumbnail, and you'll see the grayscale mask in place of your image. Note that the mask thumbnail is now outlined in green. When you want to check the result of the mask, press Alt and click on the thumbnail again and you'll see what your image looks like with the mask effect. To see your image without the mask, press the Ctrl key and click on the mask thumbnail. The thumbnail will be outlined in red. Press Ctrl and click on the thumbnail again to view the mask again. You can alternate between the two display options (the mask alone and the image alone) by pressing on the Alt key and clicking, but to enter and exit this alternating mode, you'll need to Ctrl and click first. Layer Masks Made From Gradients |
|

|
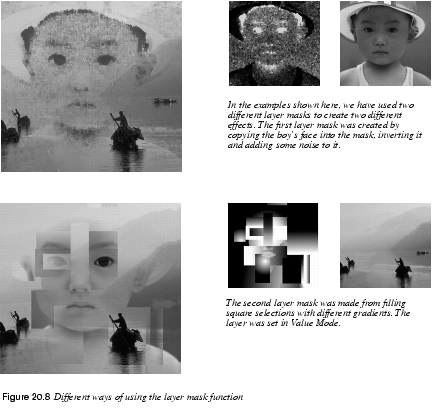
A very useful mask can be made from a gradient fill (see Figure 20.8 ). A gradient results in the top layer gradually blending with the background. You can paint areas of transparency where you want them, or use a filter or pattern to create an interesting mask. You can use selections or paste an image into the mask. |
|
|
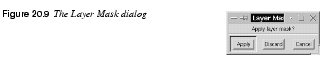
Apply Layer MaskClick on Apply Layer Mask when you're ready to apply your mask or if you don't like it and you want to discard it. If you discard it, the mask will be removed. If you cancel, you will only cancel the operation itself. |
|
|
|
Alpha To SelectionUse the Alpha To Selection command to transform opaque or semi-transparent shapes in a transparent layer into a selection. This command is so useful that you'll use it nearly every time you work with a layered image. When you work with different layers, you mostly work within the shape of an object. For example, if you're working with an image of a saucer, you'll want a copy of the saucer shape underneath the actual saucer to create a saucer-shaped shadow. You'll also want another saucer copy to accentuate highlights in the porcelain, another to show dark areas, another with a special pattern on it, etc. For every copy of the saucer, you just want the empty shape or the selection of the saucer, not a copy of the entire image with a saucer in it. The shape of the selection applies to all layers. Just activate the layer you want to work in, and start working. Mask To SelectionMask To Selection is the equivalent of Alpha To Selection, but for masks. This command isn't used as often as Alpha To Selection, but if you've made a good mask it's nice to be able to use it again in another layer. Add Alpha ChannelUse Add Alpha Channel if you want to enable transparency in the background layer. There are other ways to accomplish this, but Add Alpha Channel is fast and easy. | |
Layer Align, Adjust And Move Operations
|
|
Align Visible Layers
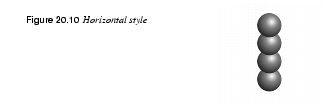
Horizontal StyleHorizontal style controls how layers are positioned horizontally in relation to each other. The consequence of this is that horizontal style aligns vertically, although it cannot change a layer's vertical position. The choices for horizontal style are: · None: No change in horizontal position. · Collect: The top layer controls where the lower layers end up. The lower layers' horizontal bases snap to the horizontal coordinate of the top layer's horizontal base. |
|
|
|
|
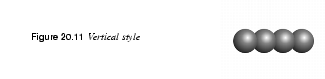
· Fill (left to right): Places the layers from left to right, starting with the top layer. The distance from the horizontal base of a layer to the next layer is always the same. If the top layer's horizontal base is already to the left of the others, it will not change horizontal position. · Fill (right to left): The same as Fill (left to right) except that the layers are set from right to left. · Snap to grid: The chosen edge will snap to the nearest horizontal grid line. A chosen corner (left edge and top edge makes a corner) will snap to the nearest node in the grid system you made. Horizontal BaseHorizontal base controls what horizontal edge the layers snap to or fill from: the Left edge, the Center or the Right edge. Vertical StyleVertical style controls how layers are positioned vertically in relation to each other, so that they align horizontally. · None: No change in vertical position. · Collect: All of the lower layers snap their vertical base to the vertical coordinate of the top layer's vertical base. |
|
|
|
|
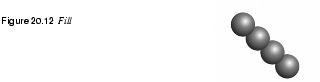
· Fill (top to bottom): Places the layers from top to bottom, so the distance from the vertical base of one layer to the next is always the same. If the top layer's vertical base is over the top of the others, it will not change vertical position. · Fill (bottom to top): Works the same way as Fill (top to bottom), except that it works from bottom to top. · Snap to grid: Snaps the vertical base to the nearest vertical grid line. A chosen corner will snap to the nearest node. Vertical BaseVertical base controls what vertical edge the layers snap to or fill from: the Top edge, the Center or the Bottom edge. CollectUse Collect to stack objects in horizontal or vertical rows. To place your layers exactly on top of each other, choose Collect from the Horizontal style and Vertical style pull-down menus, select Center from both the Horizontal base and Vertical base pull-down menus, and click on the OK button. FillFill is useful for animations where you want to move an object in equal steps frame by frame. If the layers are placed on top of each other, or very close together, you'll need to move them apart before you use Fill. |
|
|
|
|
Moving small layers is very easy. If you click on a small layer with the Move tool, that layer automatically becomes active, so you can drag and drop layers easily without having to choose them in the Layers & Channels dialog. You can't precisely control the distance between layers, but if you spread the layers as far apart as possible before alignment, you'll get the maximum separation between them after the alignment. As you align using Fill several times, the distance between layers reduces. Each time you use Fill, the layers move closer together until the layers' chosen edges touch. |
|

|
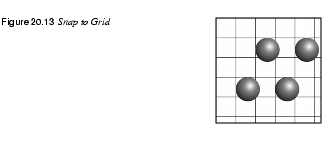
Tip: Link the layers (with the cross symbol in the layer bar) after using Fill. You can then move all of the layers as a group. Snap To GridSnap to Grid is indispensable for planning an animation, with one problem: The grid created with Grid size is invisible. So first, you need to make the grid visible. To do this, create a new full-sized layer. Create a grid with |
|
|
|
Remember that different layers may snap to different nodes in the grid, because each layer will snap to the node/line that is nearest to its chosen edge/corner. The best way to work with Snap to Grid is to place the layers close to where you want them, and then align them perfectly with Snap to Grid. If the grid doesn't work for you, you can always correct positions afterwards using Guides; see Guides. Other Align Visible Layers ParametersThe Ignore the bottom layer even if visible checkbox is checked by default. This is wise in most cases. When you have created layers with a fixed background, you normally don't want the background to start moving. The Use the (invisible) bottom layer as the base checkbox is not checked by default. If you check it, then the background or bottom layer is treated like any other layer and is aligned as you align the other layers. Use this option if you want to make a GIF animation with transparent background. The Grid size slider and/or box allow you to set the size of the invisible grid. The grid squares can measure up to 200 pixels. Adjust LayersWhen you add a small layer to an image, you may want to adjust that layer in relation to another layer or the image border. Adjust layers will help you do this in several ways. You must first choose the layer(s) or image border to which you want the adjustment to be relative. Then, you need to specify the layers you want to adjust. The adjustments are controlled by four checkboxes. As you see in Table 20.1, there are sixteen different combinations of the four checkboxes. You can also select a layer in the pull-down menu. You should keep the Layers & Channels dialog up, so you can set the layers that should be linked, visible or active. All these functions make it easy to adjust several layers against the image border or another layer. You can, for example, use a combination in which you adjust all linked layers against all visible layers. Move Layer |
|

|
Move Layer can be used to move one or several layers in a more precise way than can be done by hand with the Move tool. Select a layer to move from the pull-down menu. The sliders set the distance and direction of the movement. If you want to move more than one layer you have to check Affect visible layers, Affect linked layers or both. If you don't check any of these buttons, only the layer selected in the pull-down menu will be affected. You must also choose how to move the layers: Relative or Absolute. Relative will move the layers with the selected layer's current position as reference. Absolute will move the layers with the image border as reference. Import Layers |

|
Import Layers can import one or more layers from another image. The source image can be bigger or smaller than the target image. There is a menu where you select an image to import layers from, and several options for selecting what layers you want to import. You can make importing easier by bringing up the Layers & Channels dialog. As you can see in the interface, you can import the layers in the way they appear in the source image, or in reverse order. You can also choose what layers you want to import: linked (ones with the little cross), visible, selected or all layers. To import a layer, press OK or Apply. Pressing Apply will keep the dialog open after importing, so you can continue importing layers from other images. |
Transforms
|
|

|
The Layers Transforms option is very similar to the graphic "drag and see what it looks like" Transforms tool, except that it doesn't show you a preview. You can specify each value in a coordinate system for very exact transforming, but you must know in advance what is going to happen when you specify those values. PerspectiveThe Perspective option allows you to change the position of each corner in the original layer by dragging the sliders or typing a coordinate value in the value field. As is the case with the Rotate 3-DContrary to the Perspective commands, Rotate 3-D is a true perspective filter. It is based on simple plane geometry, so it's not difficult to understand. Imagine your image as a plane rotating on a ball joint, so that it can be turned in any direction. The x-parameter flips it around the horizontal axis and the y-parameter does the same around the vertical axis. The z-parameter makes the image rotate like a wheel. The Depth option allows you to add more depth to the perspective, as if you were smaller or the object was larger. An object that is enormous compared to the beholder (like a football field) will appear to vanish in the horizon, whereas a small piece of paper in the beholder's hand will not show much perspective effect at all, even though you see them from the same angle. Rotate Any AngleRotate any angle is the perfect complement to the Rotate tool in the toolbox. This tool allows you to specify the exact rotation angle (instead of relying on manual rotation or on 15 degrees of rotation at a time). Note, to make one degree increments, don't drag at the slider; click on the left or right side of the slidebar push button. |
 |
ScaleScale makes your layer larger or smaller in both the X and Y directions. This function also moves your layer as it scales it, so watch out for its new position! ShearShear is a great complement to the Shear tool, because it allows you to specify a precise shear angle, in the same way as the Rotate any Angle command does. |
Floating Selections
|
|
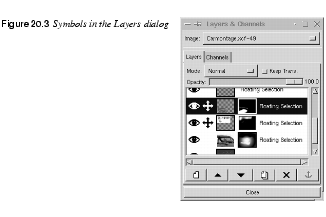
What Is A Floating Selection?When you first place a text string, move a selection or choose This means that the selection contains information that isn't attached to any layer. It floats independently. Changes to a floating selection won't affect the rest of the image (note on the Layers tab on the Layers & Channels dialog how all of the layers are grayed out). What Can You Do With A Floating Selection?You are restricted by the "marching ants" selection border, but you can affect your float in the following ways: You can change the color by using the You can't use any of the Select commands on a floating selection. You can, however, make a selection inside the floating selection, and use Select commands on that selection. Read more about moving and selecting within a floating selection in Selections Within Floating Selections. Anchoring A Floating SelectionIn the Layers & Channels dialog, you can choose Anchor layer (the button or from the right-click pull-down menu) and the float will merge with the layer that was active before you placed the float. The simplest way to anchor a floating selection is to click your mouse anywhere in the image (outside the floating selection if the Move tool is active). You can save a float as a new layer by right-clicking on the Floating Selection bar in the Layers & Channels dialog and clicking on New Layer, or simply by clicking the New Layer button. The new layer's size will be the same as the float. In Photoshop, all layers are the same size as the image, but Gimp saves disk space by adapting the layer size to the size of the floating selection. The dotted yellow layer border, which you'll see around your floated layer, constitutes the boundaries of the drawable surface in a layer. You can't paint or make a selection outside of this border in that layer, and if you use the Move tool on that layer, you'll move the entire layer around. Moving Objects In A Floating Selection LayerTo move an image object in a layer made from a floating selection (like a character in a text string), you must first select it (the Lasso or the Wand tools are good choices). When you try to move the selection, it will turn into a new floating selection. When you have moved the selection and released the mouse button, you need to immediately activate the Move tool, or you'll just get irritating subselections (as discussed in Moving Selections). To avoid this, don't move the selection with the first automatic move cursor that appears as soon as you've made a selection and you move your mouse cursor over the selection. Instead, use When you're happy with the position of the float, anchor it to the layer with the Anchor button or with Working With Floating SelectionsIf you want to apply any of the selection options in the Select menu to create special effects to a floating selection; a text string, for example, you should remember the following guidelines. Put The Float In A Layer Of Its OwnThere are two ways of doing this. Click on the New Layer icon in the bottom of the Layers & Channels dialog or select New Layer from the right-click menu and you'll place the floating selection in a new transparent layer called Floated Layer. If you double-click on the Floating Selection bar in the Layers & Channels dialog, you'll place the floating selection in a new transparent layer called Floating Selection or Text layer if you're placing a text string. As in any other layer, you can't use Select menu options until you select something. Select Menu Options In A Floated LayerTo apply effects like If you have used Select menu options that will create a larger selection size than the original object selection, you'll have to uncheck the Keep Trans. button in order to apply paint to all parts of the new selection. This is because Keep Trans. preserves all transparent pixels. The Keep Trans. option allows you to paint an image object without selecting it. If you use the Bucket fill tool instead of a brush, you should remember to Select All to paint all letters at the same time. The Size Of Floating Selection LayersSince the Floating Selection layer is reduced in size, filter effects and large selections may be cut off by the layer border. Also, if you make too many changes in the original layer, the pure form of the shape (especially for letters) will soon disappear. This is why it's usually a good idea to use a different layer for each effect. Change to a lower layer to create special effects (the selection goes through all layers, and you can choose any layer you want to work in). In a full-sized transparent layer, you need not worry about such restrictions. | |
![]()
![]()
| Frozenriver Digital Design http://www.frozenriver.nu Voice: +46 (0)31 474356 Fax: +46 (0)31 493833 support@frozenriver.com |
Publisher Coriolis http://www.coriolis.com |