![]()
![]()
The Channel Ops Menu
|
|
|
The Duplicate
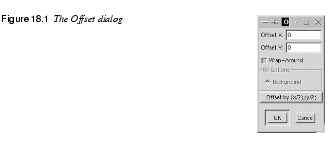
Offset
Offset is useful if you want to move layers a very exact amount, or if you'd like to move them without extending the layer border. The other important application of this command is to create seamless tiles for patterns. |
|
|
|
|
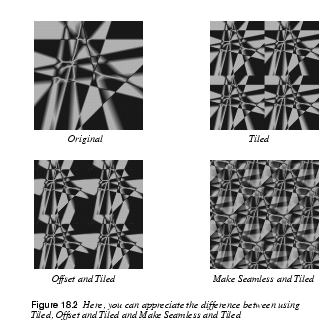
If the Wrap-Around button is checked, after you offset the layer or selection, the parts of the image that moved outside the layer border will turn up on the other side of the image. If you don't want this, you can choose to fill the empty area with the background color or with transparency. Using Offset To Adjust Pattern TilesOffset allows you to make seamless tiles. If you want to make a wallpaper pattern of your image, it's a good idea to check how well the edges fit, before you tile it. If you click on the Offset by (x/2),(y/2) button with the Wrap-Around checkbox checked, you'll split your image into four equal tiles. To create a seamless tile, you need to erase the sharp borders between the tiles. There are many ways of doing this, depending on how complicated the image is. You can use the Clone tool and the Transform tool; you can Paint, Copy and Paste suitable selections with different opacities; or you can use special filters. When you're satisfied with the results, click on the Offset by (x/2),(y/2) button again, and your image will return to normal, but now with seamless edges that will produce a perfect result when tiling the image. The You can also try the | |
| |
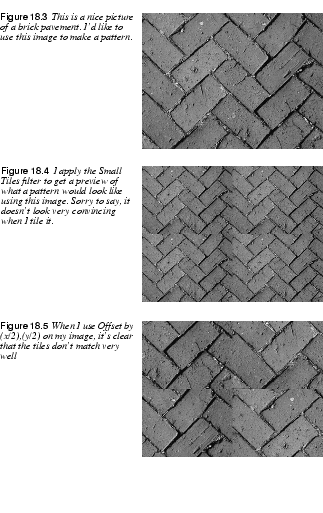
Correcting TilesFollow this example to get an idea of how the Offset tool can be used to create seamless pattern tiles. | |

| |
| |
|
|
|

|
|
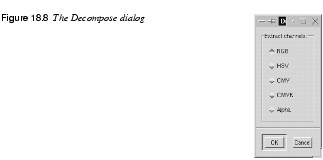
Compose And Decompose
|
|
|
|
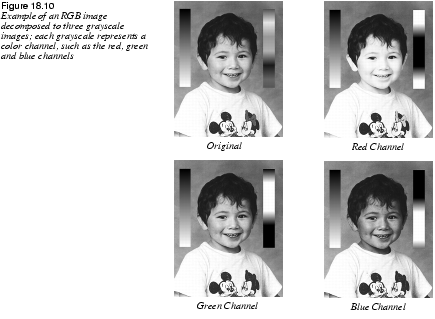
RGB DecomposingDecomposing to RGB is the same as activating a color channel in the Layers & Channels dialog, but now you'll get the color channels in the form of three different grayscale images. You can do a lot of things with decomposed images. The first thing that comes to mind is to edit them in different ways, and then use Compose to put them together again. This option lets you manipulate color channels in ways that the Channels tab folder does not allow. If you decompose your image, there is, for example, no problem in performing operations like cutting/copying/pasting, or moving selections in a single RGB channel. |
|

|
|

|
You can use an extracted decomposed grayscale as a selection or mask by saving it in a channel ( |
|
|
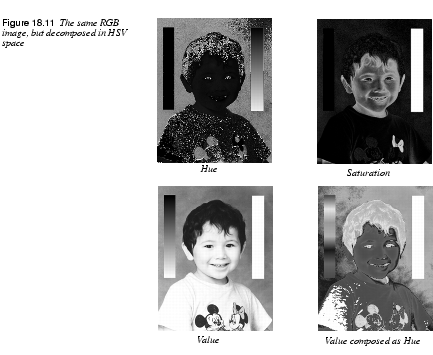
HSV DecomposingThe HSV decompose option creates three different grayscales: one for Hue, one for Saturation and one for Value. It may seem strange that a grayscale image can describe color, as in Hue, but consider the HSV color circle. Imagine a circular gradient where white and black meet in the starting and ending points on the circle. Pure black and white represent red, which is on top of the HSV color circle. Dark gray equals orange or yellow, and medium gray tones represent green or cyan. Accordingly, light grays represent blue and magenta. The Saturation and Value grayscales are easier to understand. White represents pure, strong color (Saturation) and maximum brightness (Value). Black means completely desaturated gray (Saturation) and black (Value). Therefore, if you want something to be white in an HSV-based image, Saturation in that area must be set to black, and Value to white. The big difference between RGB Compose and HSV Compose is that grayscale information means very different things for Hue, Saturation and Value, whereas gray in RGB channels just represents the concentration of a certain color. This also explains why it is possible to manage with just one grayscale, when you are composing to HSV. If you were to use the same grayscale for composing RGB, the result would be exactly the same as the original grayscale. If you did the same for CMYK, you'd just end up with an overbright negative of the image. To show the great difference between the HSV-extracted grayscales, we have decomposed an image to HSV and composed it again using Value in the place of Hue, and vice versa. See Figure 18.11, below. |
|
|
|
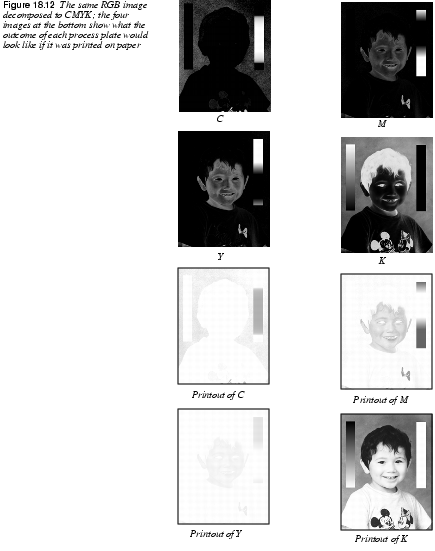
CMYK And CMY DecomposingThe CMY or CMYK Decompose options are interesting if you are planning to print your work. The difference between CMY and CMYK decomposing is that CMY doesn't decompose to black, and therefore creates darker (more saturated) grayscale separations. Using CMYK Decompose is actually the same as making your own color separation for four-color printing plates (see Figure 18.12). In principle, you can use CMYK Decompose, print the outcome on a laser printer, and give it to a professional print shop, but the professional printer will most likely do a much better separating job than you can. However, you can certainly achieve very interesting results with CMY/CMYK decomposed images, even if you don't use them for printing purposes. Alpha DecomposingAlpha Decompose is a fast and easy way of converting a semi-transparent layer to an equivalent grayscale. You can accomplish the same effect by using a Layer Mask, but Compose/Decompose lets you decompose a layer to alpha as well as to RGB, and then compose a new RGBA image from the edited grayscales. This allows you to edit all channel information, not just transparency. It's a very convenient way to edit layers with transparency information, and a worthwhile alternative to editing using commands from the Layers & Channels menu. |
|
|
|
Alpha
|
|
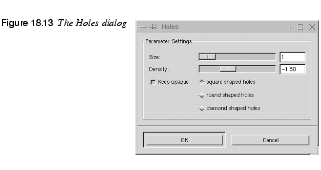
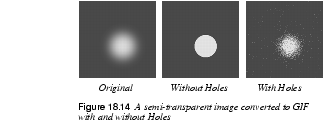
Add Alpha ChannelIf you wish to add alpha information (be able to work with transparency) to the background layer, you can use this option. Add Alpha Channel is also available in the HolesThis command requires a layered image. As you may have noticed, indexed images like GIF don't support semi-transparency. Holes creates a rather convincing illusion of semi-transparent pixels (at least if you compare it to a dithered Netscape image in 8 bit mode). |
|
|
|
|
You can, of course, use Dissolve to achieve a similar effect, but this is slicker. In order to make this look good, you must use a small Hole Size (like 1) and a medium to low Density (like -1.50). Make sure the Keep Opaque checkbox is checked. If you don't use Keep Opaque, you'll risk getting spillout or "dot pollution" on the transparent areas of the image. This is undesirable behavior if you're trying to create a semi-transparent look in a GIF, but if you're not, this option can result in quite nifty effects. Depending on what effect you want, you can change the shape and size of the holes. You can choose from square, round and diamond, though round- and |
|
|
|
Threshold Alpha |
|

|
The Threshold Alpha lets you remove pixels by their alpha value or transparency. The resulting image is always totally transparent or solid and never semi-transparent, so it's a great tool for controlling the appearance of an image that you want to save as a transparent GIF. The slider value determines which values you want to remove. If you set a high value, only pixels with even higher alpha values (less transparent pixels) will remain after the filter is applied. |
![]()
![]()
| Frozenriver Digital Design http://www.frozenriver.nu Voice: +46 (0)31 474356 Fax: +46 (0)31 493833 support@frozenriver.com |
Publisher Coriolis http://www.coriolis.com |