prevnext


Enhance Filters

Do you want to sell your old car? Here are the tools you'll need to enhance the advertisement image.

Adaptive Contrast

Adaptive Contrast is a very powerful contrast-enhancing filter. The effect is very strong, sometimes with an almost three-dimensional quality, so it's not suitable for all images.

Contrary to the other enhancing filters in this menu, Adaptive Contrast creates little change in the Hue and Saturation values, so if you use it in an image with faded colors, this filter will not retrieve lost color. It is, however, very effective in finding and accentuating hidden or faded Brightness values in an image.

Deinterlace

Deinterlace will help you adjust images captured by video cards. Sometimes, the even fields or odd fields don't get captured correctly. This filter can be used to correct that.

Despeckle

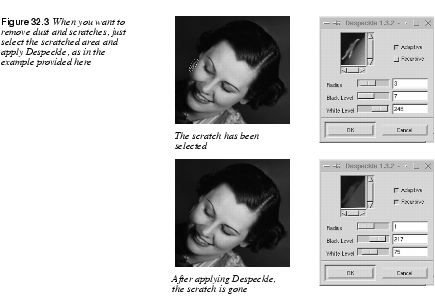
Despeckle is the filter to use if your image is noisy, if you scanned an image and there was some dust or fibers in the scanner, if you got a moiré pattern when you scanned a printed image from a magazine, or if your image has physical damage, like scratches.

· If your image is just noisy, or suffers from moiré effects, use Despeckle over the whole image.

· If dust or scratches are your problem, select the damaged area with the free selection tool and use Despeckle on that selection.
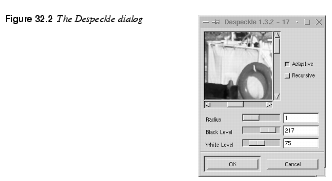
Parameters

You have the following choices: Radius (if both Adaptive and Recursive are unchecked); Radius and Recursive; Adaptive; and Adaptive and Recursive.

Radius refers to the window size, which can be from 1 (3x3 pixels) to 20 (41x41). The image will be chopped up in several windows, with a specified size: for example, 3x3 pixels. In each of these windows, the filter will try to smooth the color range, and thereby remove unwanted defects like scratches or noisy pixels.

Adaptive will adapt the radius window size depending on the image (selection) content. It does it by using the histogram of the image. Adaptive despeckling gives a smoother result than only Radius, thereby producing a better output.

Recursive will repeat the Radius function, so that the smoothing effect gets stronger. It is, however, much slower than Radius.

You can also adjust the Black Level or White Level sliders to hide scratches. If the damage you want to repair is bright and the background is dark, raise the Black Level. If the scratch is dark against a white background, raise the White Level.

How To Use Despeckle

If you use only Radius, a general algorithm is used to smooth the color range. If you set the radius high, the blur level will also be high.

If you use Radius and Recursive, you can use a smaller Radius to get the same effect as with a large Radius and no Recursive. Be careful, because Recursive can easily result in unwanted blurring.

If you use Adaptive, the filter will try to calculate the best window size, and will use a general algorithm to smooth the color range in each window.

If you use Adaptive and Recursive, an adaptive recursive algorithm will be used. This is very effective and you can use quite small radius values. It will, however, be even slower than Recursive.

General Advice

To remove a scratch or other defect, select the damaged area and use Recursive and Radius.

If you want to remove some noise, use Adaptive or perhaps a combination of Adaptive and Recursive. If you use Recursive and/or Radius on the whole image, it will often get too blurred (this is not a problem when you're only using it on a tiny selection).

Destripe

Destripe corrects images captured from video films, or poorly scanned images with stripes on them. This filter will add a striped interference pattern to the image.

You change the phase by dragging the Width slider, and if you can find the right setting, the two wave patterns will extinguish each other. Because the stripe pattern will be different for each image, you'll have to experiment to find the setting that will get rid of the stripes in your original. The Histogram checkbox will give you a better view of the current phase displacement.

NL Filter

NL Filter is an efficient image enhancing filter (the "NL" stands for non-linear).

NL Filter uses a 7-hexagon pixel block that you can adjust with the radius slider (instead of using a fixed 3x3 pixel block for its filter algorithms).

Parameters

NL Filter provides three different filters: Alpha Trimmed Mean, Optimal Estimation and Edge Enhancement.

The Radius slider controls the strength of the filter. Alpha determines whether the filter will just smooth out, or reduce, noise. Recommended values for both Radius and Alpha are between 0.0 and 0.5. If you use values over 0.5, funny things will happen (but they can be quite artistic).

· Use Alpha Trimmed Mean and set the Alpha to 0.5 when removing single noise spots in the image.

· Optimal Estimation is very good for reducing dithering noise. Low Alpha values make the smoothing subtle and high values (around 1.0) smooth all parts of the image. Radius should be from 0.8 to 1.0 for this filter to work correctly.

· Edge Enhancement is the opposite of Optimal Estimation. Edge Enhancement sharpens edges instead of blurring them. Radius controls the effectiveness of the filter. Useful Radius values range between 0.5 and 0.9.

Sharpen

Sharpen will sharpen unfocused images.

The interface is simple: The Sharpness slider controls the amount of sharpness, and you judge for yourself using the preview.

Sharpen is one of the more useful tools in Gimp for enhancing photographs. However, when you use Sharpen, you risk accentuating not only edges, but also noise or blemishes. If your image is very damaged or noisy, we recommend that you try the NL Filter's Edge Enhancement option, or the Unsharp Mask filter instead.

Unsharp Mask

The Unsharp Mask filter will enhance your image by making it sharper without accentuating the small imperfections in the image. It's hard to tell by the name, but Unsharp Mask is based on a darkroom technique that was used before computer graphics arrived on the scene. Anyway, it's a very efficient filter for sharpening enhancements.

Why Should I Use Unsharp Mask Instead Of Sharpen?

Usually, it's much better to use Unsharp Mask than Sharpen. The reason for this is that Unsharp Mask will sharpen the edges in the image, and the human eye is very sensitive to unsharp edges. Actually, sharpening the edges in an image will make the whole image look sharp, because you will not easily detect the other parts that are less sharp. Also, because Unsharp Mask won't sharpen the entire image as much as the Sharpen filter does, the resulting image will look much more natural than the somewhat artificial look that Sharpen will produce.

Unsharp Mask can also be used to prepare images for Web and professional printing, because it allows you to control the thickness of the edges in an image.

Sharpening Without Distorting The Colors

When you enhance images, you often don't want the colors to be affected. Sharpening the colors in an image will usually just distort them and make them look unnatural, and that is no enhancement.

Tip: A useful piece of advice when you wish to sharpen up an unfocused image is to decompose the image to HSV, and only apply the enhancement filter to the Value part of the image. Afterward, you compose the image to RGB and you'll have a sharpened image where the colors have not been affected by the Sharpening process.

Parameter Settings

Instead of discussing exactly how this filter works in a mathematical way, we will try to tell you how to use it.

At the time of this writing (September 1999) there are only two parameters in this filter. Blur Radius and Combine amount. We will refer to these parameters as Radius and Amount.

· Radius refers to the thickness of the edges in the image. Higher values will produce thicker edges and more contrast in the image. Lower values will produce fine/crisp edges. You can set the radius to 0.1 and higher.

· Amount controls how much the image will be sharpened. This value is normally specified in percent, but we guess that you understand that 0.5 is the same as 50%. You can set the amount of sharpening to 1% (0.01) and higher.

Recommended Values

Amount

If we only had Amount to play with, there would be no problem figuring out how to use Unsharp Mask. Generally, we recommend starting out with low values, and repeating the filter several times instead of applying it once using a high value. Because Gimp has an excellent undo/redo function, you can easily find out what values you should use to get the best result by redoing/undoing your changes.

As a general guideline, values between 0.25 (25%) and 0.5 (50%) are appropriate for creating a gentle sharpening effect. Values between 0.5 (50%) and 2.50 (250%) will produce a stronger sharpening. If you want to create artificial-looking images, high values over 4.5 (450%) will do. The given values assume that you have a Radius of 1.0.

Radius

Radius determines how thick your edges will be after having applied Unsharp Mask. Low values such as 1.0 will produce very fine edges. Low values on lossy compressed images (JPEG) can sometimes produce unwanted grain and aliasing edges. If you encounter that problem when you use Unsharp Mask, try raising the Radius value to exceed 1.5.

A Radius from 1.0 to 2.0 will create thicker lines that may look unnatural on your computer monitor. They are, however, very useful when you want to print your image. It's not uncommon to use a low Amount with a Radius between 1.5 and 2.0 on all images that will be printed in a book, because imagesetters and printers don't show fine lines as well as a computer monitor.

A rule of thumb is to add 0.2 to the Radius value for each 30 ppi in your image. So, for example, a 300 ppi image will require a Radius of 2.0 and a 210 ppi image will require a Radius of 1.4. The algorithm is as follows:

Radius= (image ppi / 30) x 0.2

The values above are not fixed, and it's up to your common sense to experiment with different values. Naturally, you can use high values to create special effects in your image.


prevnext


Frozenriver Digital Design
http://www.frozenriver.nu
Voice: +46 (0)31 474356
Fax: +46 (0)31 493833
support@frozenriver.com
Publisher Coriolis
http://www.coriolis.com