![]()
![]()
|
|
Would you like to create a fish-eye lens or make your image look like it's behind a wall of glass? Then you'll find some interesting filters here. |
Apply Lens
| |
|
Apply Lens places a virtual lens (bulb) on top of your image. If you keep the original surroundings, it will look as if you had placed a crystal ball over your image. The Lens reflection index controls how fish-eyed or spherical the lens will be. If you set the surroundings to Background color, you will get the background color from the toolbox. With Transparent surroundings you could create images such as nice surrealist buttons for web pages. 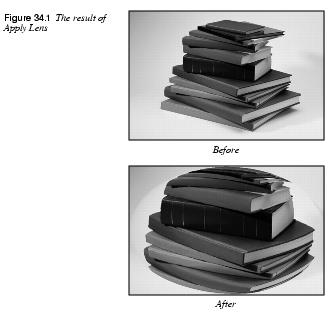
| |
Conical Anamorphose And Central Reflection
| |
 |
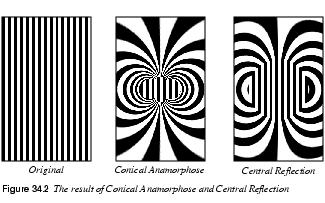
The Conical Anamorphose and Central Reflection plug-ins can best be described by making a parallel to funny mirrors in an amusement park. If we assume that the image you're working on is a picture of you, it's like having a conical/tube mirror, which you are looking into from the bottom. What you see is a highly distorted image. Parameter SettingsNaturally, since you are looking into the mirror-tube, you can't see yourself undistorted, but if you check Keep original surroundings, you will be able to see yourself in the center looking into the mirror. If you'd rather fill this area with a solid color, check the Set surroundings to background color button. Take a look at Figure 34.2 to get an idea of how the filters work. Other SettingsThe most important parameter settings are Radius and Base angle, which control the shape of the cone/tube (there is no base angle in Central Reflection because it is a tube). Radius controls the size of the base or circular bottom of the reflecting cone/tube. Base angle of cone refers to the steepness of the reflecting cone. The Base Angle must be set to a value between 0 and 90 degrees. The image is flipped vertically by default to make the image easier to understand. If you uncheck Flip image vertically, you will see what you would see if you were really looking into such a mirror, but this is probably not what you want -- it looks very weird. We recommend using Antialias to prevent the image from getting jaggy. Check this button, and you will get a much smoother image. |
Ellipse
| |
 |
Ellipse is similar to Apply Lens. The effect simulates refracting through an elliptical lens. You can set the quality of the rendering both horizontally (X-Quality) and vertically (Y-Quality). Setting high render quality will produce smooth edges, but it will also be slower. If the image is rectangular and the width is greater than the height, it will render well and relatively fast with a high Y-quality and a low X-quality. If you check the Make Circle checkbox, the output image will always be square, and the distorted object will be circular. Also, the specified X and Y quality values will be averaged and both values will be set to the calculated mean. 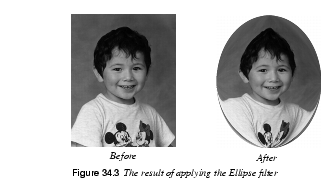
|
Glass Tile
| |
|
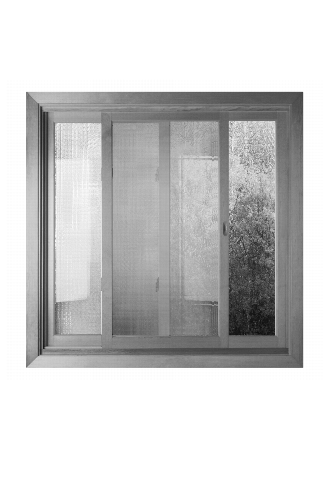
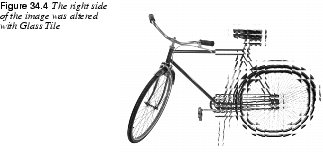
Glass Tile can make it look like your image is behind a glass wall. You can set the Height and Width of the tiles to a value between 10 and 50 pixels. A perhaps more accurate explanation of what the filter does is that it splits your image in X*X pixel tiles, where each tile repeats a small part of the previous tile. This behavior will make it look like the object is behind a glass wall or shower curtain.
| |
RaX Structurizer
| |
 |
The RaX filter will create a funny mirror effect. It can also be compared to looking at a water reflection where the waves have no structure. You can control the behavior of this hallucinating effect filter by dragging the sliders. 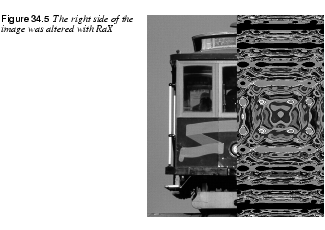
|
Refract
| |
 |
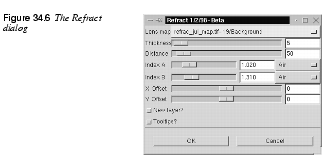
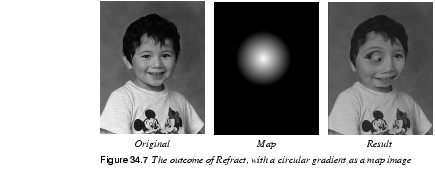
The Refract filter will distort the image with an imaginary lens. The lens shape is determined by a second image (a map image). The side of the lens that faces the image is flat, and the side facing you is curved. The lens shape is determined by the map image. The map image should be a grayscale image. It will work with an RGB image but that will complicate things, so use a real grayscale image. There are a few parameters that you have to set to make your lens reflect the way you want. ParametersDepth (thickness): This slide controls the thickness of the lens. You can think of it as the thickness of a glass cylinder that we put the curved lens over. The actual lens is built up of a flat, solid cylinder that is X in thickness, and on top of that is a user-defined curved lens. Distance: The distance between the bottom part of the lens and the image (you're holding the lens in the air and this is the distance from the image). Index A and B: B refers to the medium the lens is made of (e.g., glass), and A is for the medium you are looking through (e.g., air). So, in order to make a lens of ice, set B to 1.309 and if you are looking though air, set A to 1.0003. If you don't want to set these figures manually, you can also pick it from the menu. Offset: This is used to place the lens, but we think it's a lot simpler to make the map image the same size as the distort image, and make sure you place the map in the right place from the beginning. Lens Map: You choose what map you should use as a lens in the drop-down menu. The map should be a grayscale image. White represents maximal lens thickness, and black represents minimum or no thickness at all. In order to make it appear like you're looking through a magnifying glass, create a black map image, and apply a radial black-and-white gradient to it. Figure 34.7 shows the map and the outcome after applying the filter.
|
| Frozenriver Digital Design http://www.frozenriver.nu Voice: +46 (0)31 474356 Fax: +46 (0)31 493833 support@frozenriver.com |
Publisher Coriolis http://www.coriolis.com |