![]()
![]()
|
Author Dov Grobgeld |
Background
|
|||||||||||||
|
One of the wonderful features of Gimp is that all its functionality may be accessed through scripting. So far, most of the script programming for Gimp has been done through Scheme through Script-Fu. Unfortunately, the Scheme environment Gimp provides is very primitive, e.g., it doesn't provide any reasonable error handling. Furthermore, most users are not familiar with Scheme as a language. Some users may, therefore, prefer to write scripts for Gimp in Perl. Perl, as a language, is probably more familiar to the web-literate users, because it is the preferred language for writing CGI scripts. Now, Gimp scripts may also be written with Perl. This tutorial will describe how to write such plug-ins and scripts for Gimp. As there are several excellent tutorial texts describing the Perl language, this tutorial assumes that the reader has a working knowledge of Perl and will concentrate on using Gimp with the Perl modules Gimp and Gimp::Fu written by Marc Lehmann, | |||||||||||||
What You Need
|
|||||||||||||
|
The Perl::Gimp tutorial scripts have been tested with the following versions: · Gimp version 1.04 or later, with all its prerequisites · Perl version 5.005 or later · The perl module Gtk, version 0.5121 or later · The Gimp module, version 1.083 or later Perl and all its associated modules are available in source form from the Perl Comprehensive Archive network, CPAN. It is also possible to download them in RPM format from the | |||||||||||||
The Gimp Module
|
|||||||||||||
|
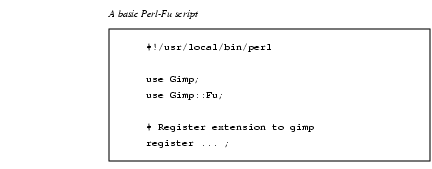
Most scripts make use of the simplified interface Gimp::Fu provides with the Gimp module. Gimp::Fu provides a framework for entering parameters to the script in a frame-like interface, just like Script-Fu, but also allows the script to be run in batch mode from the command line. This tutorial details the construction of a Gimp::Fu script, but first, we want to show you the general framework of a Perl-Fu script |
|||||||||||||
|
|||||||||||||
|
The interesting items to note in the script are the use of the two modules Gimp and Gimp::Fu, the register function and the way control is handed over to the Gimp module on line 9. | |||||||||||||
The Gimp PDB
|
|||||||||||||
|
All functions known to Gimp are available through the procedural database (PDB). All the PDB functions may be called from Perl. These PDB functions are either internal to Gimp, or have been made available through a plug-in or a script extension. As far as the caller is concerned, there is no difference. When a Perl function is registered through the register function, it will appear in the PDB as well. Gimp provides a PDB browser available in The entries in the PDB browser are given in Scheme style with dash characters. The perl programmer must use underline characters instead. A call to create a new image of size 100x150 of type RGB looks like the following: $img = gimp_image_new(100, 150, RGB) The PDB entry earlier shows that An exception to this rule are Script-Fu scripts that are registered in the database with a dash instead of an underline character. To call these, the following syntax must be used: gimp_call_procedure("script-fu-basic1-logo", \ |
|||||||||||||

|
Note: When calling a PDB function from Perl::Gimp that has an image and a drawable as the first two arguments, only the drawable should be given as argument in the calling sequence. Gimp::Fu And The Register FunctionGimp-Fu is Perl's answer to Script-Fu. It provides a simplified method for accepting parameters for a script through a Gtk interface, just like Script-Fu, but it has some additional bells and whistles. The main function for a Gimp-Fu script is the register function. This function declares the interface of the script to Gimp. The register function takes the following 10 parameters that must all be provided: 1. The name of the function -- A string. This is the name of the function as it will be known in the PDB. 2. A brief description -- A string. 3. A help text -- A string. 4. The authors name -- A string. 5. The copyright of the script -- A string. 6. Creation date -- A string. 7. Menu path -- A string. The path has one of the following two forms:
If first form is given, then the script is a standalone script that appears in the menu hierarchy under 8. The acceptable image types -- A string. This is a list, of acceptable image types. This field is only used for scripts that are in the
1. Parameters -- A reference to an array of parameters. (A reference to an array in Perl is simply an array written within square brackets.) Each parameter in turn is a reference to an array containing the following five values: · The type of parameter. The types recognized by Gimp::Fu and Perl are given in Table 45.3. · The name of the parameter -- a string · A help text for the parameter · Default value for the parameter. This should be given in the form listed in Table Table 45.3. · An array defining allowed range for the value. This is only possible for 10. A reference to an array of return types of the sub in the 11th parameter. 11. The sub to be called -- A reference to a sub. This subroutine will be called when the associated menu entry is declared through the menu path described in Step 9. When the sub is called, it is passed as arguments to the list of parameters declared in field 9, declared in the above table, and in the case of a A reference to a sub in Perl may be declared in two ways: by declaring a subroutine at a different place in the source file (e.g., sub run and reference it by writing
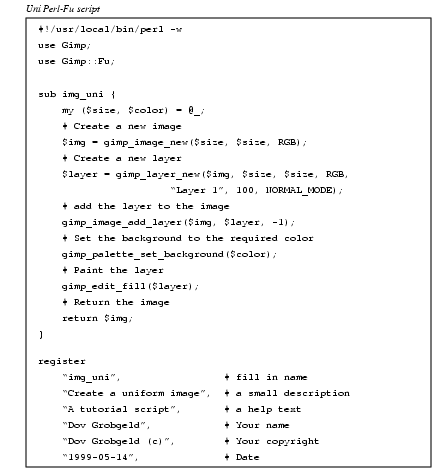
The sub is expected not to need to display a new image after it has created it. Instead, it is expected to return the new image or images that were created in accordance with the return types declared in parameter 10 of the register call described in Step 10. This behavior has been added in order to be able to call the sub noninteractively. A Commented ScriptThe following Gimp::Fu script example shows the steps described in the previous section. It registers a script that takes the size of the image and a color and then produces an image of the requested size with the requested color. Quite useless, but it shows the important steps of how to register a script, how to create a new image, and how to access some PDB functions. |
||||||||||||
|
|||||||||||||
|
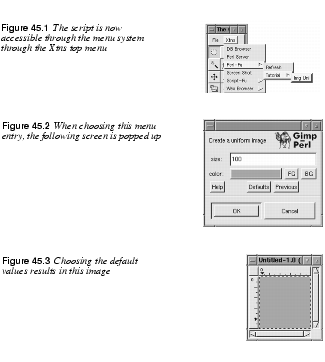
Most of these commands are directly copied from the PDB. This script shows the essential steps of producing a standalone script: · Creating a new image (line 8). · Creating one or more layers (lines 10 through 11). · Attaching the layer to the image (line 13). · Do some painting operations in the layers (lines 15 through 17). · Return the image to the caller (line 19). · Register the extension (lines 22 through 35). To test the script, save it in the directory |
|||||||||||||

|
Note: Due to a bug in Gimp (verified for version 1.0), it is not possible to add scripts when Gimp is running. It is possible, however, to change a script that has already been registered, as long as the parameters don't change. |
||||||||||||
|
|||||||||||||
Object-Oriented Syntax
|
|||||||||||||
|
Gimp::Fu provides an alternative object-oriented syntax for the image and the drawable commands. The following table shows the procedural versus the object-oriented syntax for a few commands:
The substitution rule for converting a PDB turning into a method is as simple as erasing |
|||||||||||||
|
|
Note: The object-oriented syntax is only syntactic sugar that makes the calling syntax cleaner in some cases. The error messages are still given in the procedural format. | ||||||||||||
Painting Areas With Selections
|
|||||||||||||
|
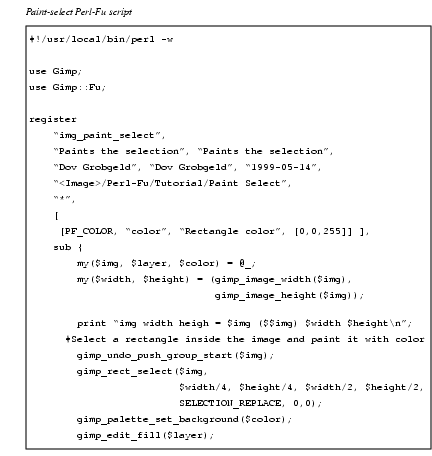
In the uni script the function
In Perl::Fu, the image parameter should not be given because it is automatically calculated from the drawable parameter. If a selection is active when g
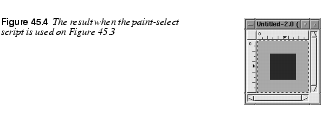
Paint Area Selection ScriptA simple use of this function is to select a rectangle in the middle of an image and paint that rectangle with a user-defined color. This example also introduces a couple of new features: · The script is associated with an image because its menu path starts with · The use of a subroutine without a name as a parameter to register. · The use of the PDB functions · The return type of the register function defines what new images should be displayed by Gimp. In this case, we don't want to display any new images and, therefore, return an empty array. |
|||||||||||||
|
|||||||||||||
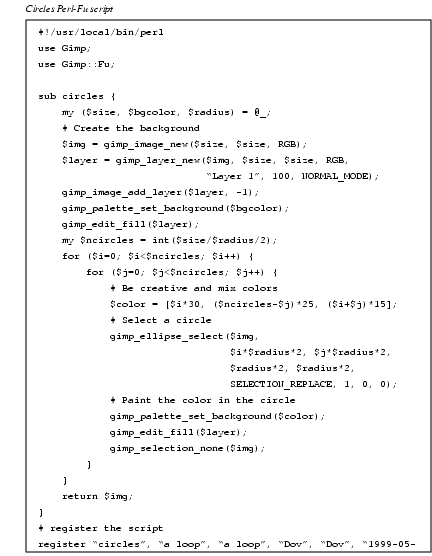
LoopsIn Perl, it is simple to write loops that, together with the various selection tools, gives powerful creative possibilities. Here is an example that mixes colors in circles. There is nothing really new here, but it shows the power of what we described previously. |
|||||||||||||
|
|||||||||||||
Creating Text
|
|||||||||||||
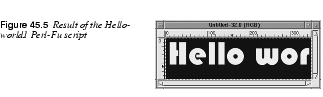
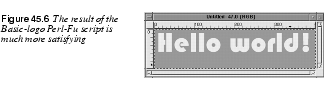
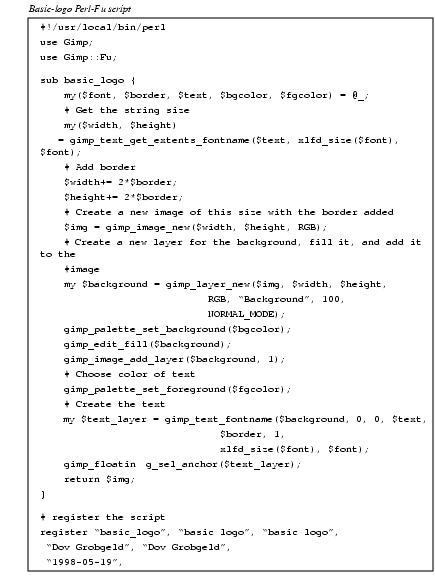
Hello World -- Writing Text In An ImageTo create text, the The Hello-world1 Perl-Fu script shows an example of a script that creates an image containing "Hello world".
The Hello-world1 Perl-Fu script makes use of the function The text created on line 20 is a floating layer that needs to be anchored to its parent layer. This is done on line 23 through the call to In the Hello-world1 Perl-Fu script, the image size is unrelated to the text size (see Figure 45.5). This is taken care of in the Basic-logo Perl-Fu script, which is a more complex example showing the basic steps for a logo-generating script: · Extraction of the string size. · Creation of an image with the size of the string and borders. · Creation of a drawable with the same size. · Creation of text and anchoring it. |
|||||||||||||
|
|||||||||||||
|
|||||||||||||

|
|||||||||||||
|
|||||||||||||
|
|||||||||||||
Floating Selections
|
|||||||||||||
|
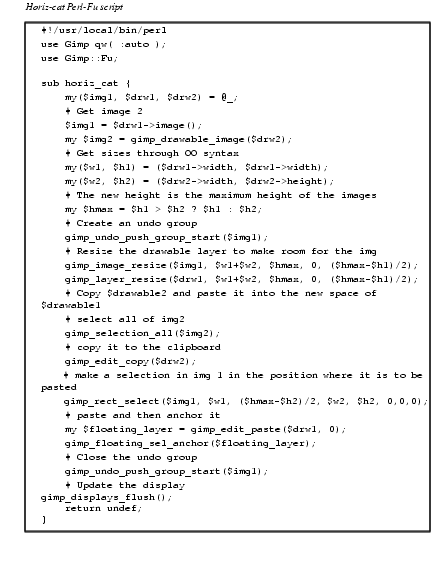
When a region has been selected through one of the selection routines, the area outlined by the selection may be copied to the cut-buffer through the This is illustrated in the Horiz-cat Perl-Fu script, which works on one image and takes another image as a parameter, which it concatenates to the right of the first image. Lines 13 through 28 show how the second image is copied and glued into the first image. |
|||||||||||||
|
|||||||||||||
The Perl Server And Standalone Scripts
|
|||||||||||||
|
So far the scripts have all been started from the menu structure within menu. The scripts can, however, be from the command line as a normal Perl program. When run this way, the script tries to connect to the Perl-Server, and if it fails, it launches Gimp on its own. If you plan to run several scripts this way, it is obviously much faster to run the Perl-Server; launching Gimp takes quite a bit of time. The Perl-Server may be started from the Xtns menu. When a Perl-Fu script is run from the command line, the result is the same as when it is run through the menus, except that it may be run with the The file name for the Here are two invocations of the scripts declared above, but with output written to a JPG file and a PNG file. They can't be saved as GIF because the scripts do not index the images. |
|||||||||||||

|
|||||||||||||
|
This interface also enables running the perl debugger on the Perl-Fu scripts. |
|||||||||||||

|
Note: The image is saved to the directory where Gimp was started from and not to the directory in which the scripts were invoked. A Shell For Gimp-PerlWhen using the Perl-server, it is not necessary to use Gimp::Fu and the register function. Instead, Gimp::Net and a sub named net may be declared. For a simple but powerful example of the use of Gimp without Fu, here is a an interactive Gimp-Perl shell that may be run from the command line: |
||||||||||||

|
|||||||||||||
|
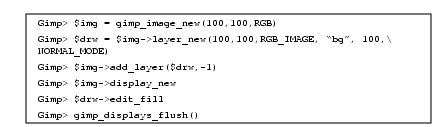
Here is an example of an interactive session with this shell: |
|||||||||||||
|
|||||||||||||
End Notes, Links And References
|
|||||||||||||
NotesThis tutorial has covered only a small part of the possibilities available to a script writer. In particular, the following issues available to Gimp::Perl scripts have not been covered: · The possibility of writing customized Gtk interfaces. · Writing full-fledged plug-ins that manipulate the tile data through the Perl Data Language (PDL) module. · Using Perl::Gimp in a CGI environment. · How to fill with gradients in a plug-in. · How to do "free selections." Links And ReferencesMarc Lehmanns Gimp page, The online version of this tutorial, The Scheme tutorial this tutorial is based on, The Gimp home page, Gimp Registry with Perl plug-ins, |
|||||||||||||
![]()
![]()
| Frozenriver Digital Design http://www.frozenriver.nu Voice: +46 (0)31 474356 Fax: +46 (0)31 493833 support@frozenriver.com |
Publisher Coriolis http://www.coriolis.com |