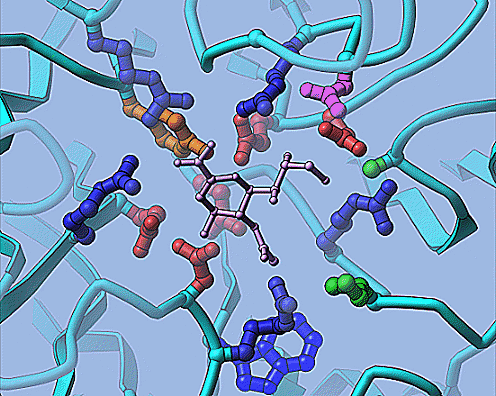

The coordinates of a viral neuraminidase (na) and its inhibitor dana (basically PDB entry 1nnb) was split into separtate files: na.pdb and inhib.pdb. 'na.pdb' is a single protein chain. Remember, you still must split each chain into a file for a ribbon. Here a nice view of the active site, sort of like the figure on the home page, will be made.
The data preparation utility was called:
ribbons-data na
The NameTag is the default 'na'. Click 'Create inhib.model'. The model-data utility is called, bringing up a sub-panel.
The defaults are ok, but I wish to center on the inhibitor, so the PDBfile name field will be changed to 'inhib.pdb'.. Click 'Generate' at the lower left of the form. A message of successful completion should appear. Now click 'Quit and Exit' at the lower right. The sub-panel disappears and a red check should appear saying the model file exists. Now you can add display objects to the model.
Click 'Setup inhib.ribbons' to create ribbon diagrams. The ribns-data utility is called, bringing up a sub-panel. The defaults create a standard protein ribbon drawing. Click 'Execute' at the lower left of the form. This will create the *.ribbons and *.coords database files, and the *.ss file describing the secondary structure. Now click 'Quit and Exit' at the lower right. The sub-panel disappears and a red check saying display files exist.
To make the key residues of the active site, click 'Setup inhib.atoms'.
The default behavior is changes to color by residue, to make the names of
the output files 'na_site.sph' and 'na_site.cyl', and finally the selection
(like in the tutorial chapter) is set:
not ( name N or name C or name O or hydro ) and byres point (27.0 18.5 63.5) cut 8.0
This means not the mainchain atoms and keep whole residues within 8 angstroms
of the inhibitor (see the help on ribbons-data concerning atom selection). Click 'Execute', but don't exit.
Now make the files for the inhibitor. Change the name of the PDB file to 'inhib.pdb' and the names of the output files to 'in_site.sph' and 'in_site.cyl'. Set to output all as the single color 14 (gold). chosen. 'Execute' again, then 'Quit' after successful completion.
The ribbon/active site/inhibitor model is now ready for display.
Click 'Execute Command: ribbons -n na' at the bottom of the form.
The graphics window was made as large as possible. The adjustments were made much as described in Example 3 of the tutorial. Decided this was close enough for now. Alt-i (or file) to set image file for save, hit PrintScreen to save the image, and finally Alt-z (or file) to save all the changes as initialization files for the demo.
Quit and Exit 'ribbons-data'. To view again: ribbons -n na